Loading...

User Guide

Table of Contents

Features

Make your online store run smoothly with Shopify to Salesforce integration using Sync Made Easy app, and boost your business with below features:

  • Import old data easily into your Salesforce to keep all information in one place.
  • Simple and easy-to-use interface.
  • Records create/update instantly in real time.
  • Manage your inventory quickly and efficiently.
  • Easy, no-code setup with flexible field mapping — perfect for non-technical users.

System Requirements

Here are 3 key points to know: 

1. Salesforce account : Visit www.salesforce.com to create an account if you don’t have an account or Log in to your existing account. 

2. Shopify store account : New users should log in to www.shopify.com to locate their business store and proceed as per the instructions in further manual sections if you don’t have an account .

3. Enable Order Object : Users must enable the Order Object on their Salesforce org to continue with the installation of the package.

Installation

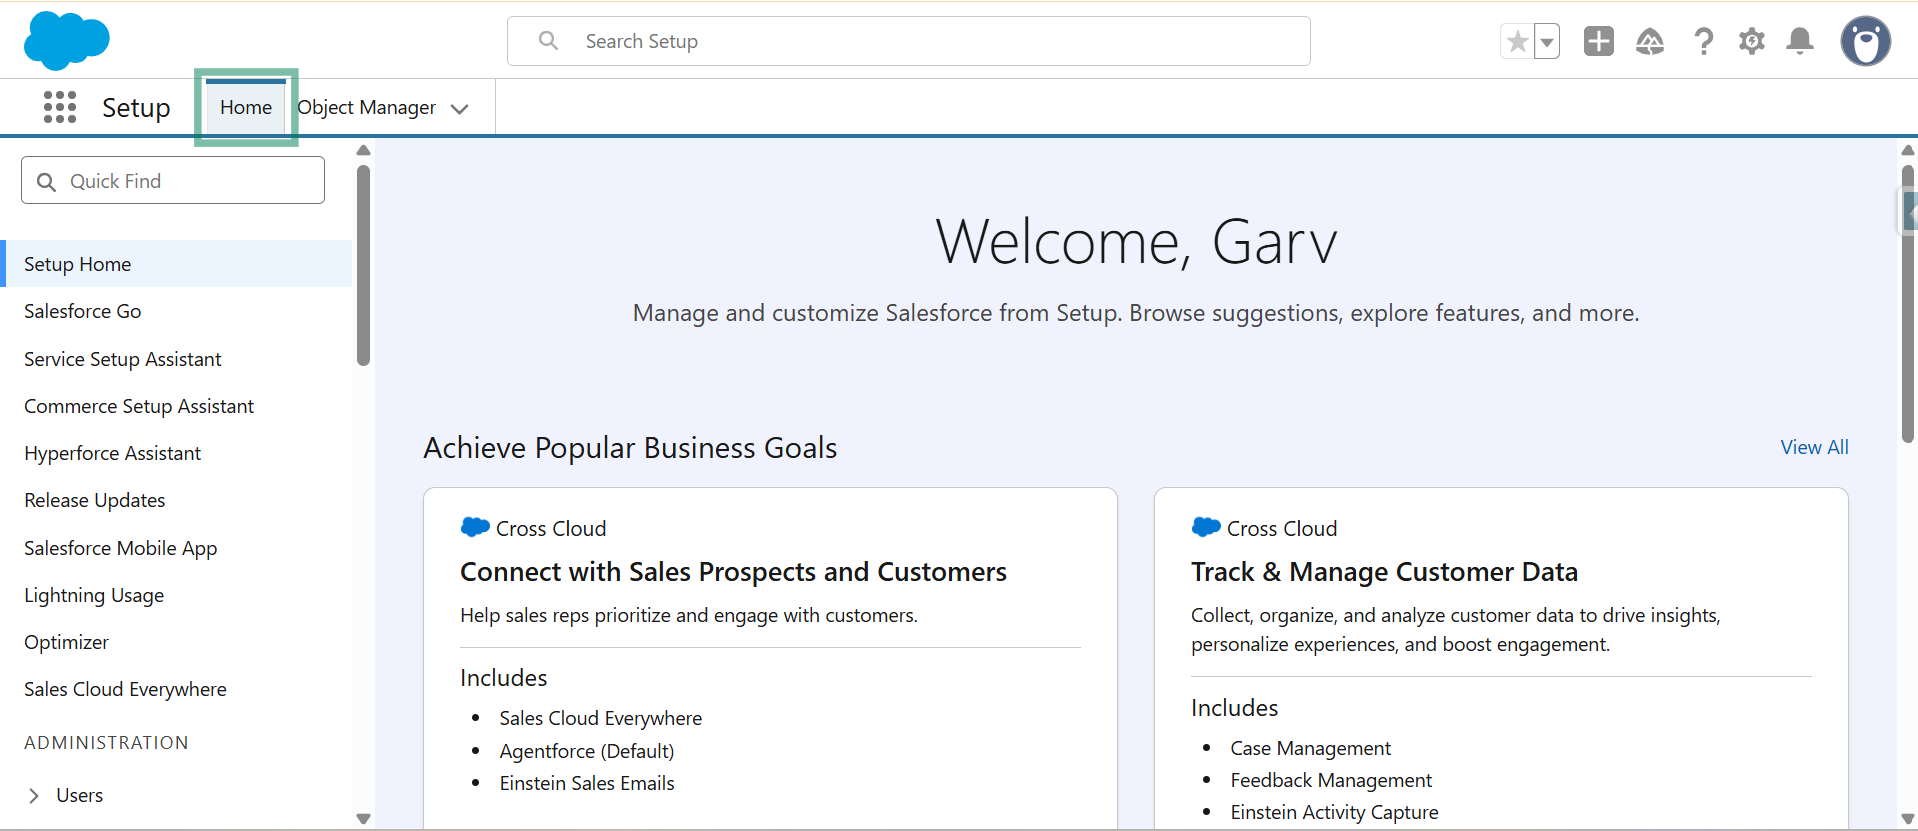
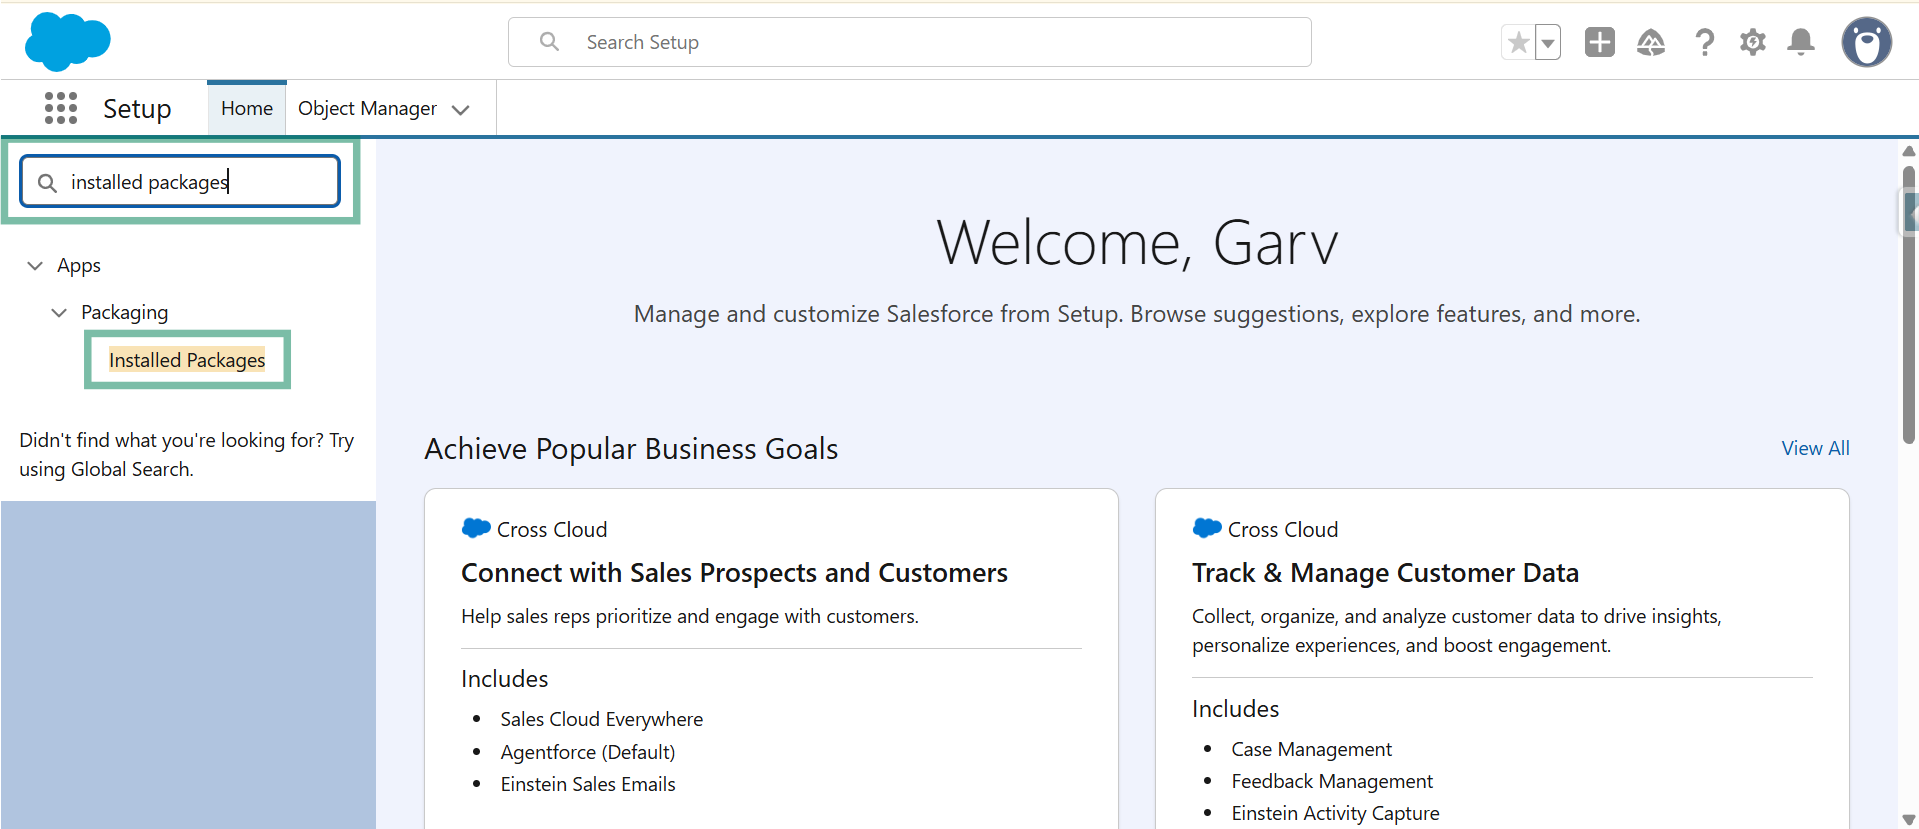
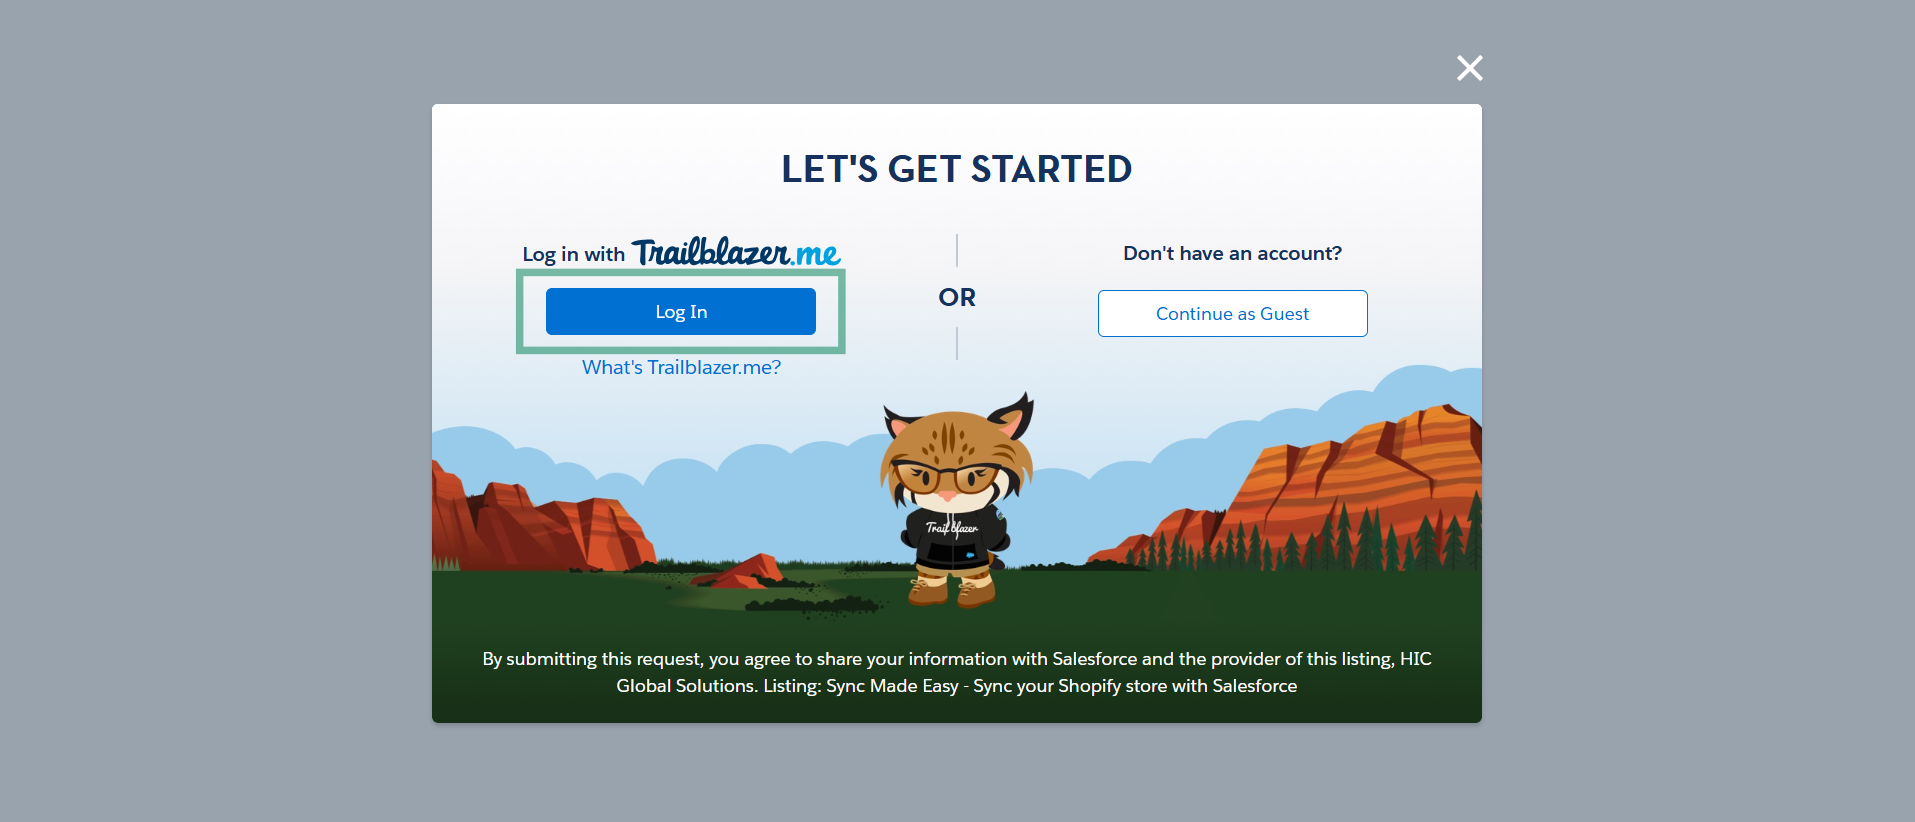
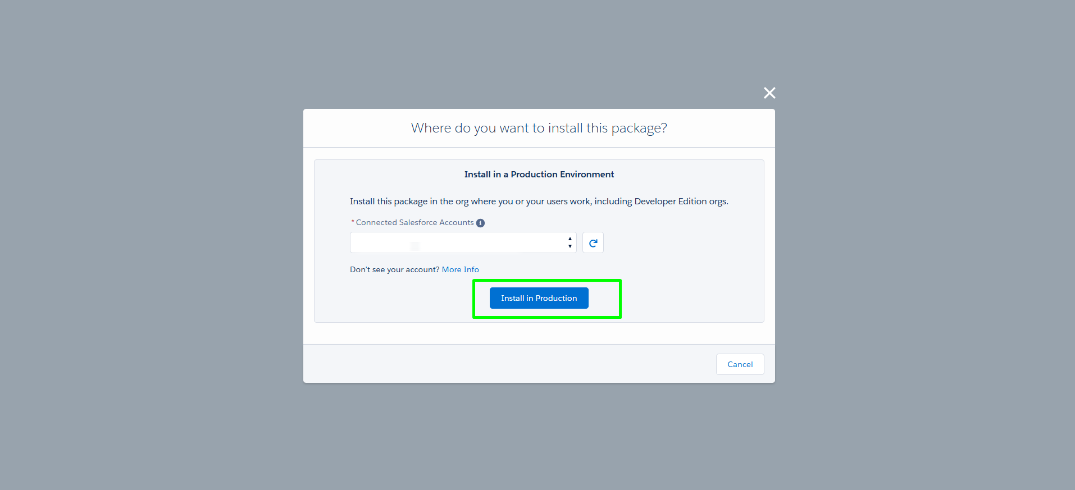
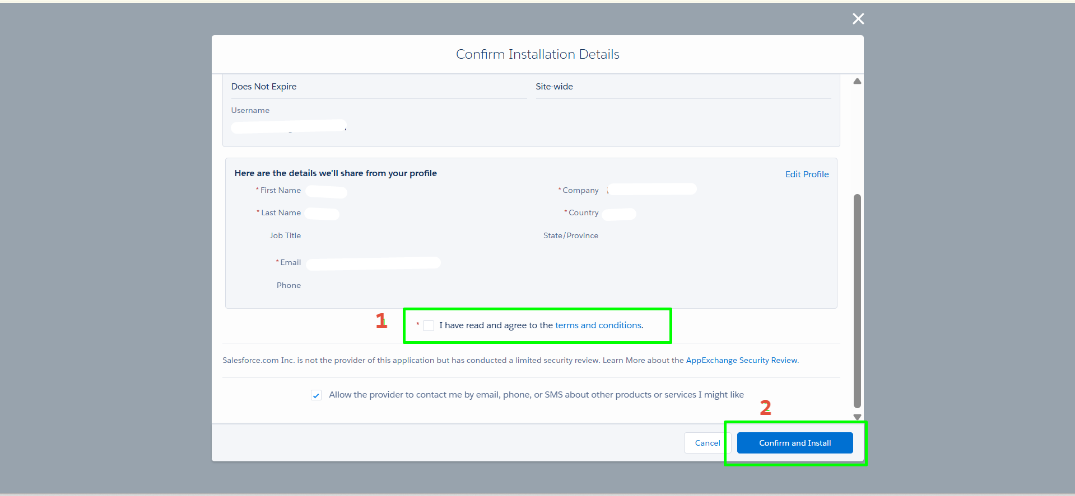
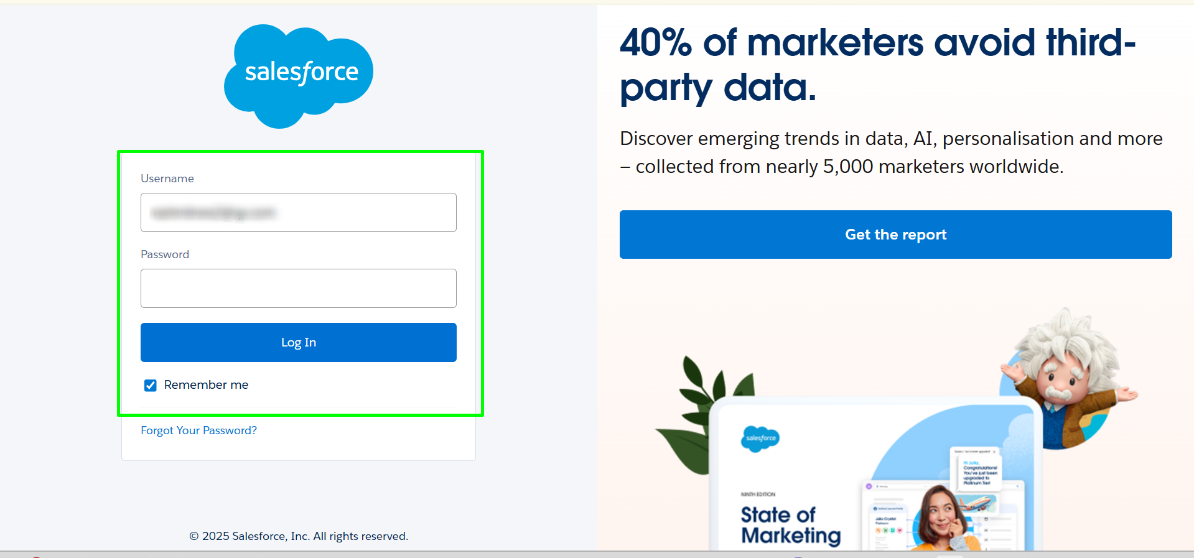
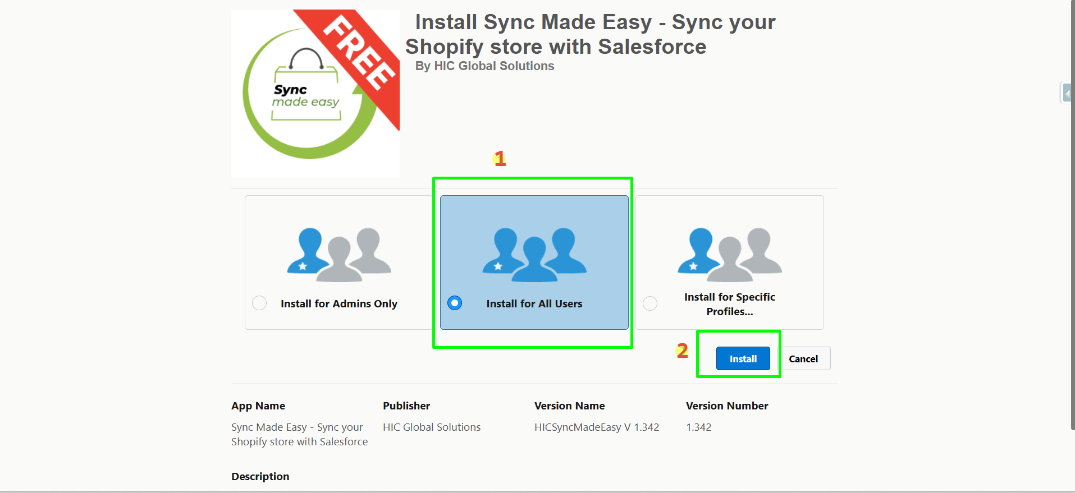
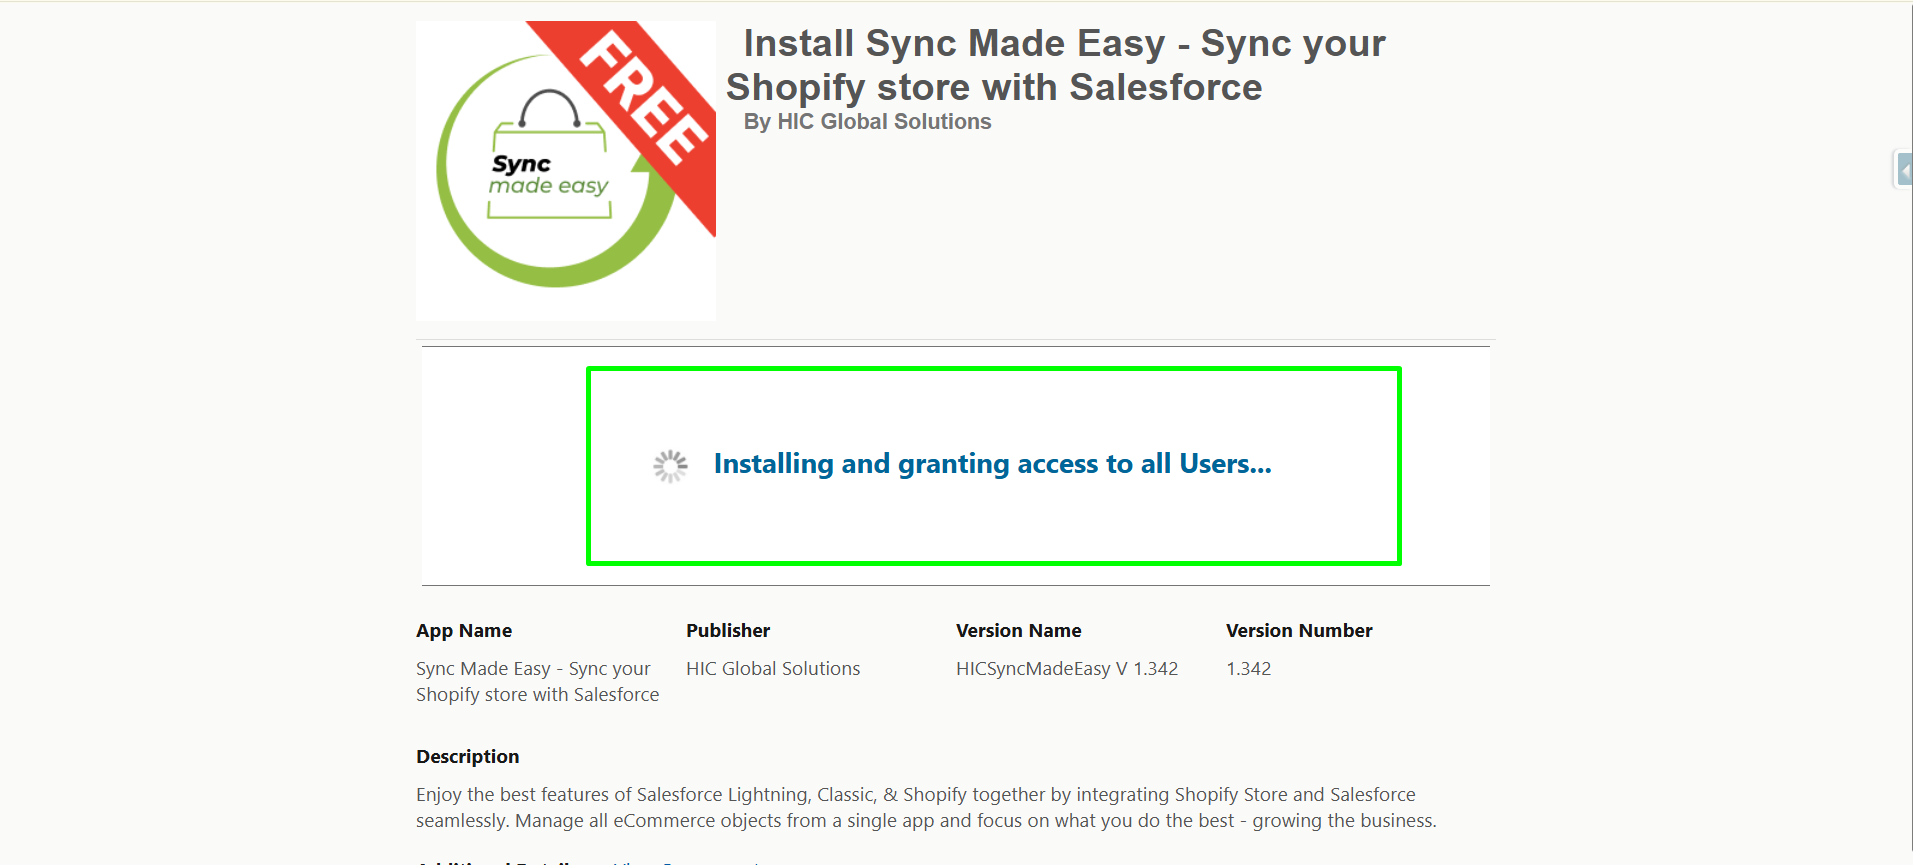
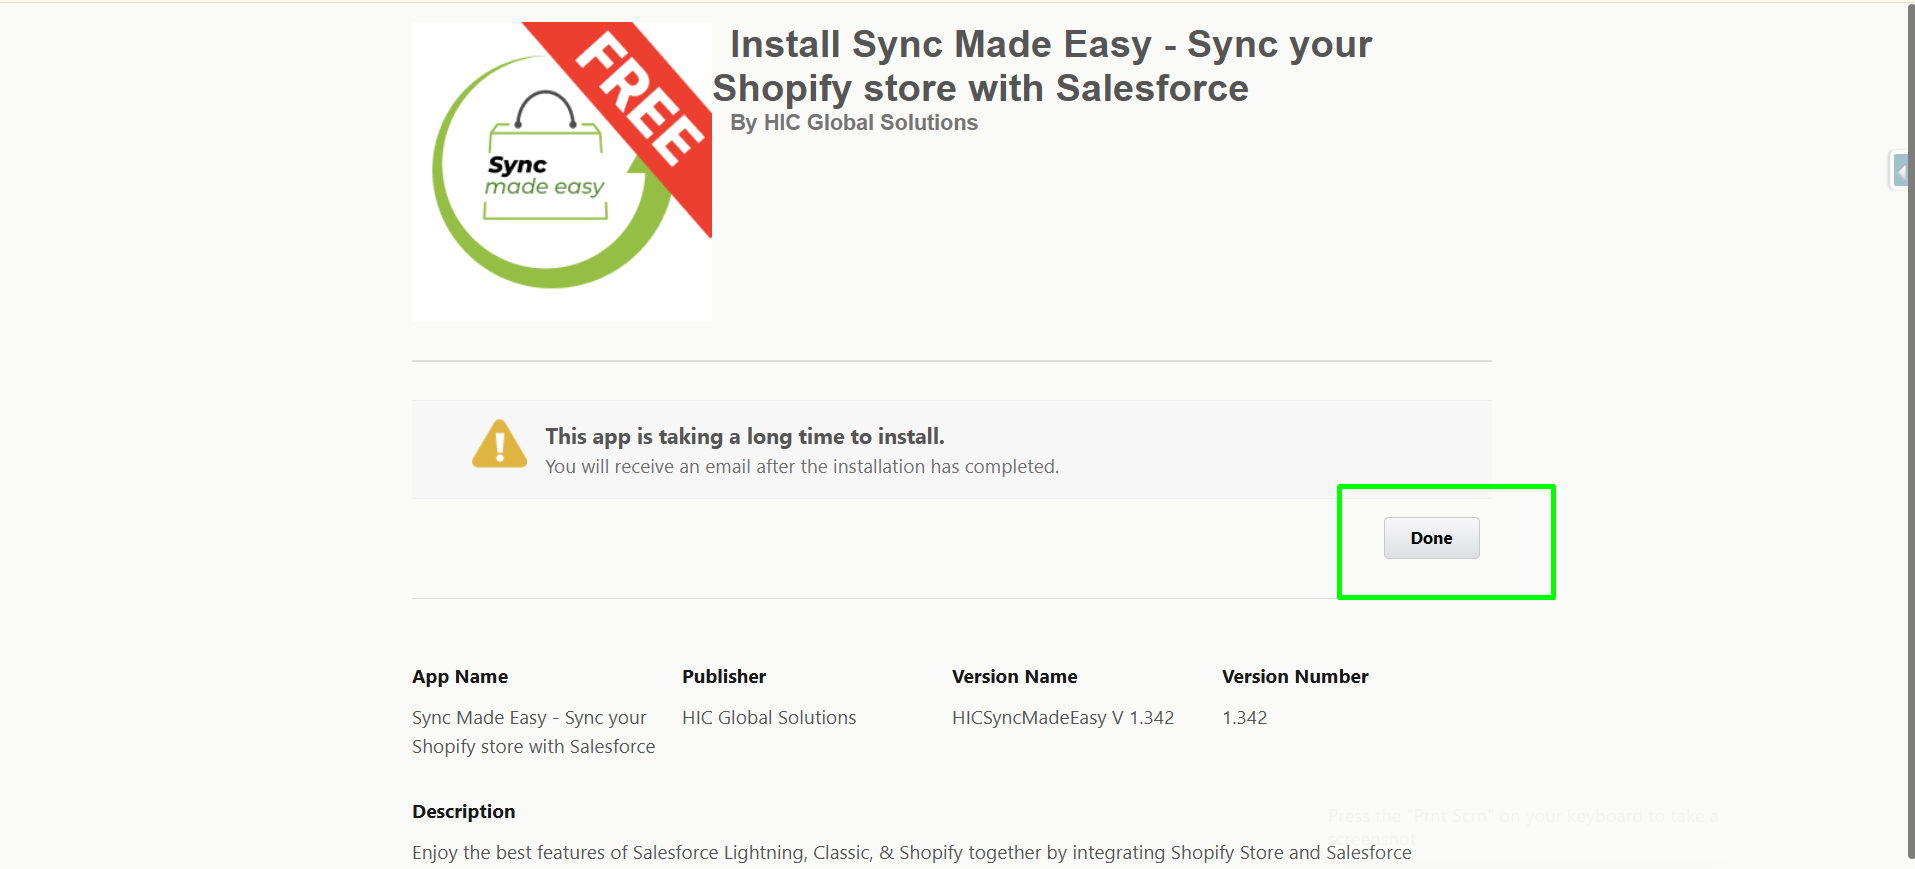
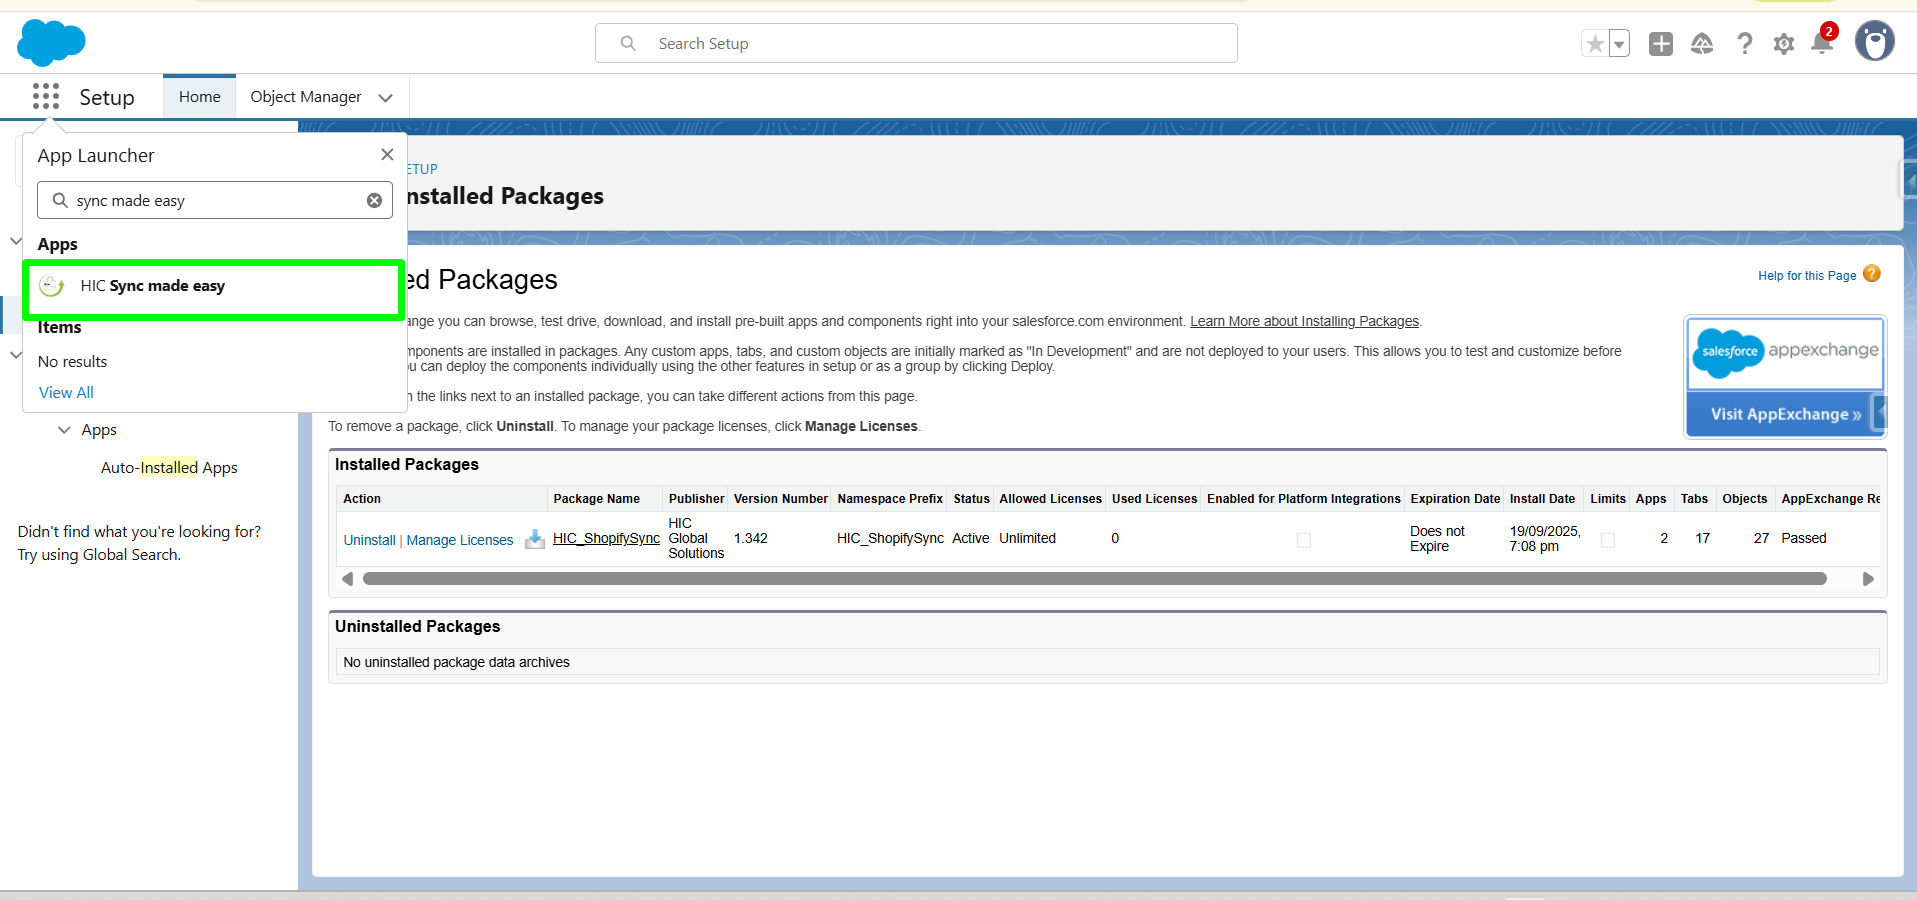
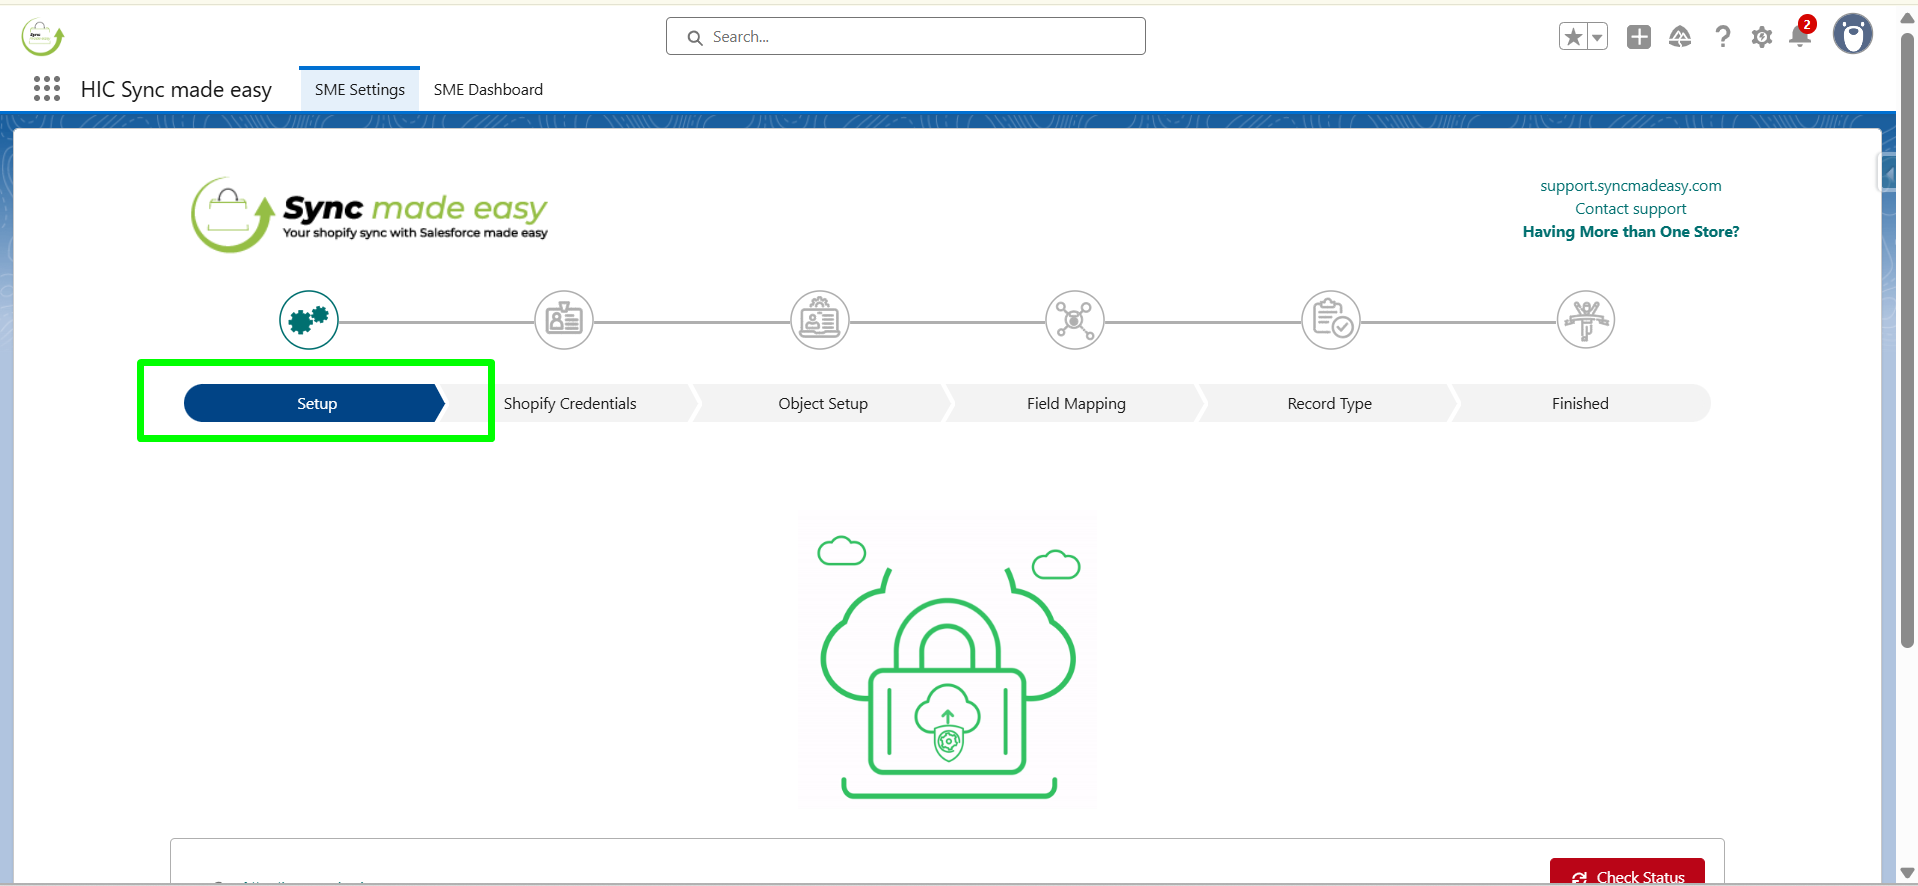
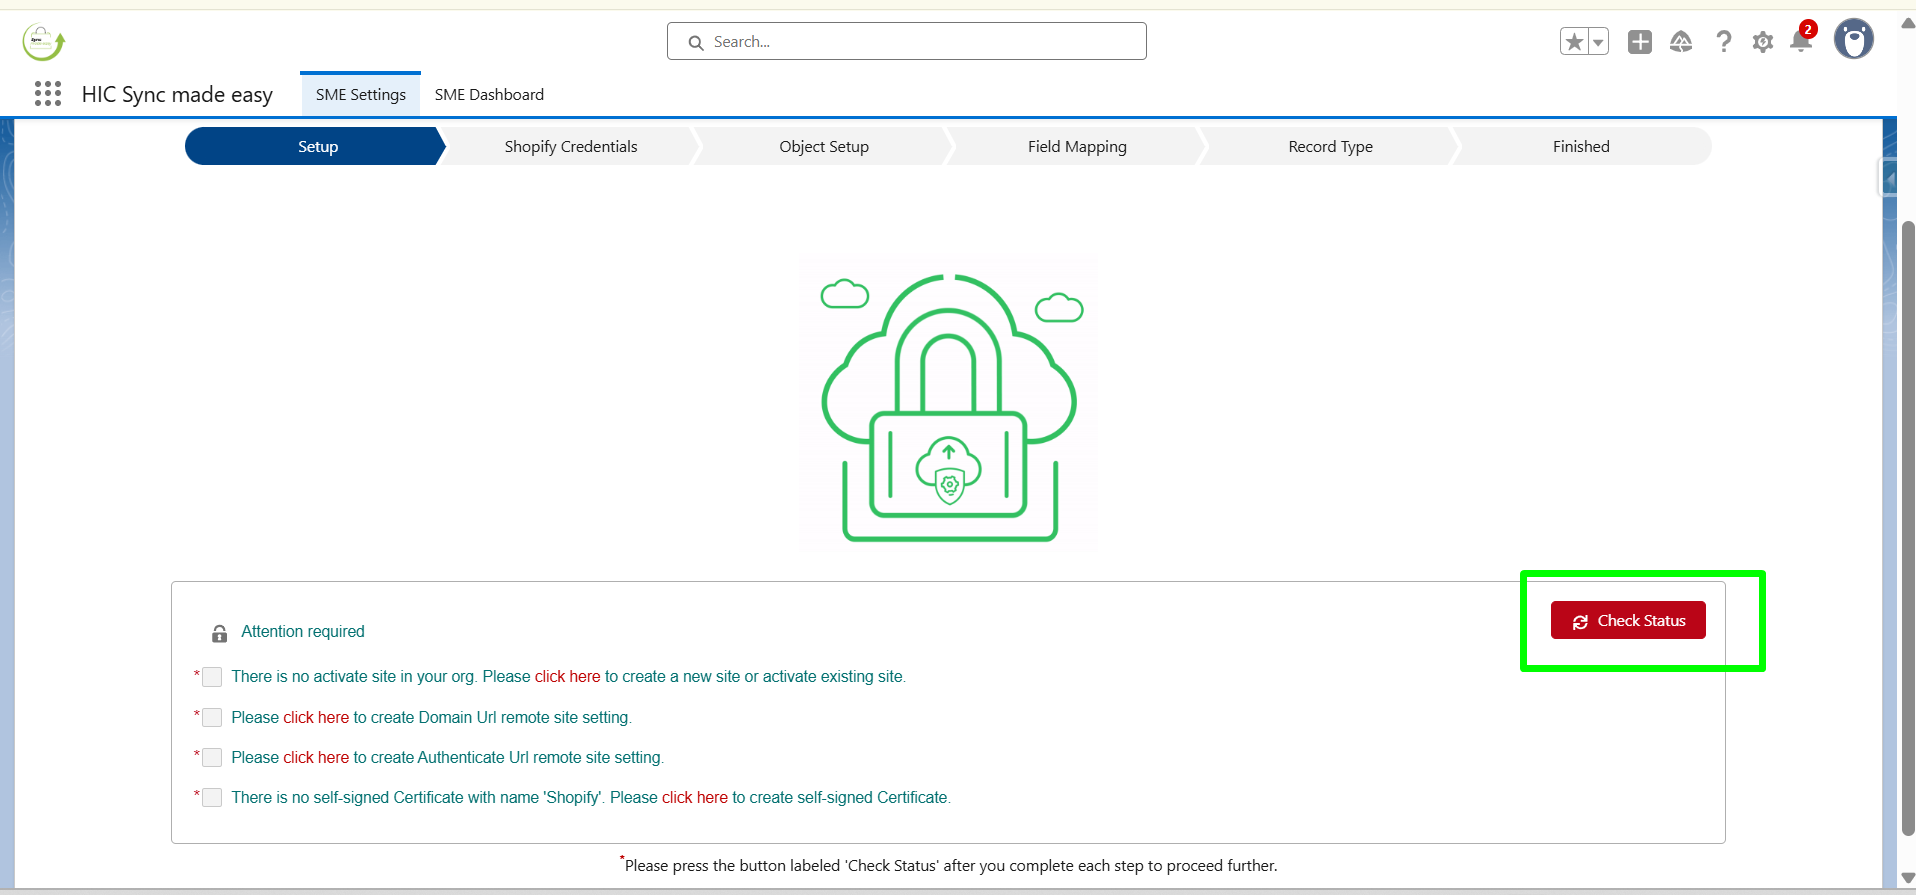
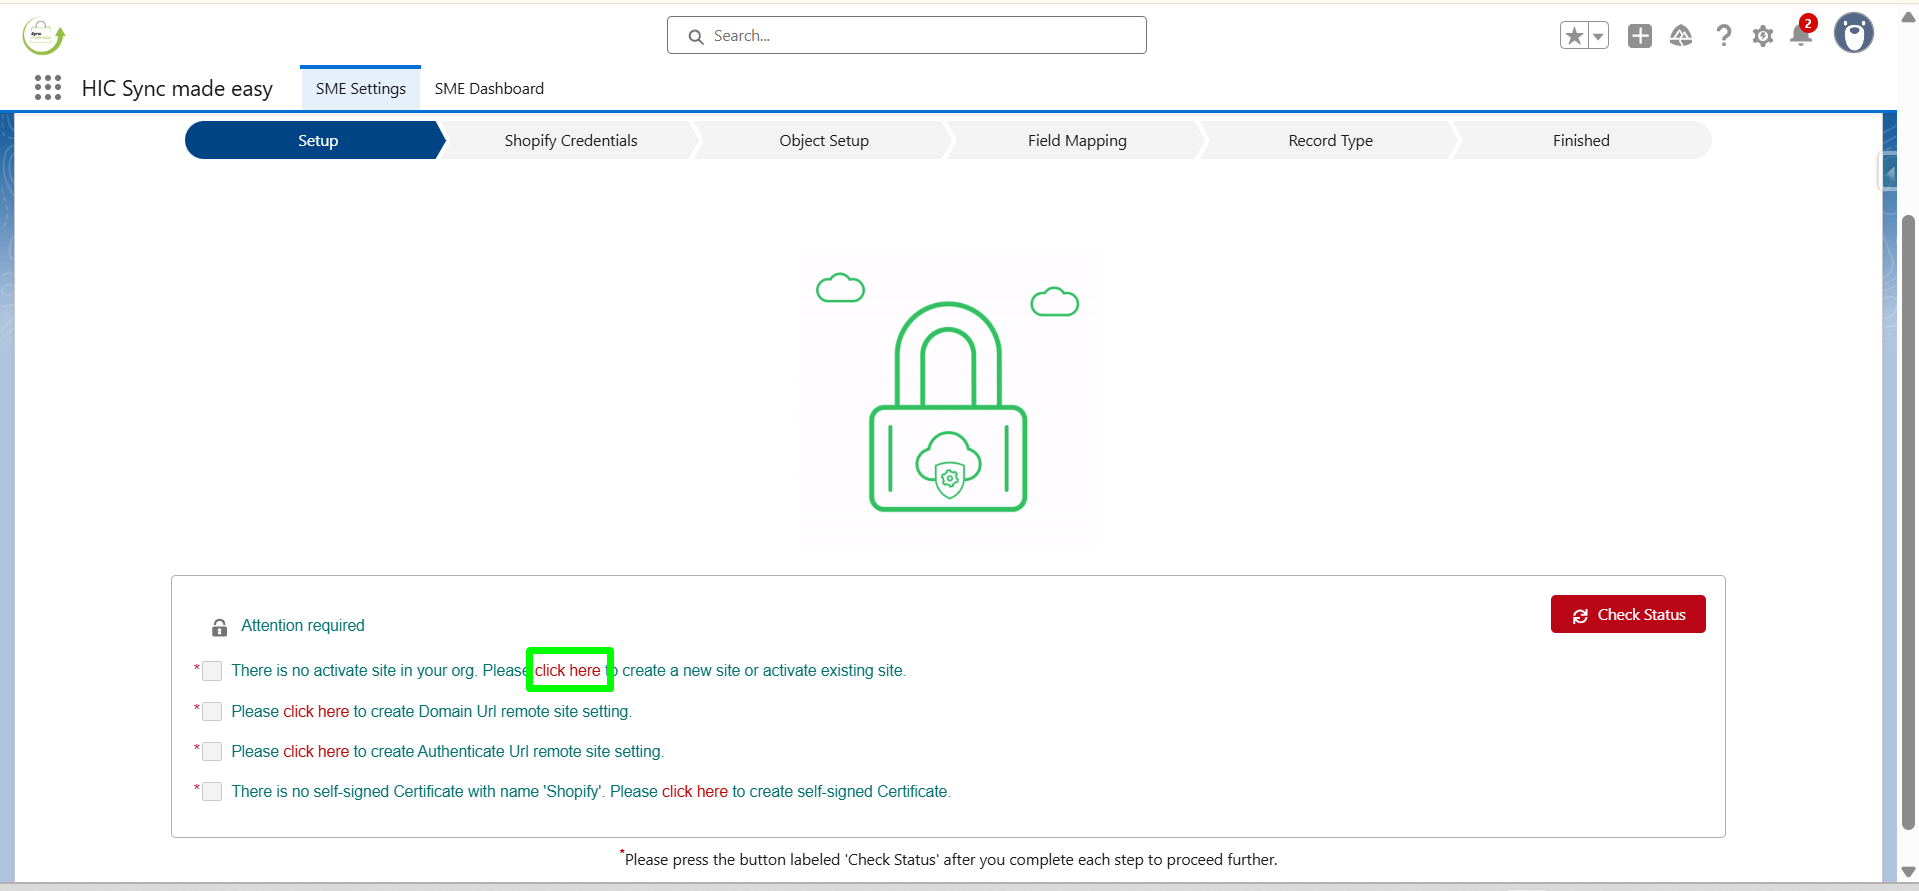
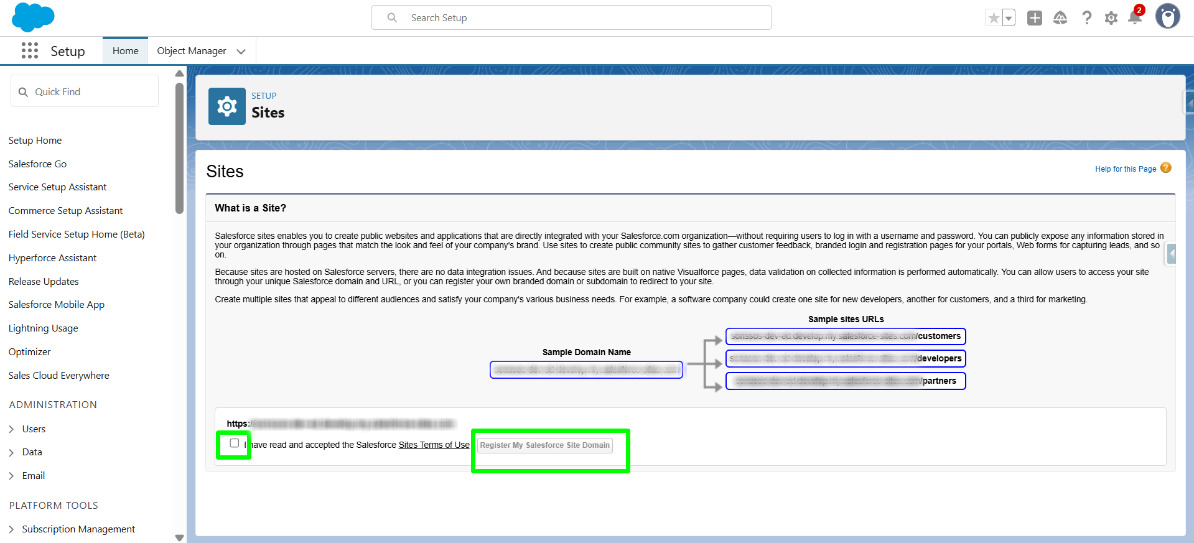
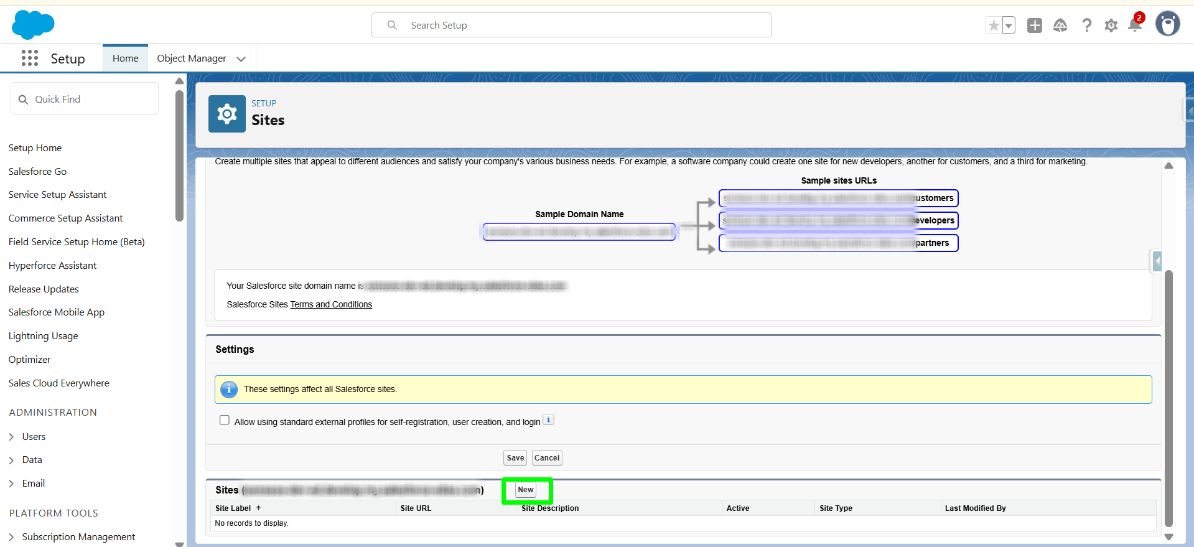
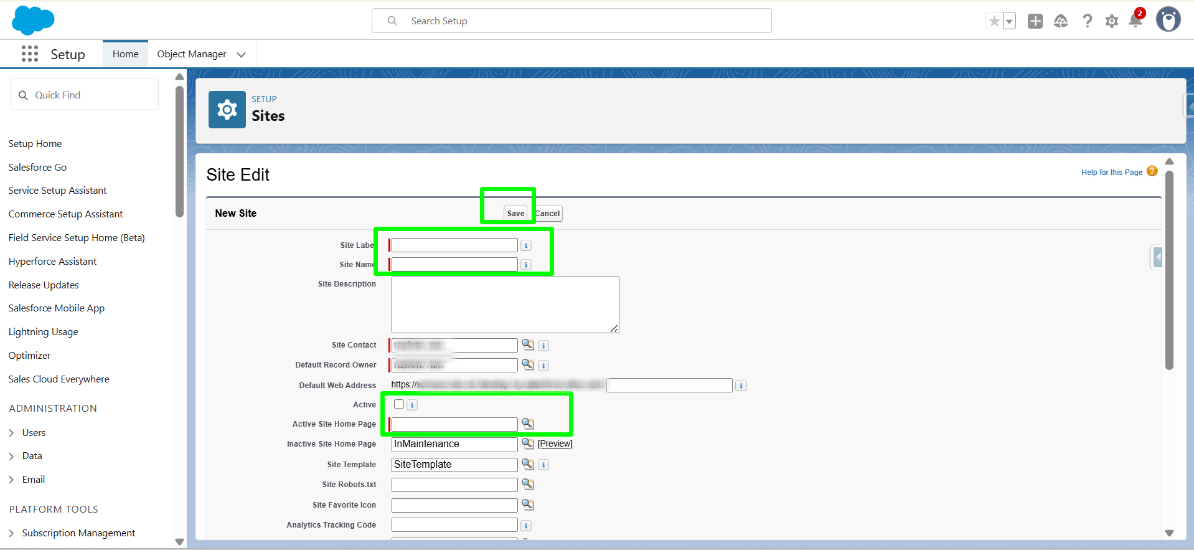
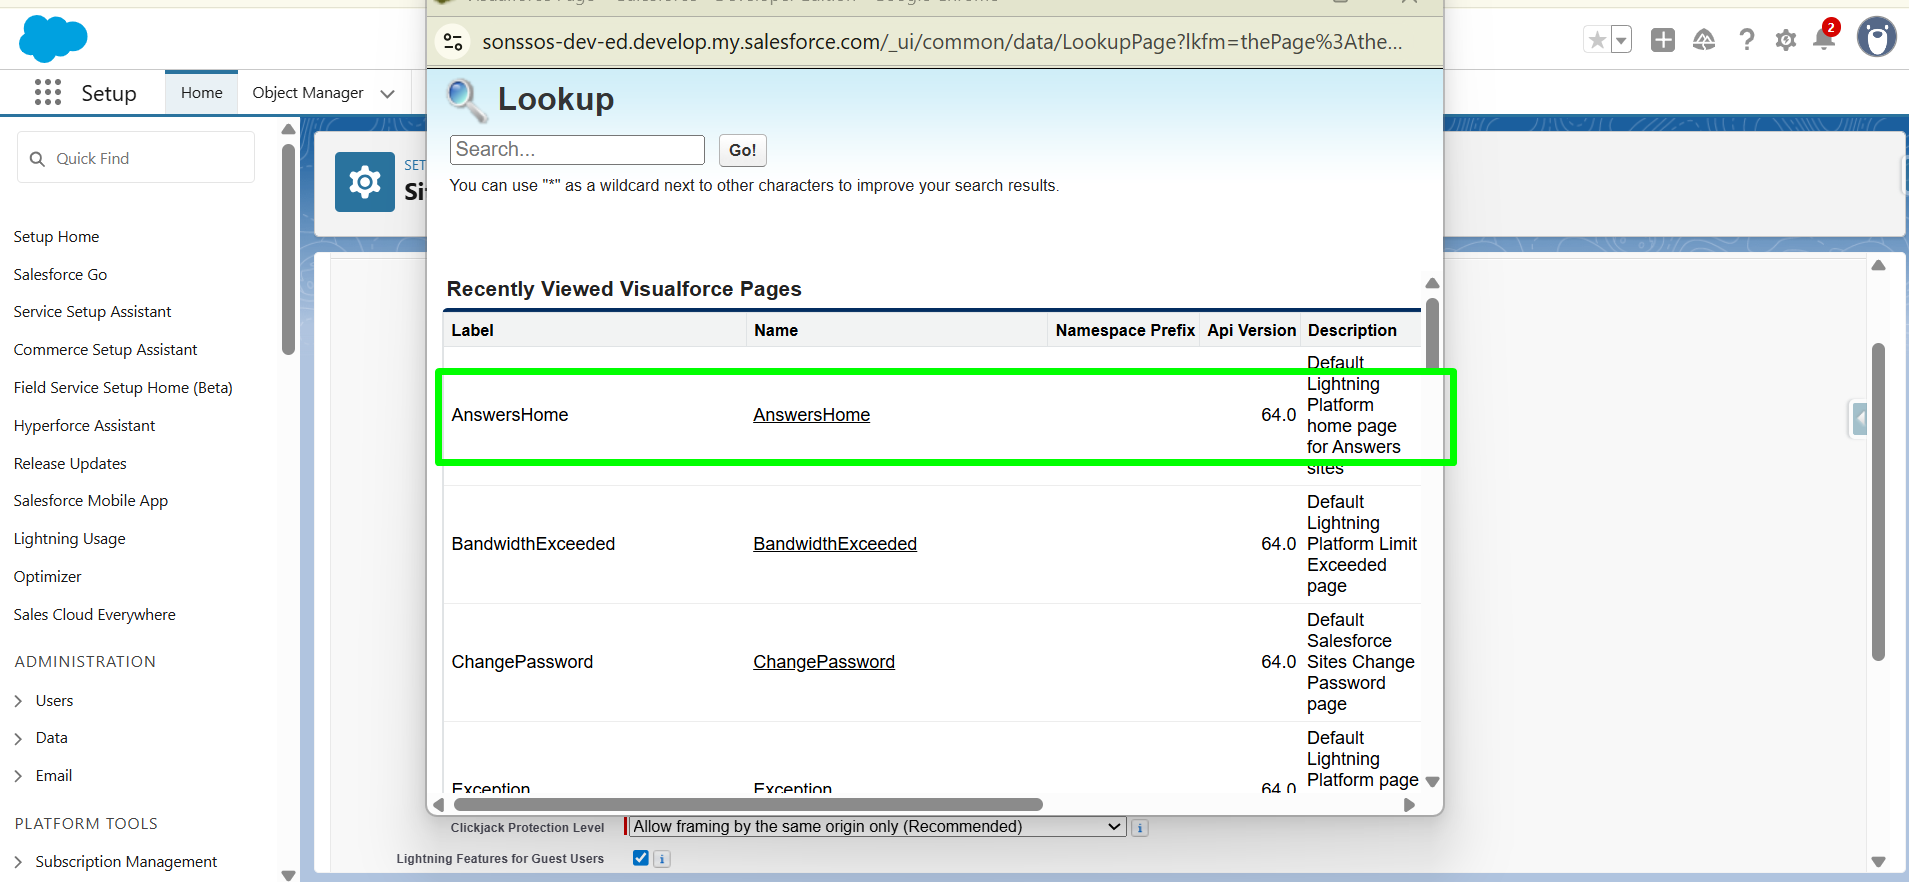
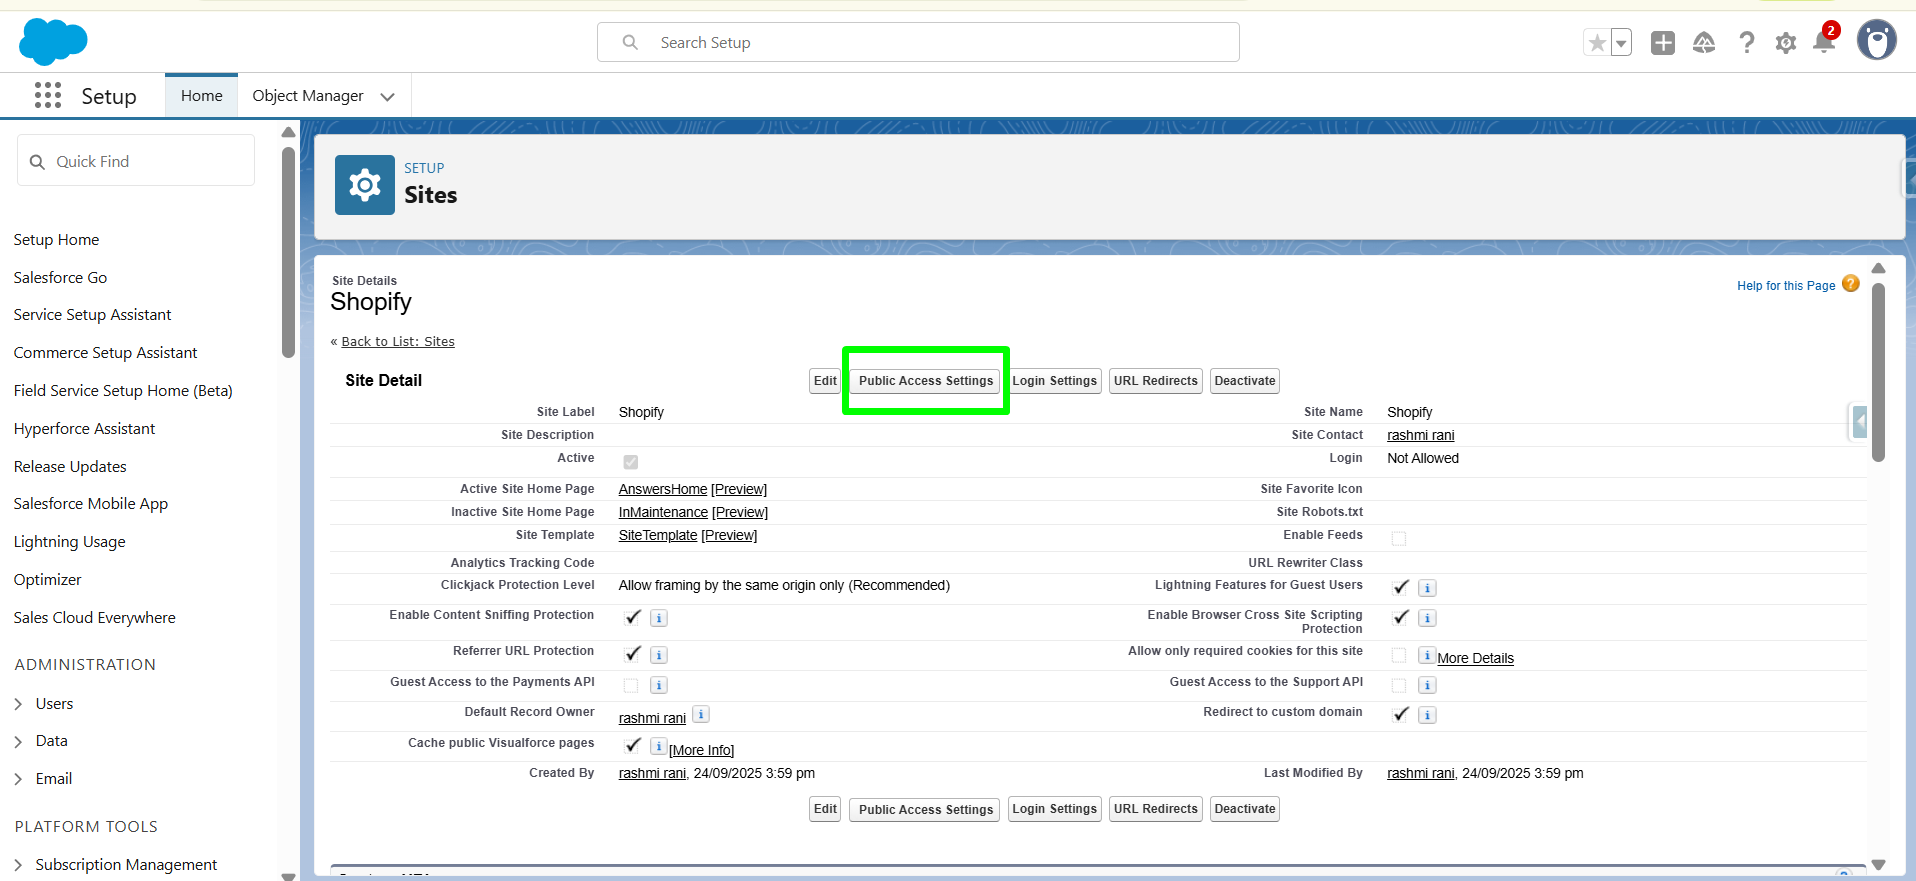
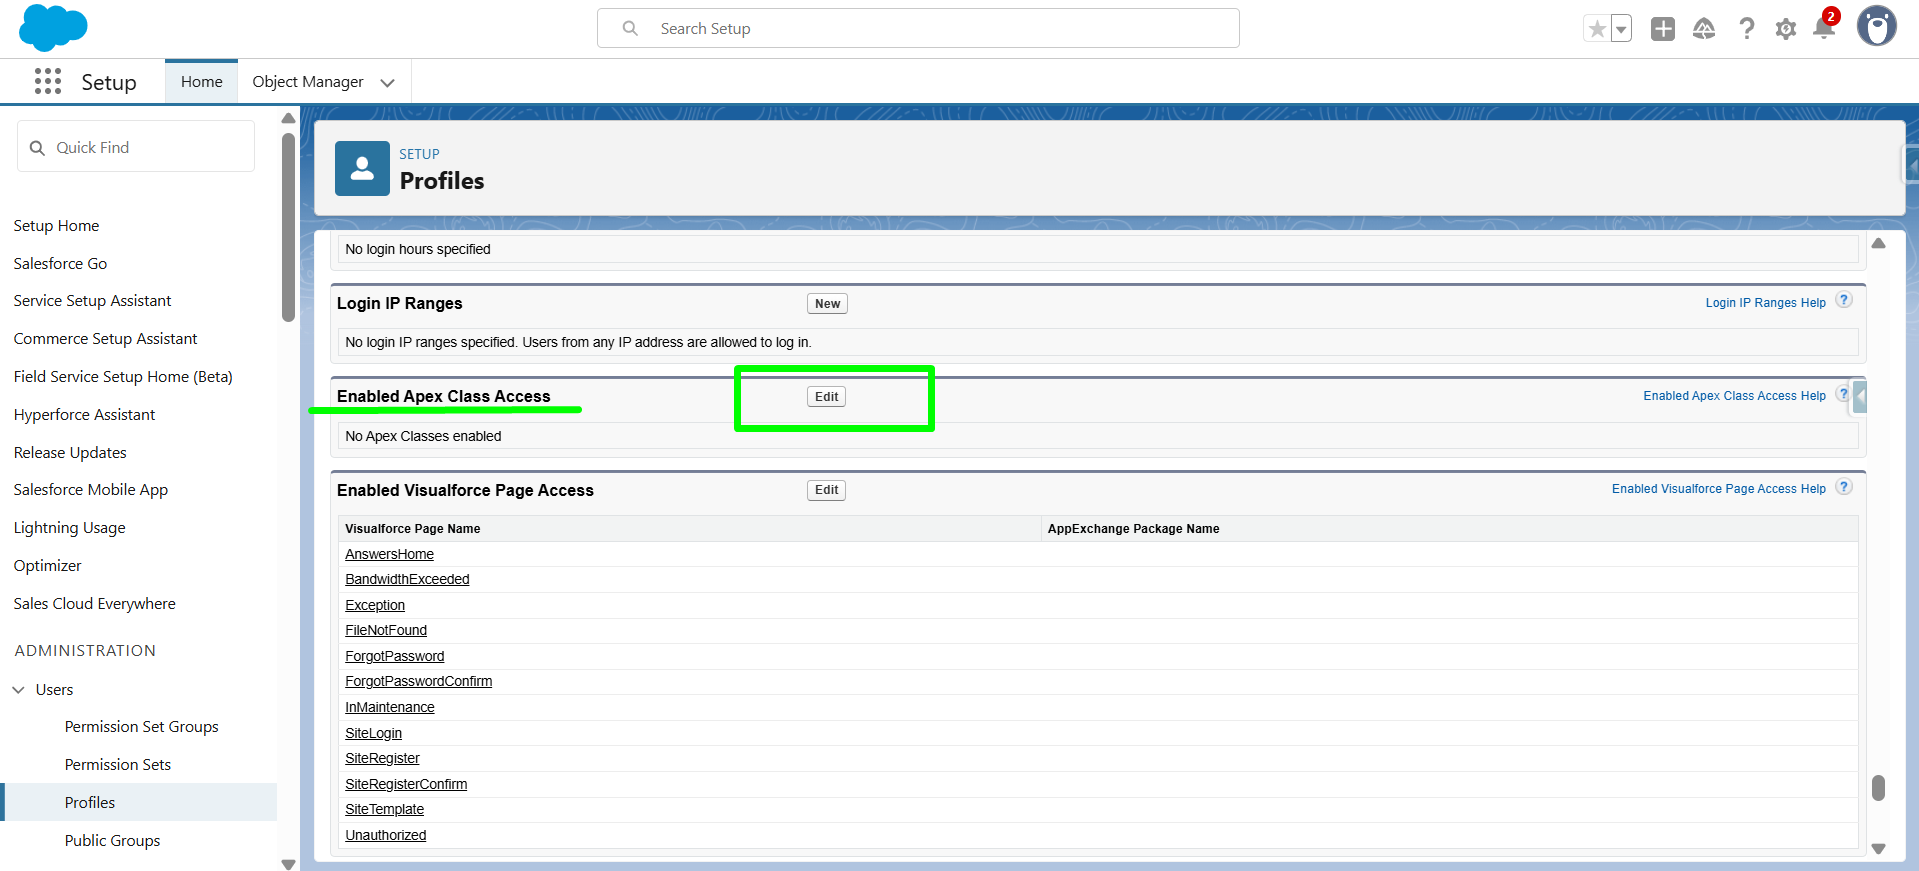
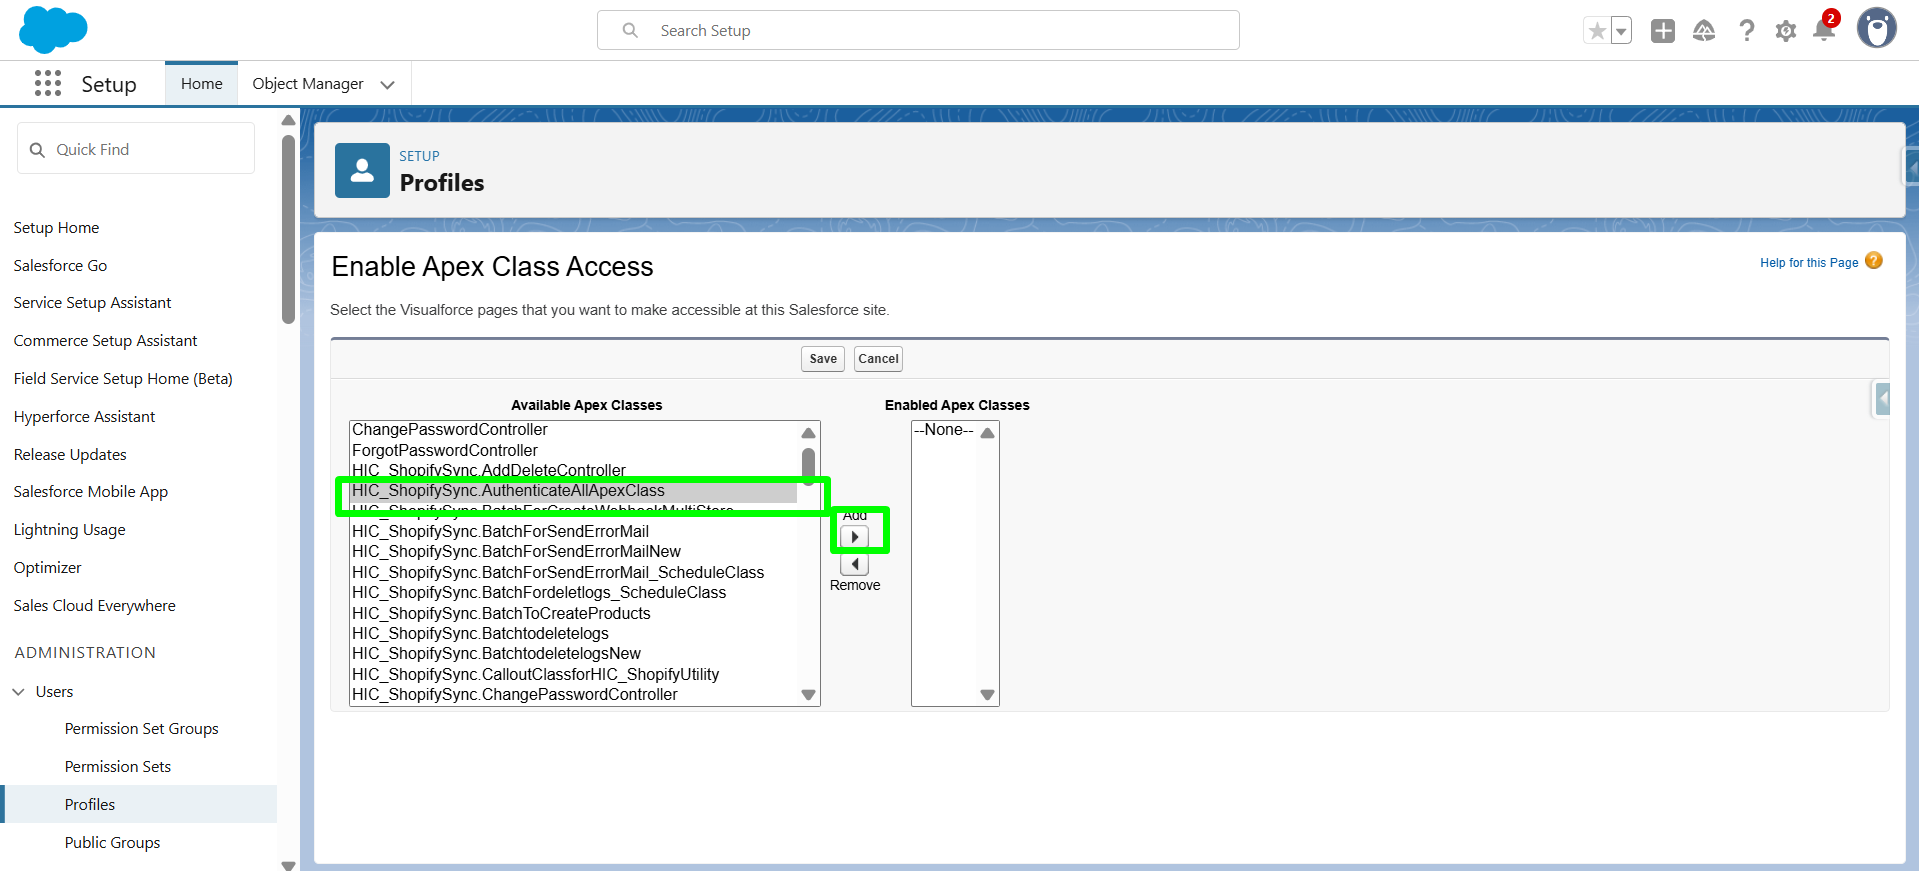
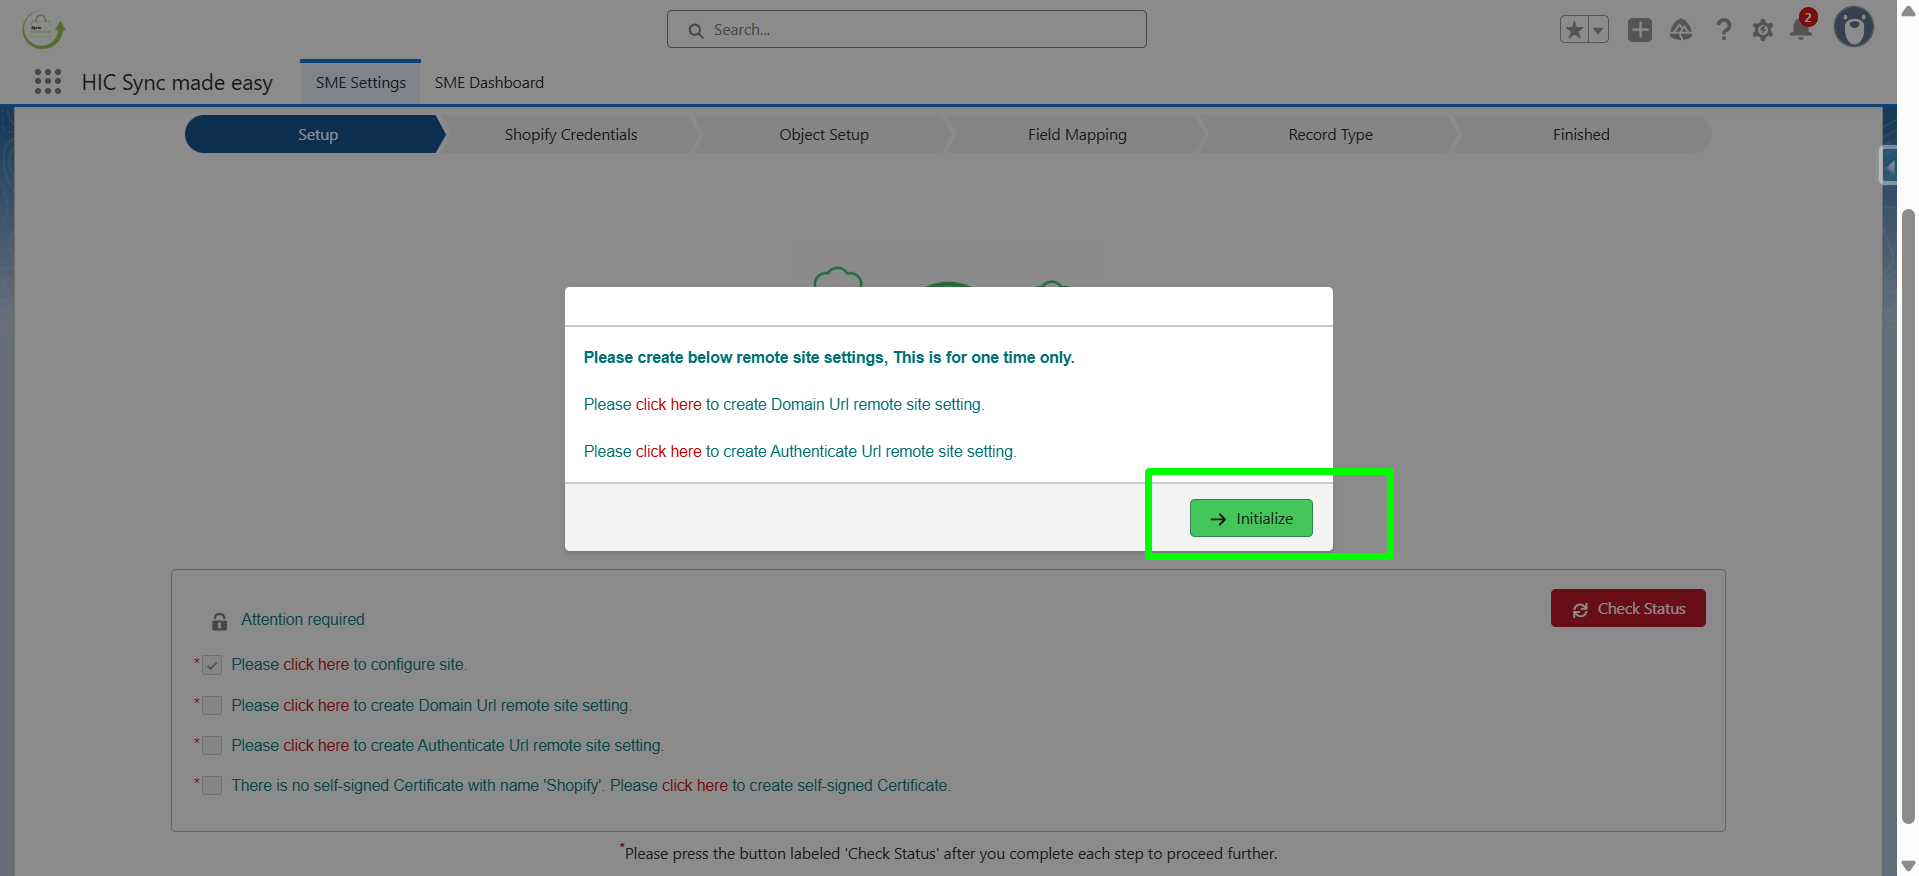
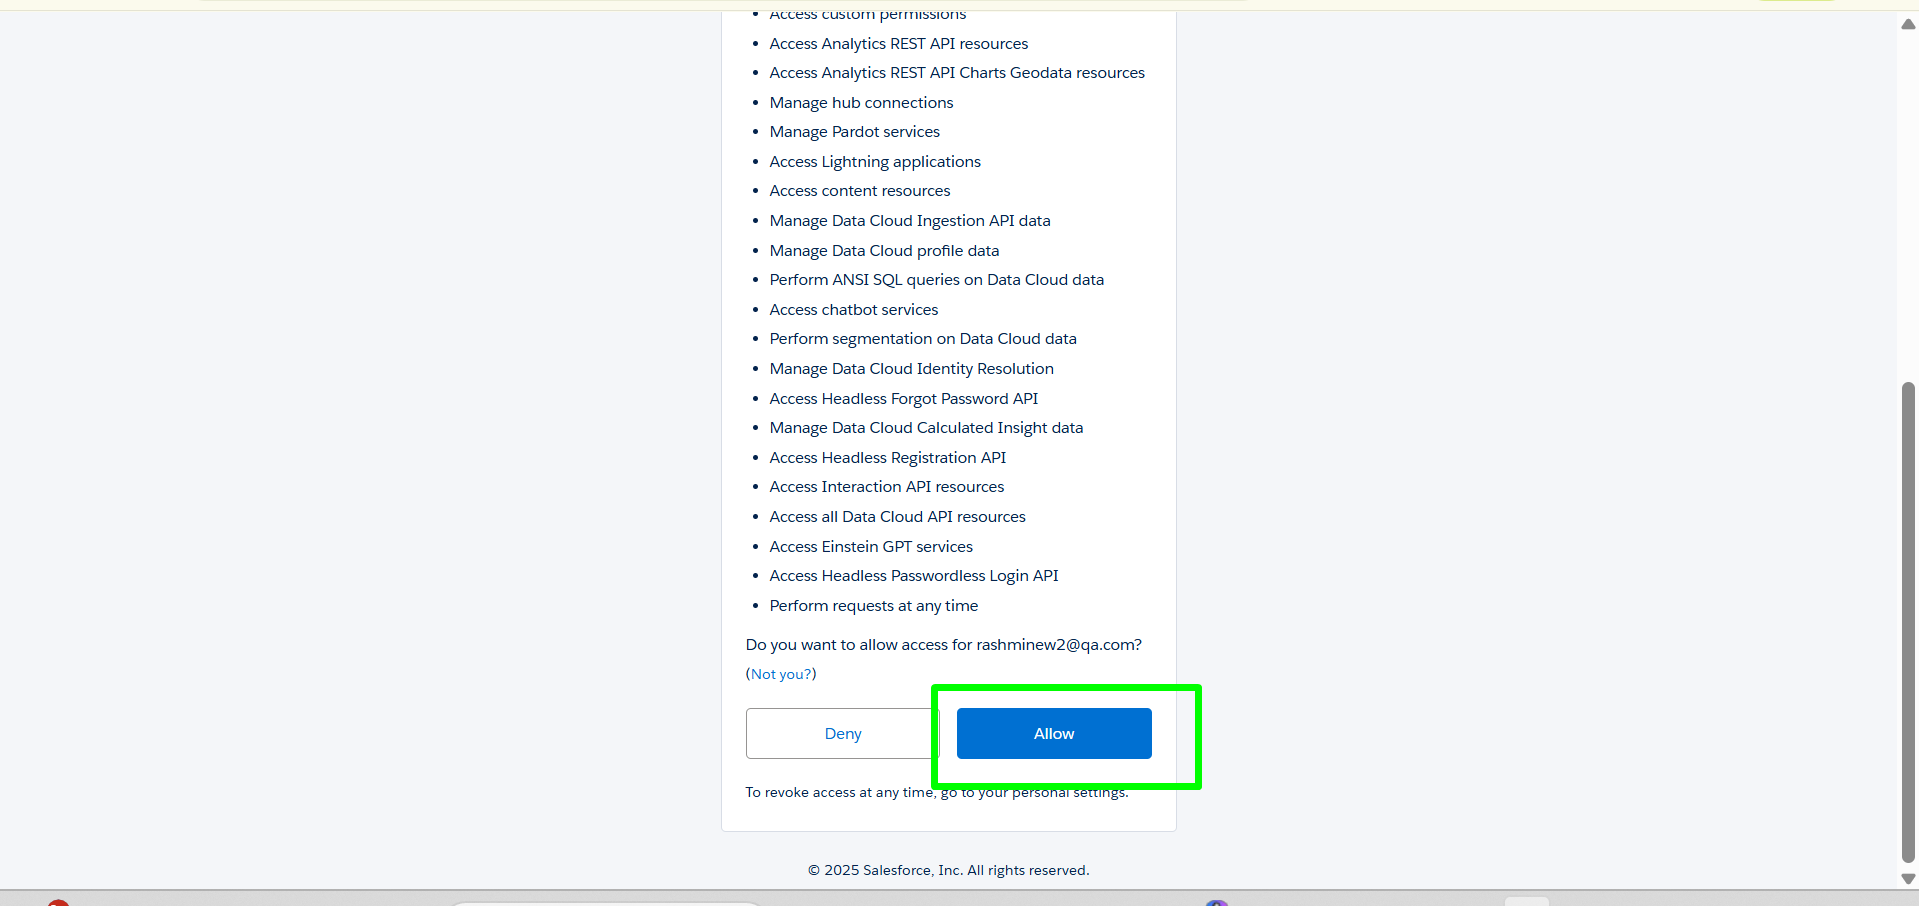
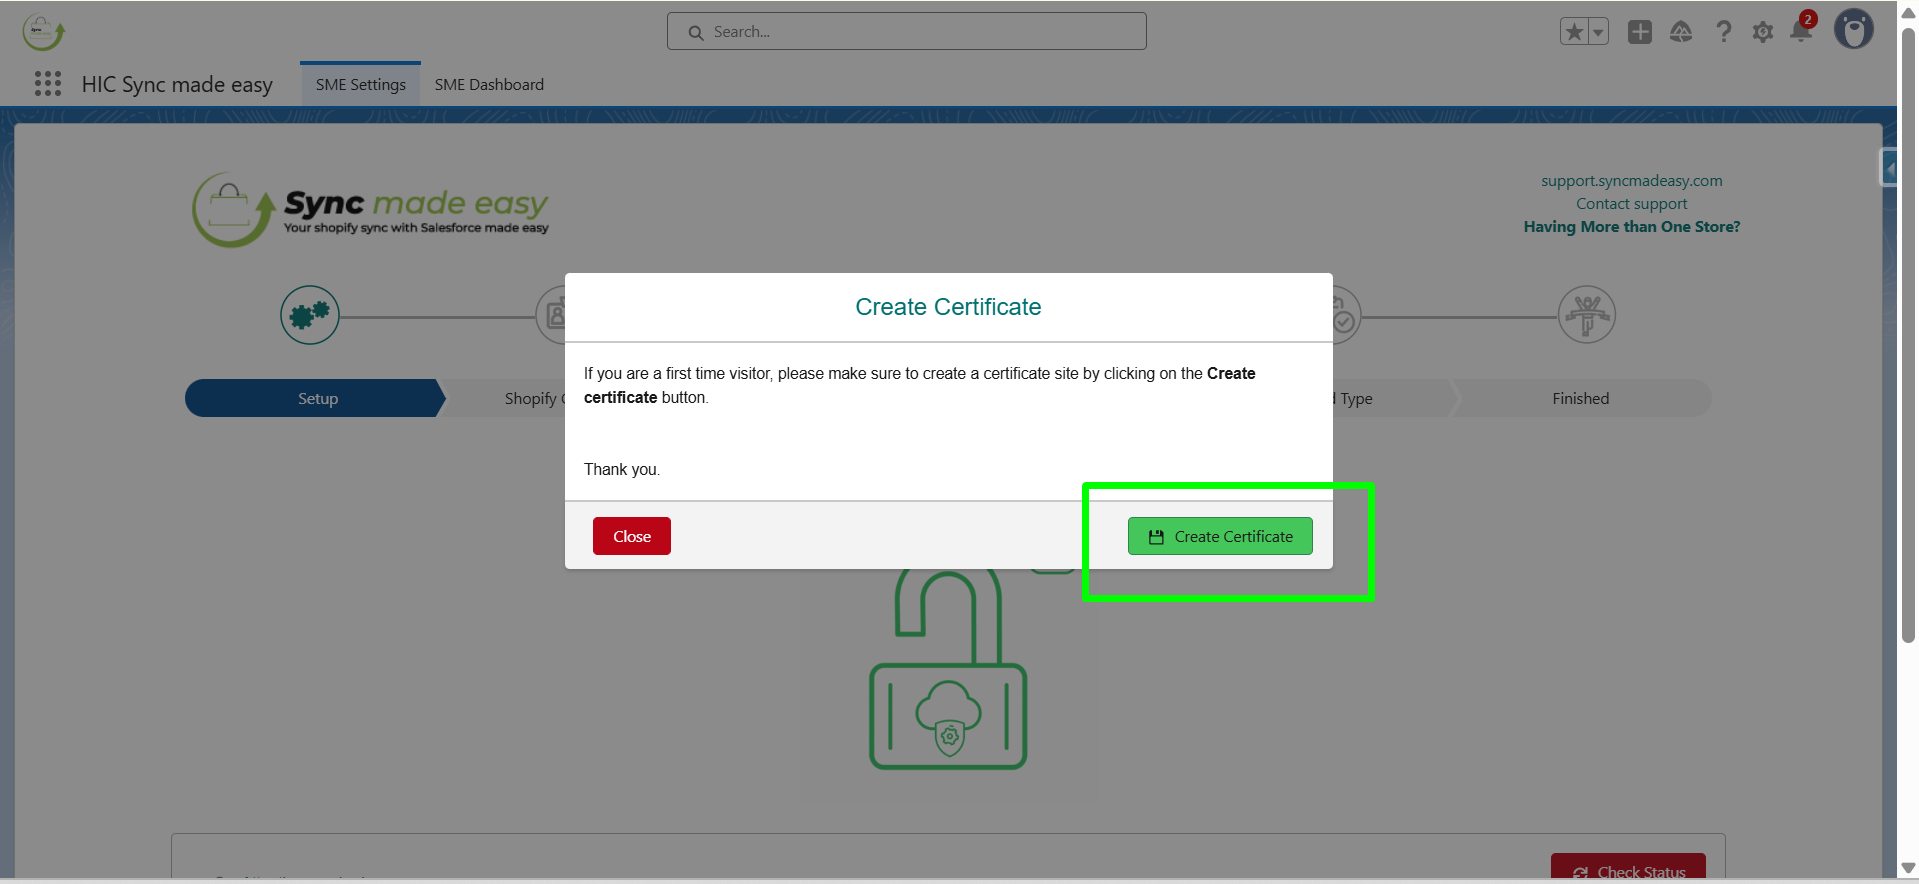
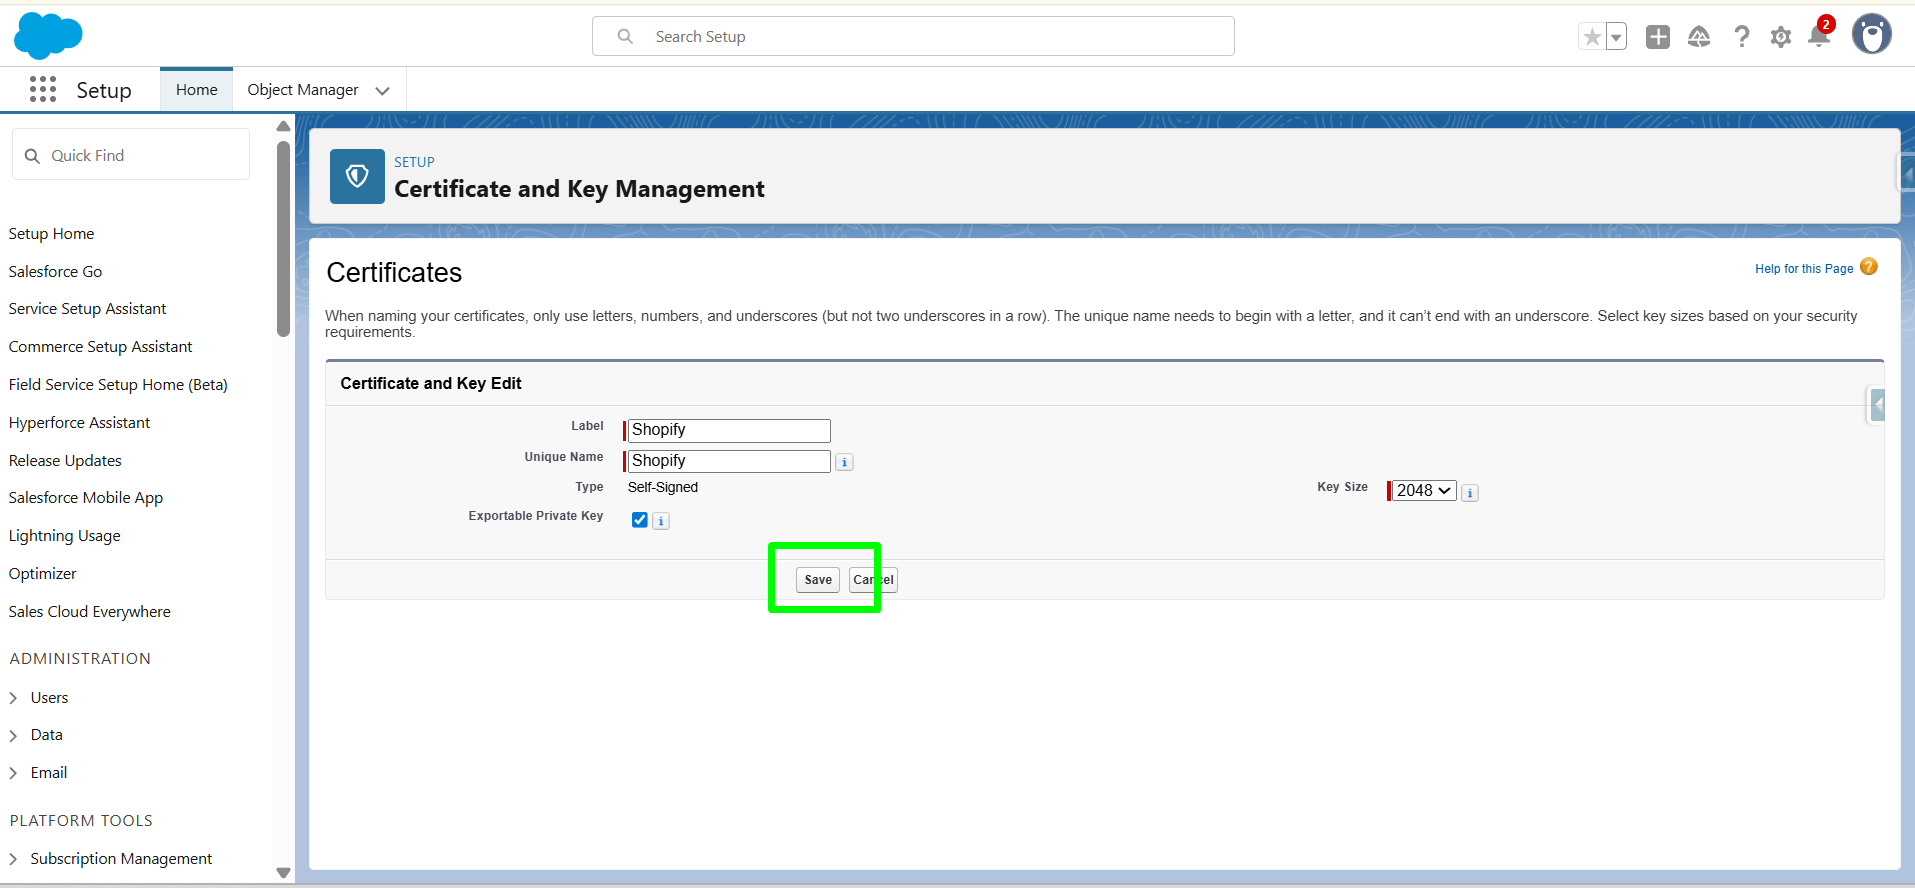
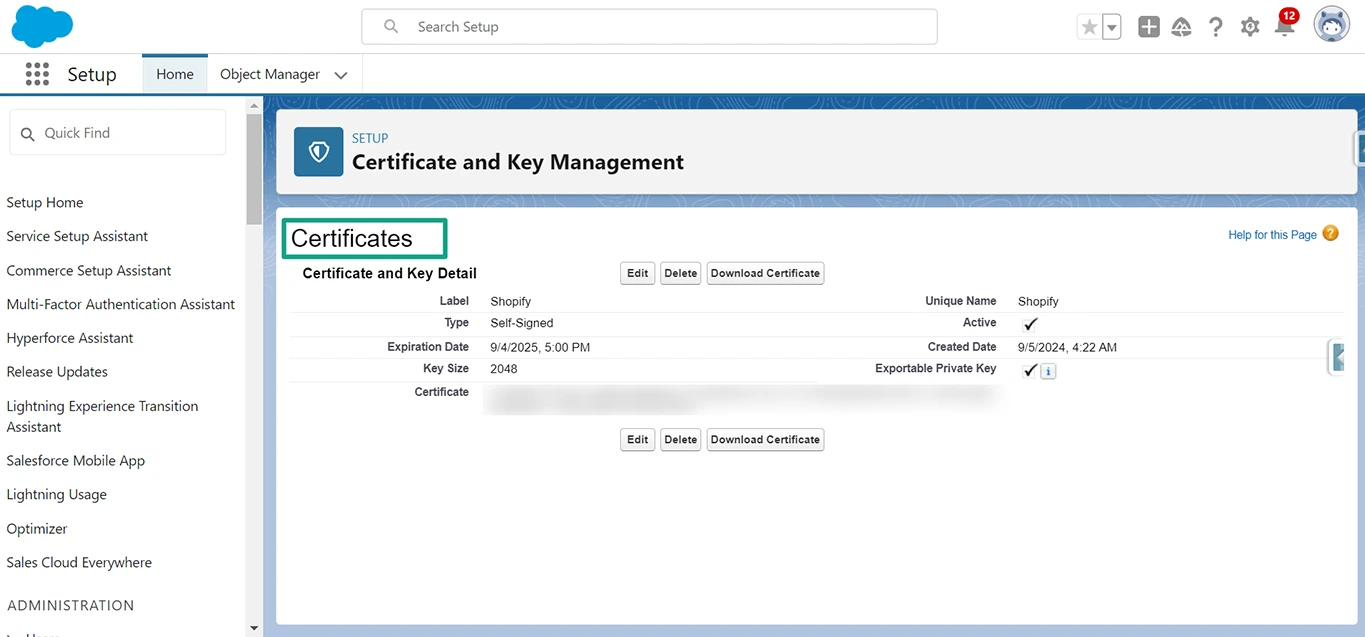
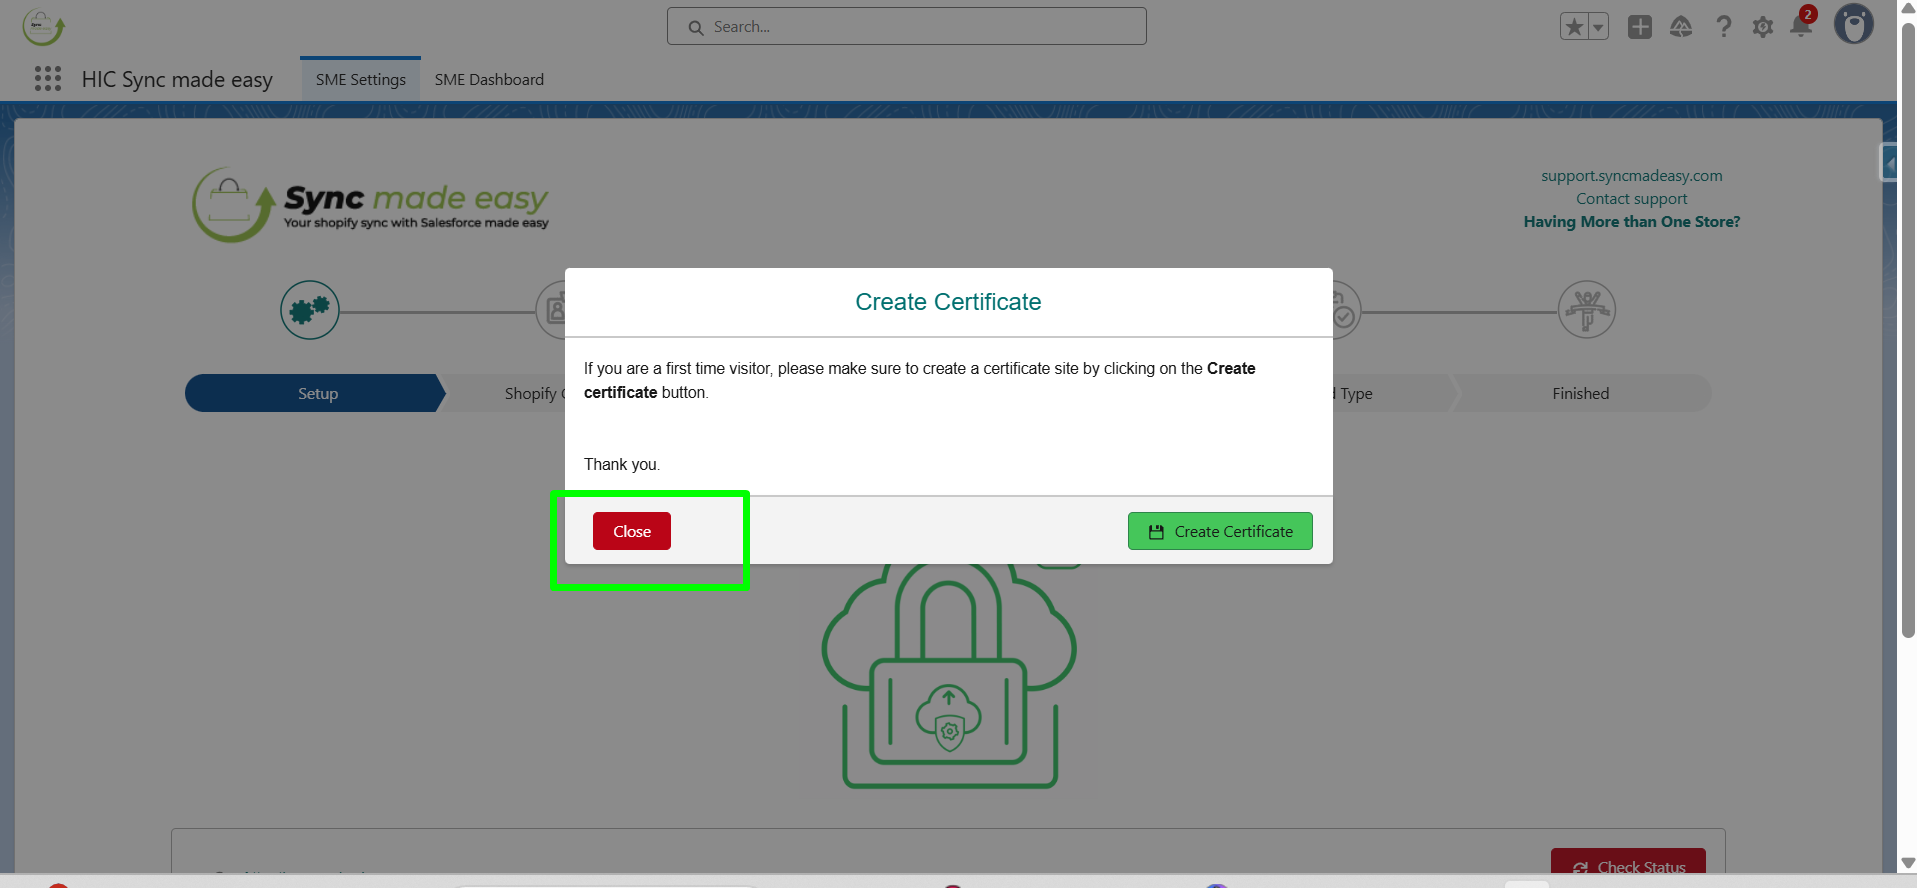
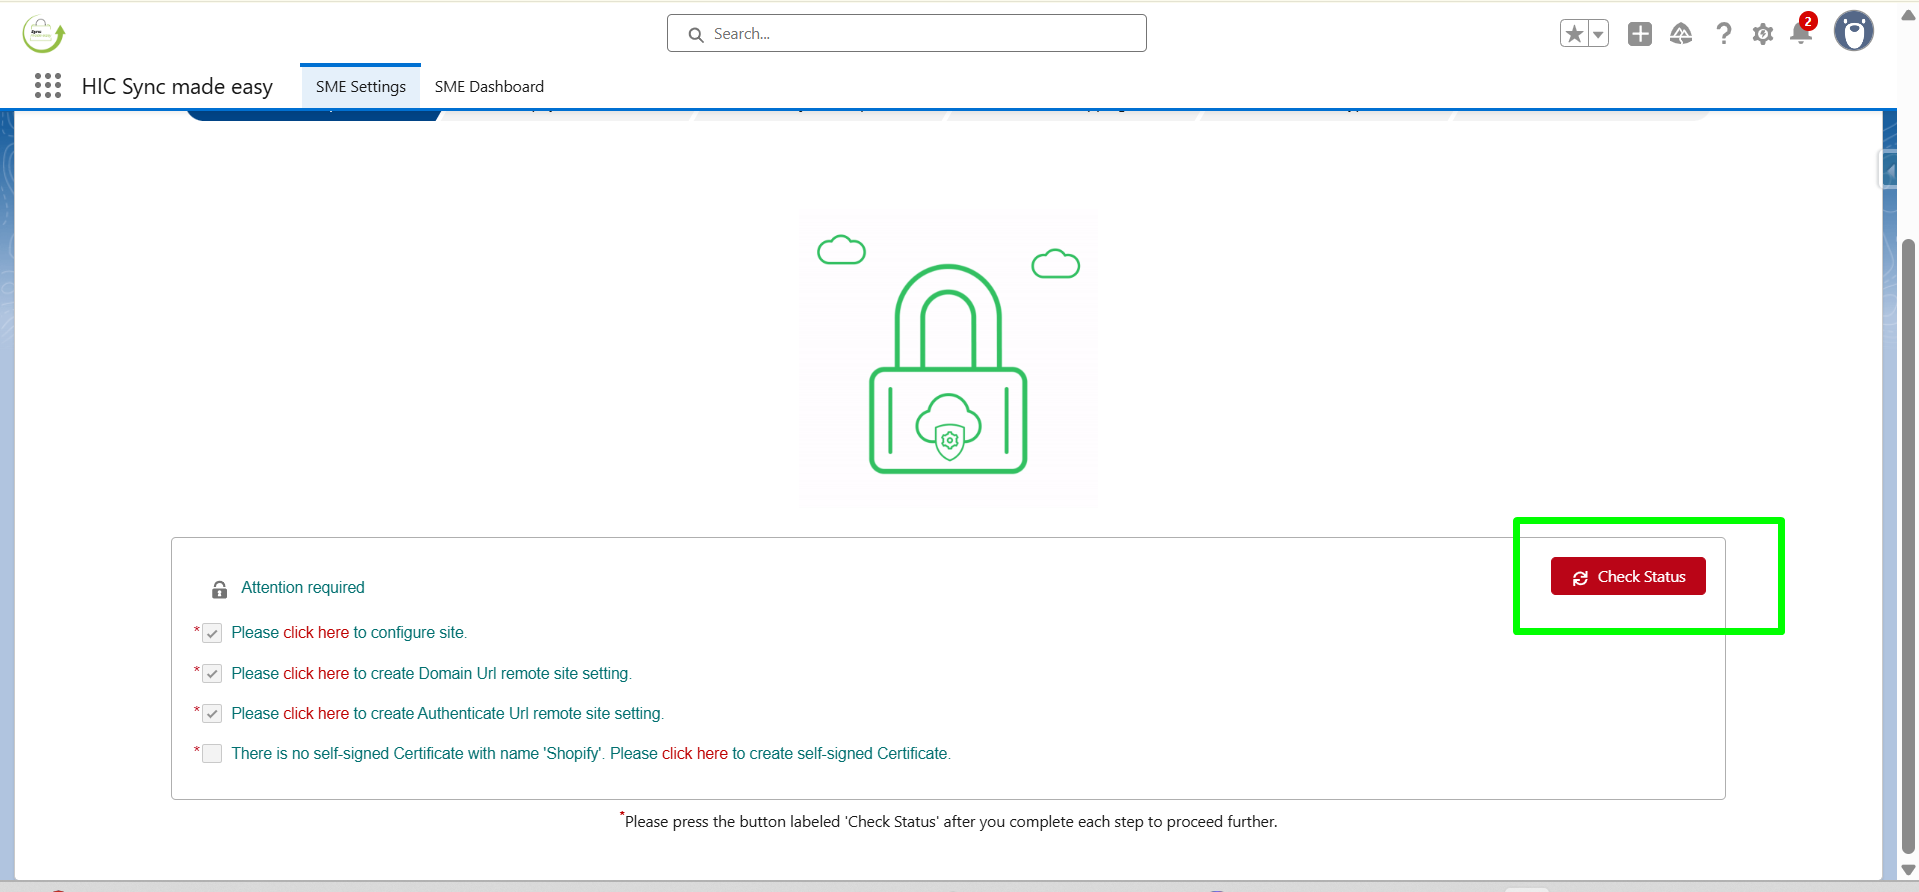
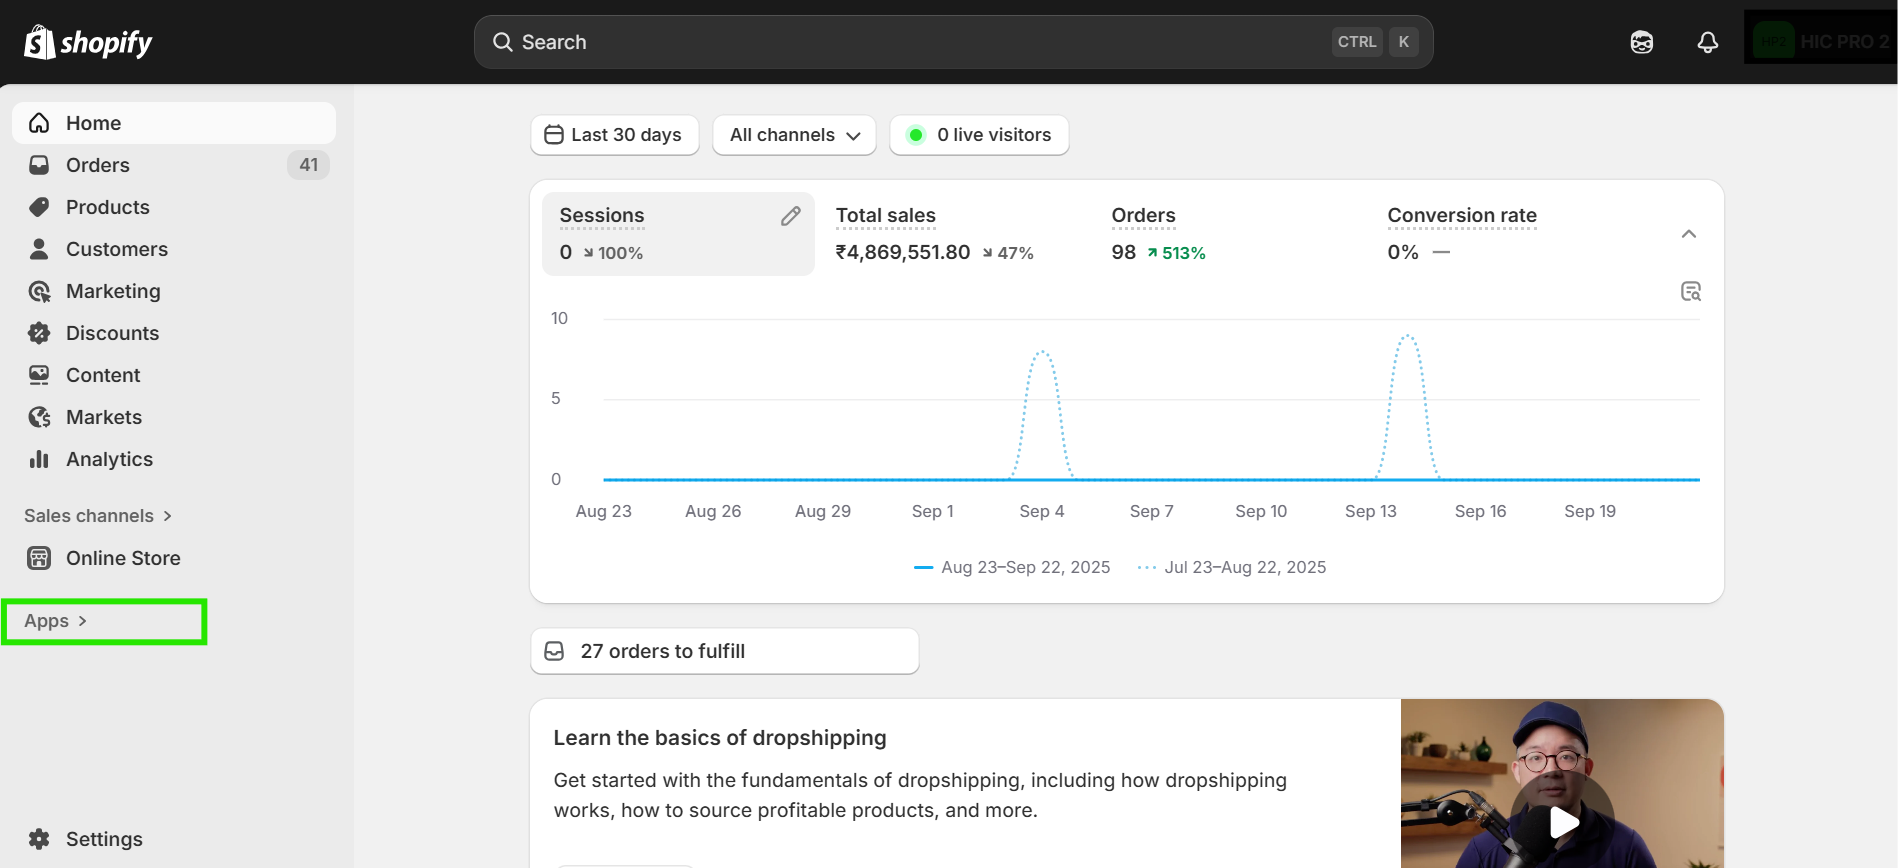
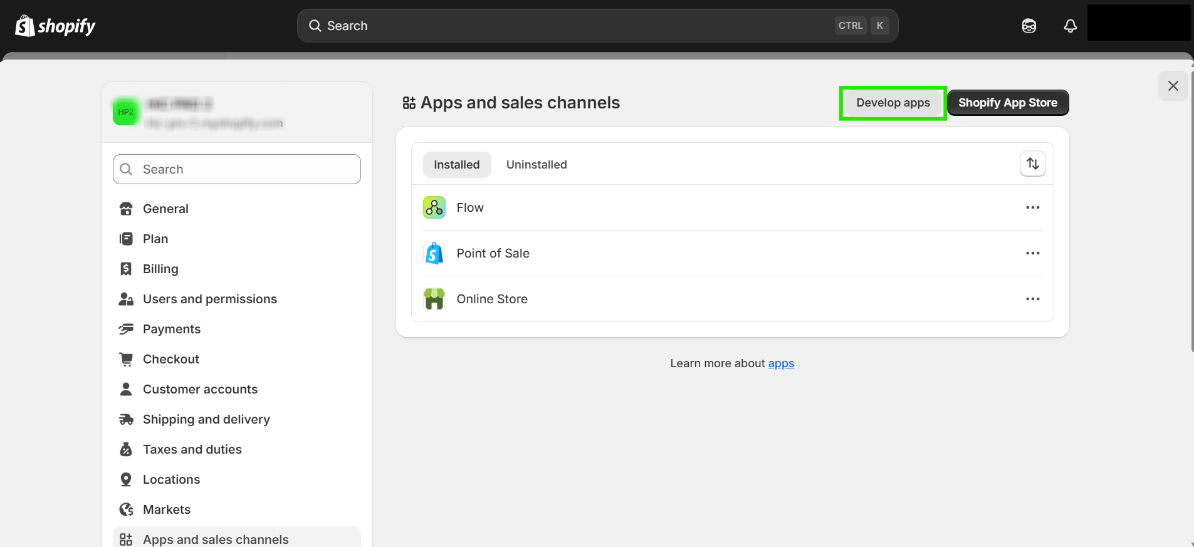
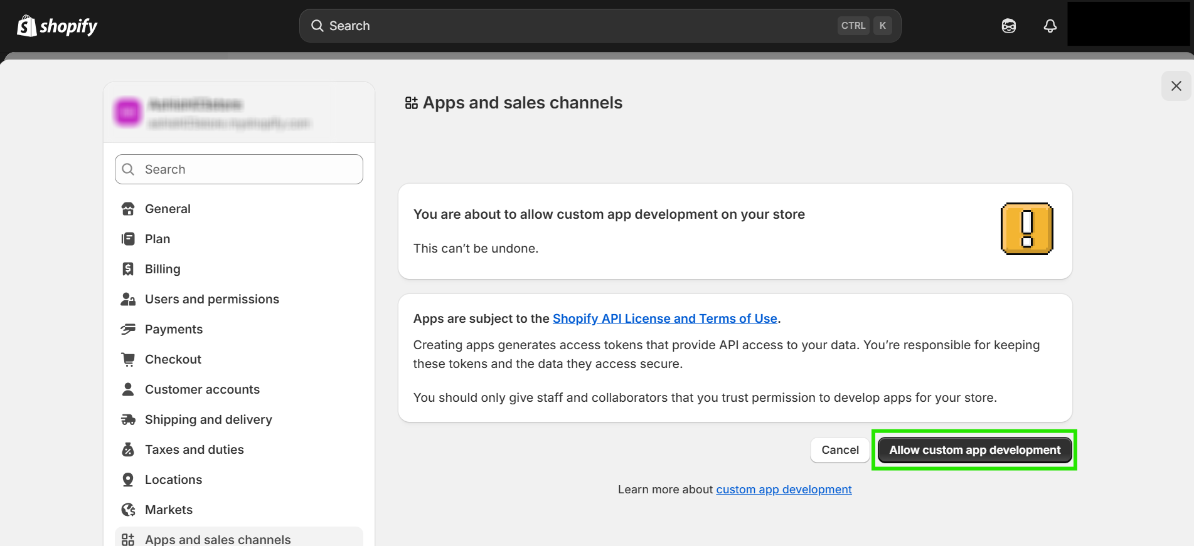
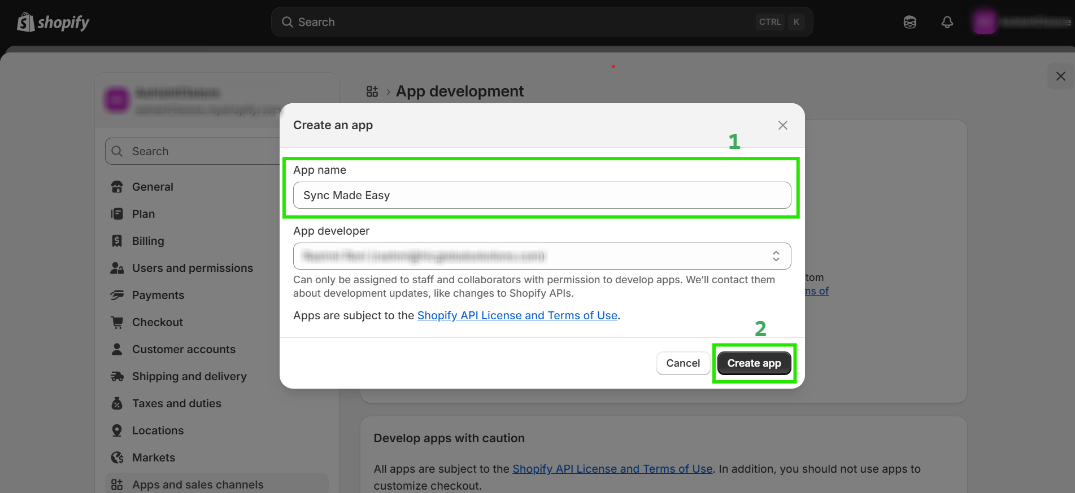
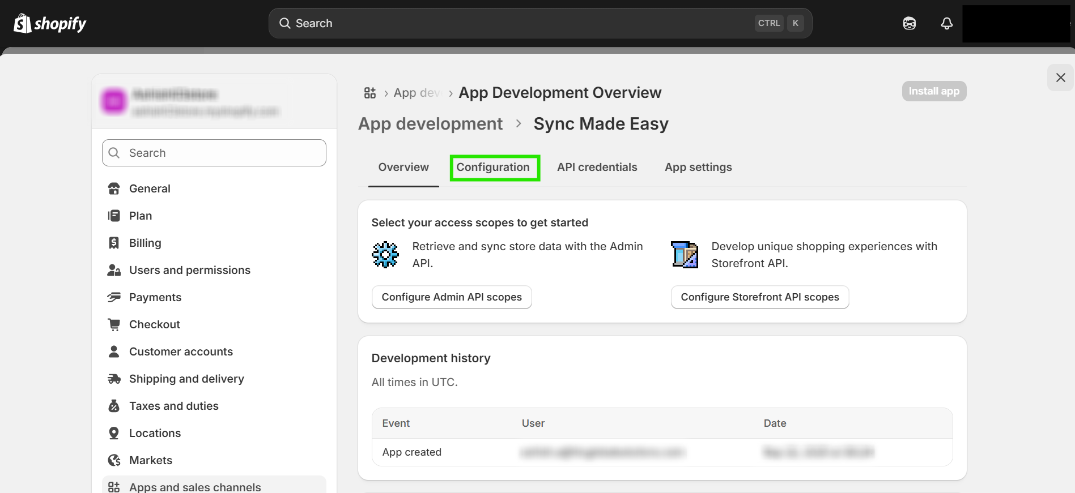
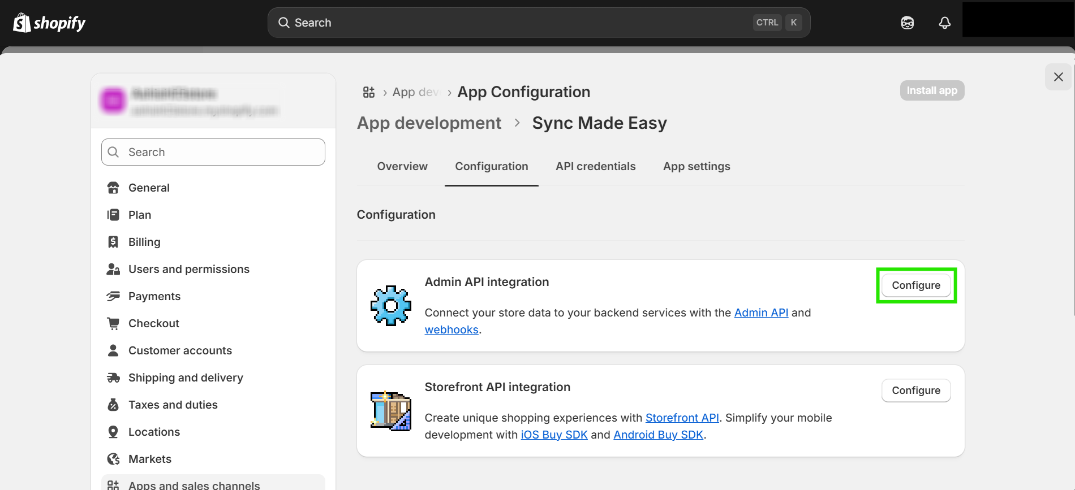
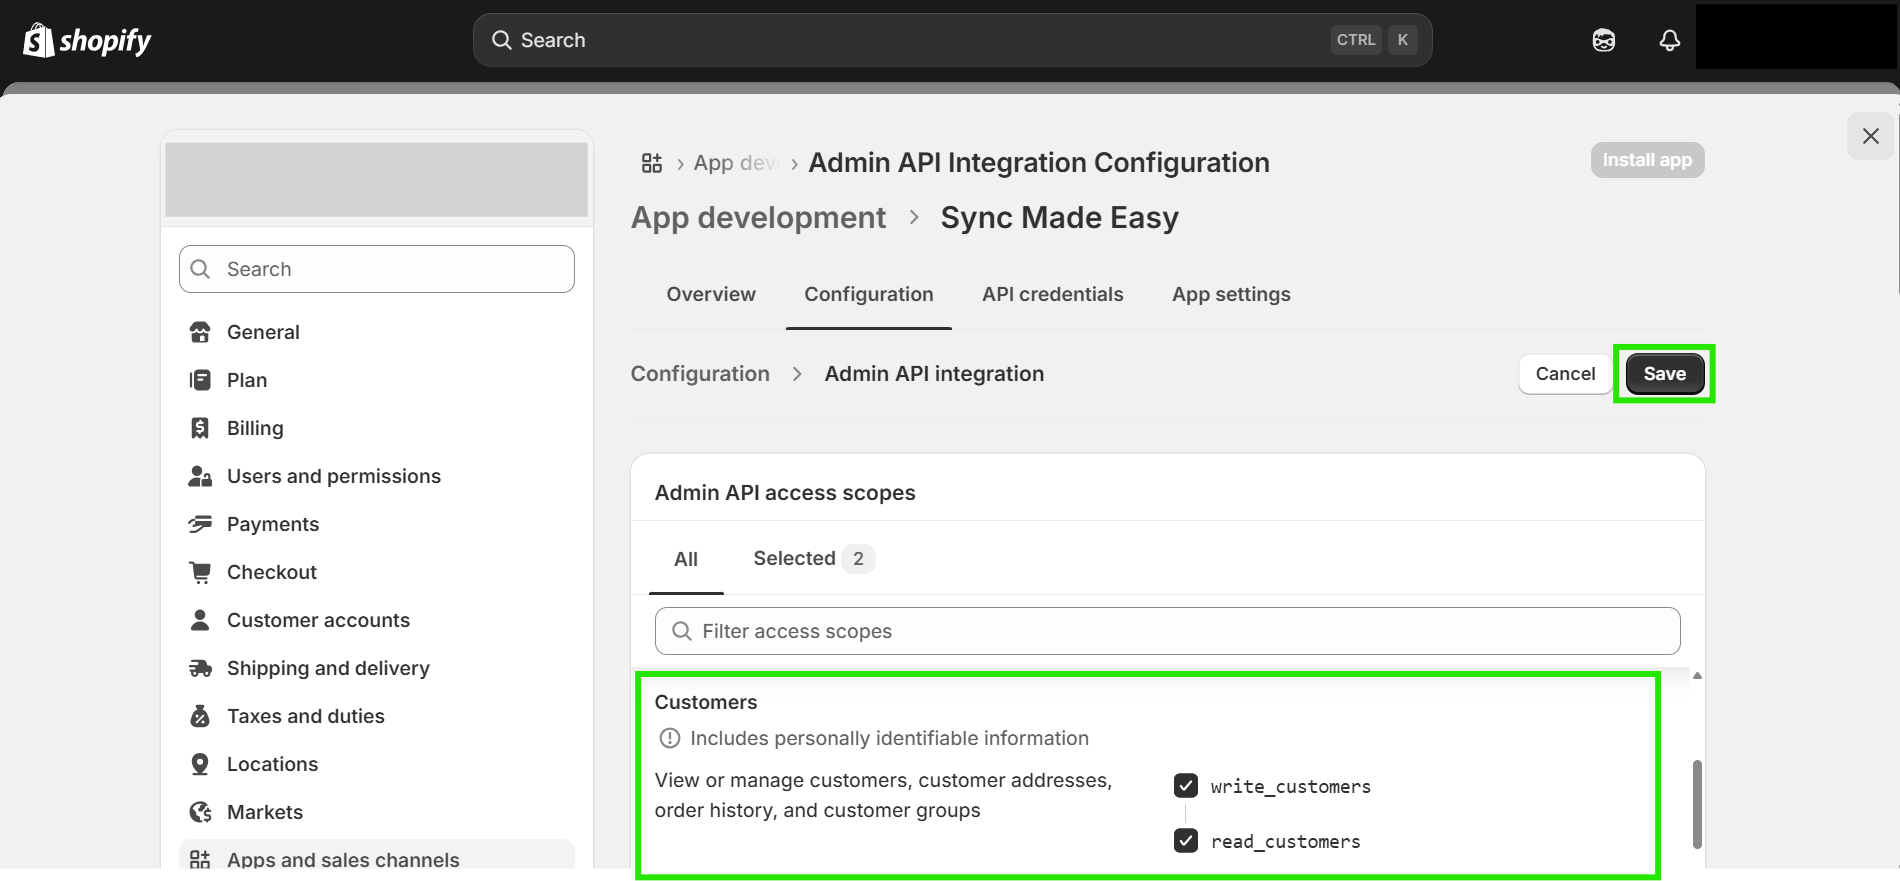
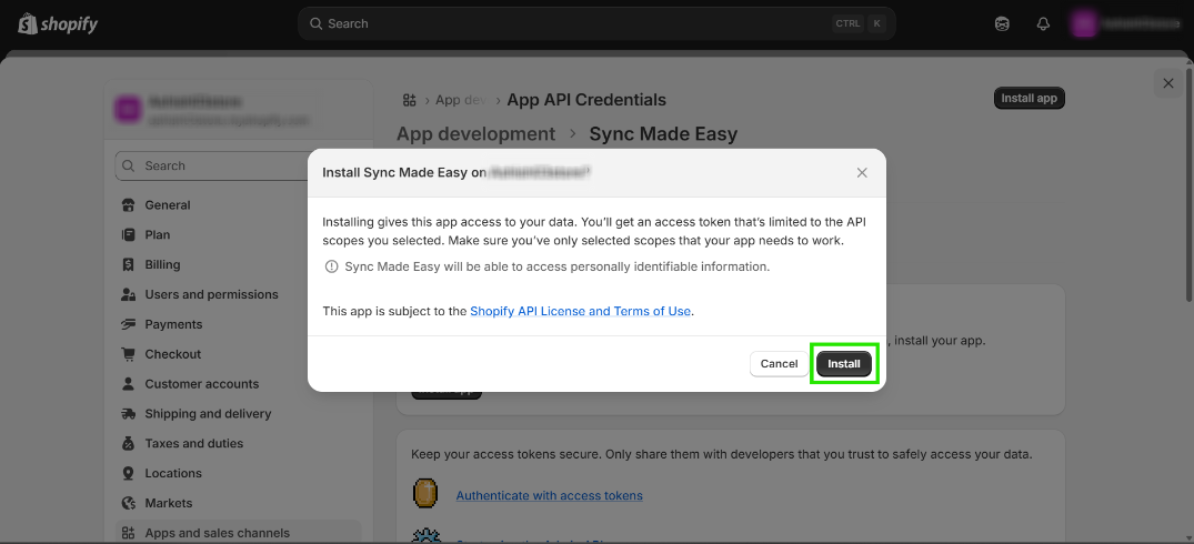
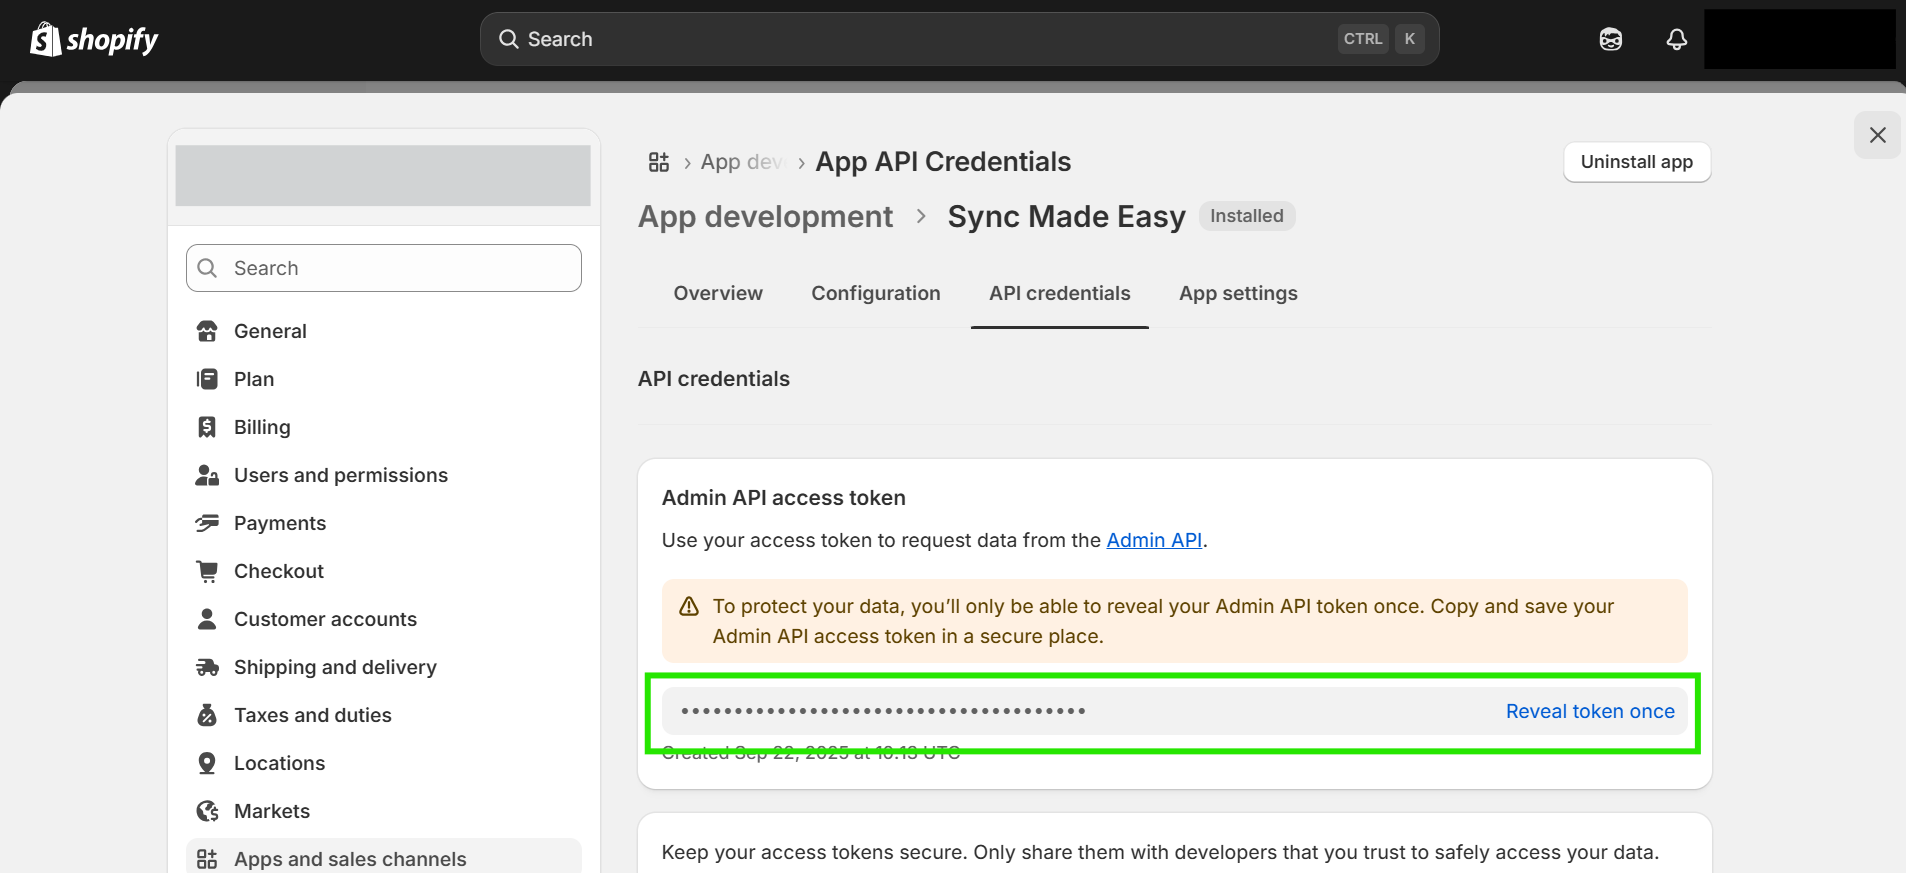
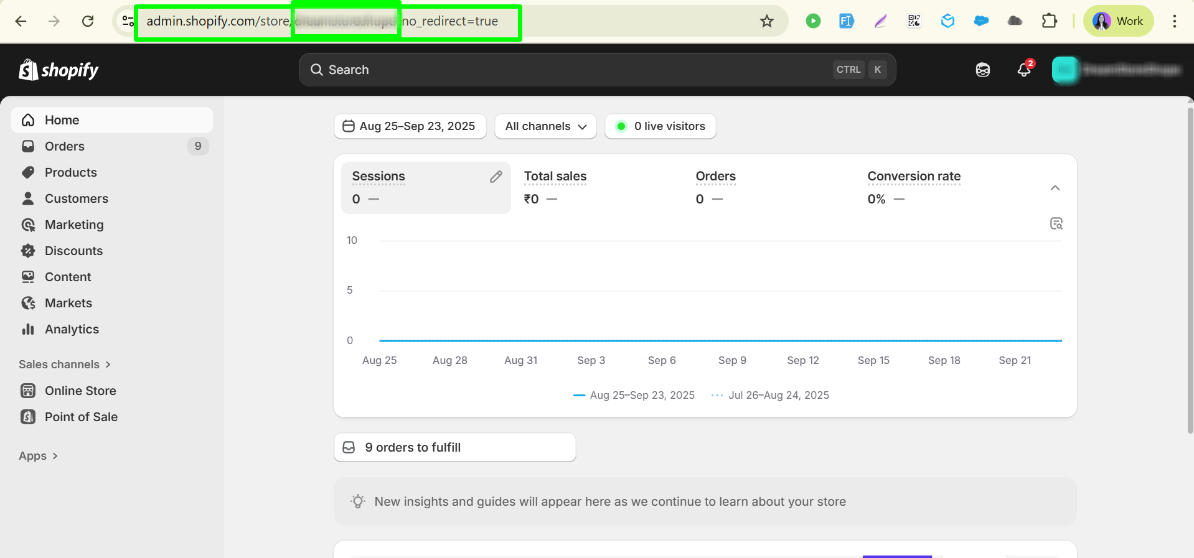
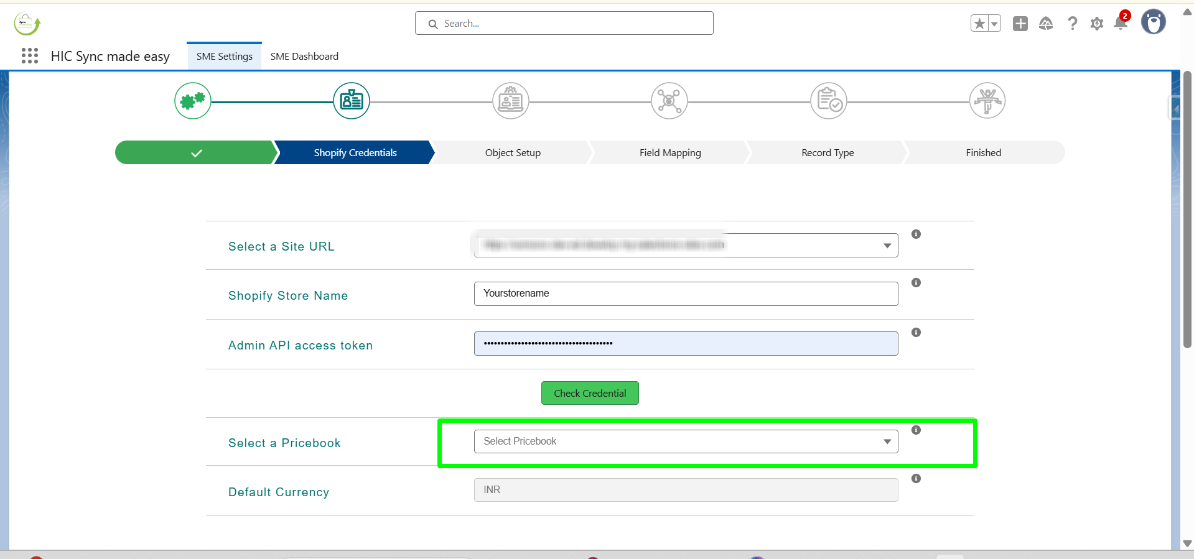
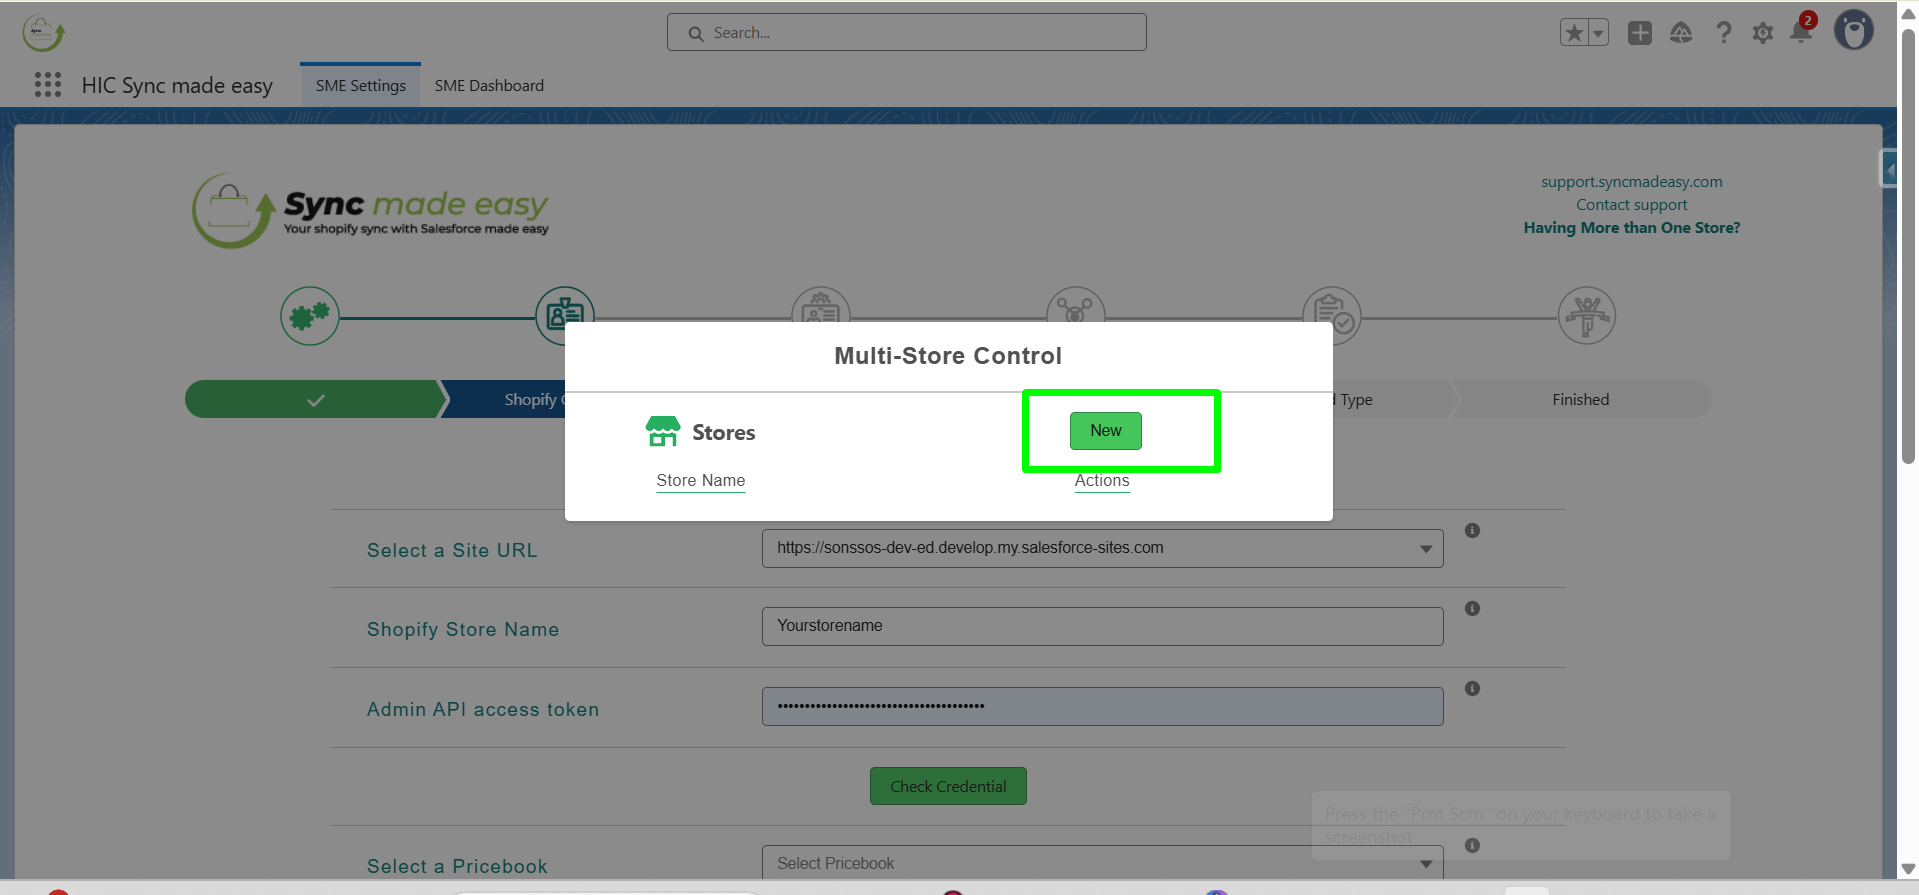
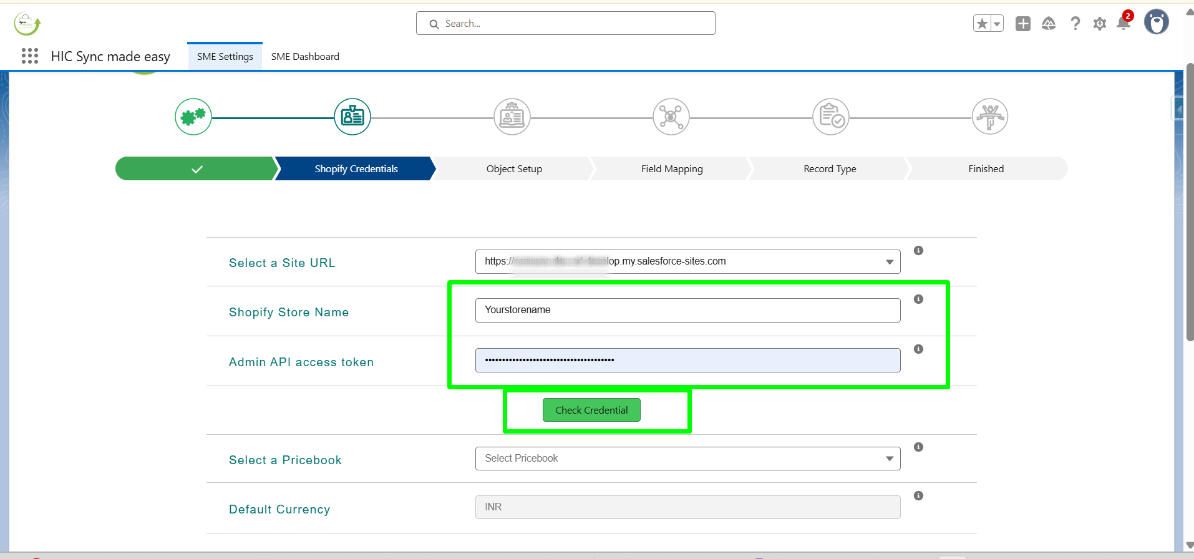
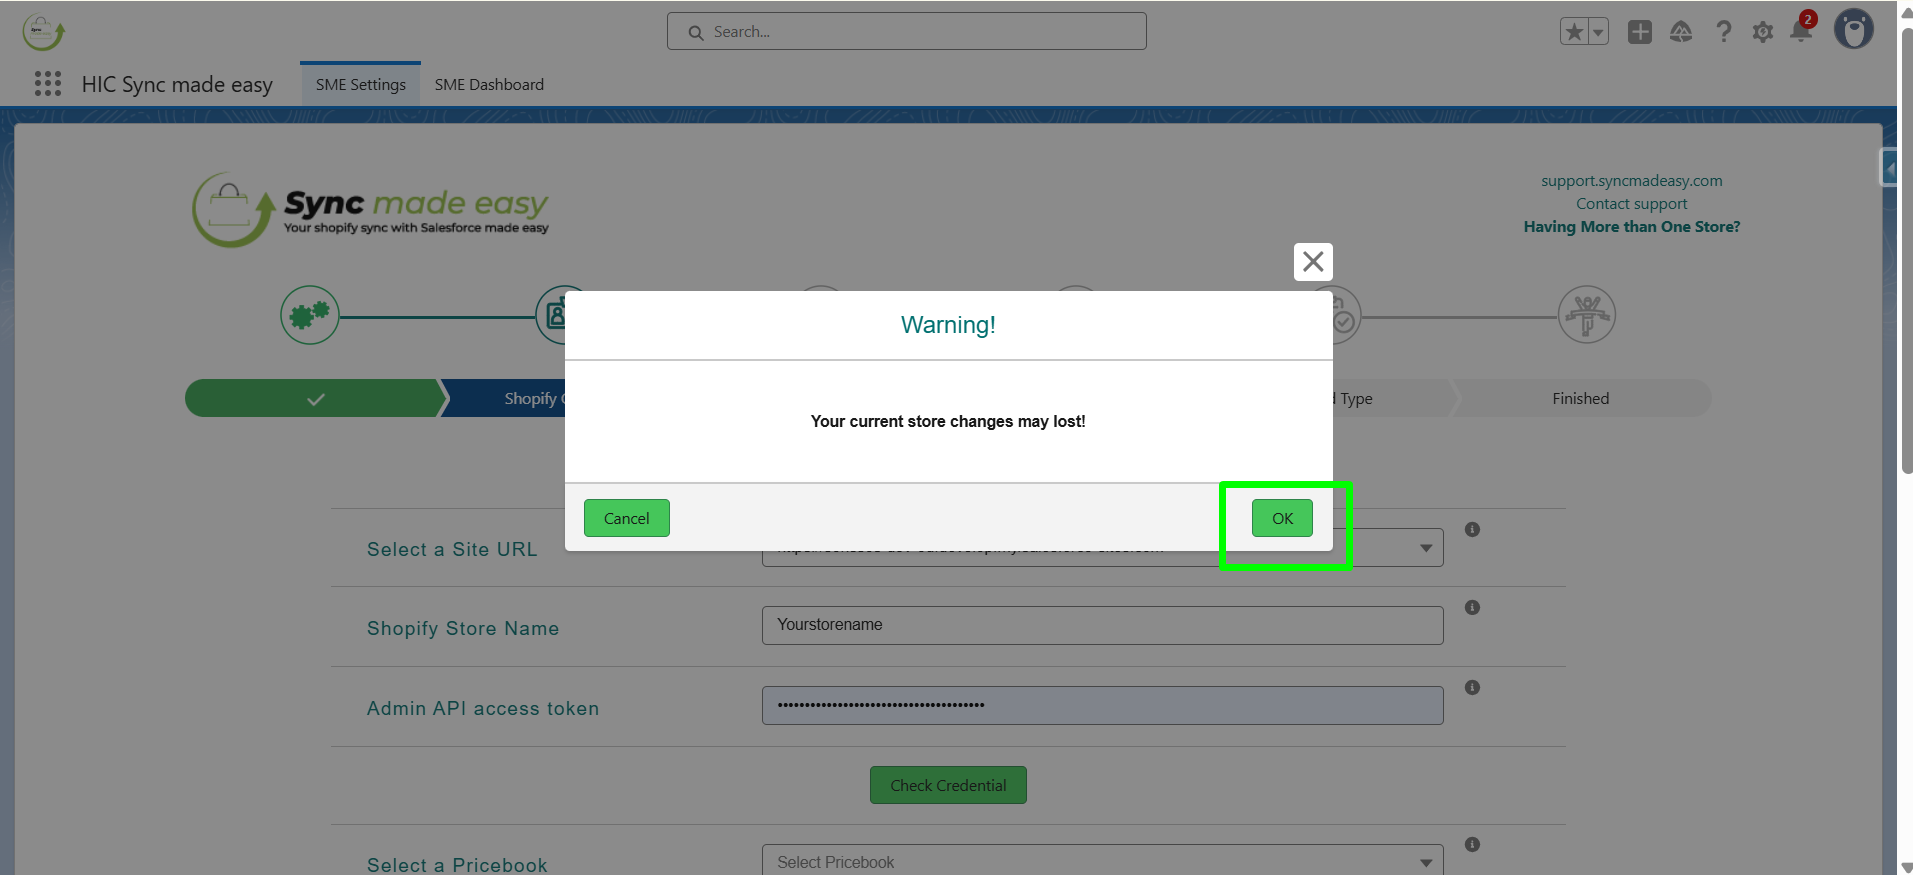
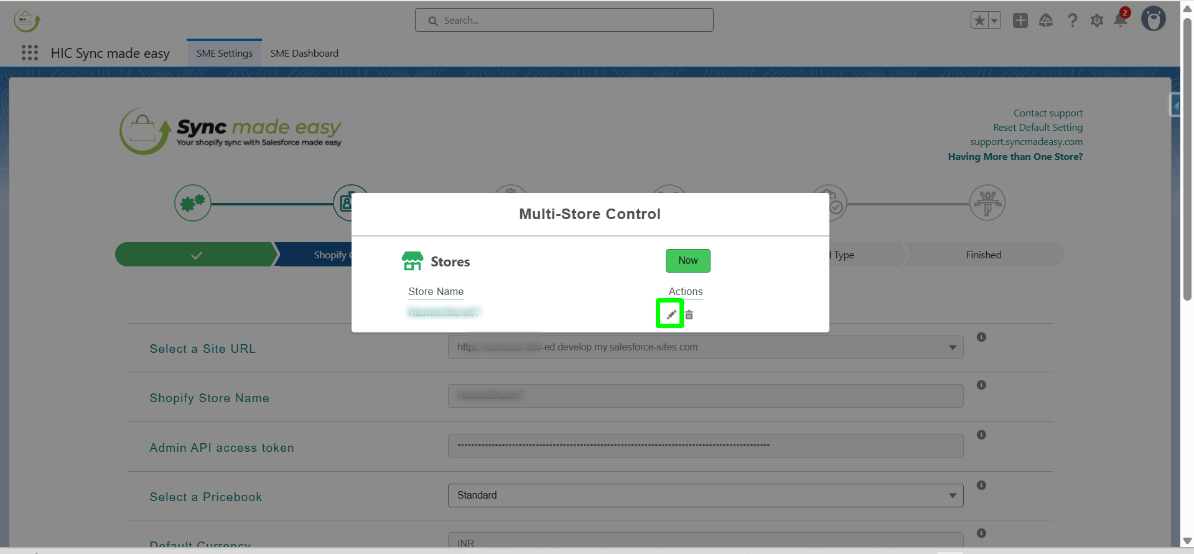
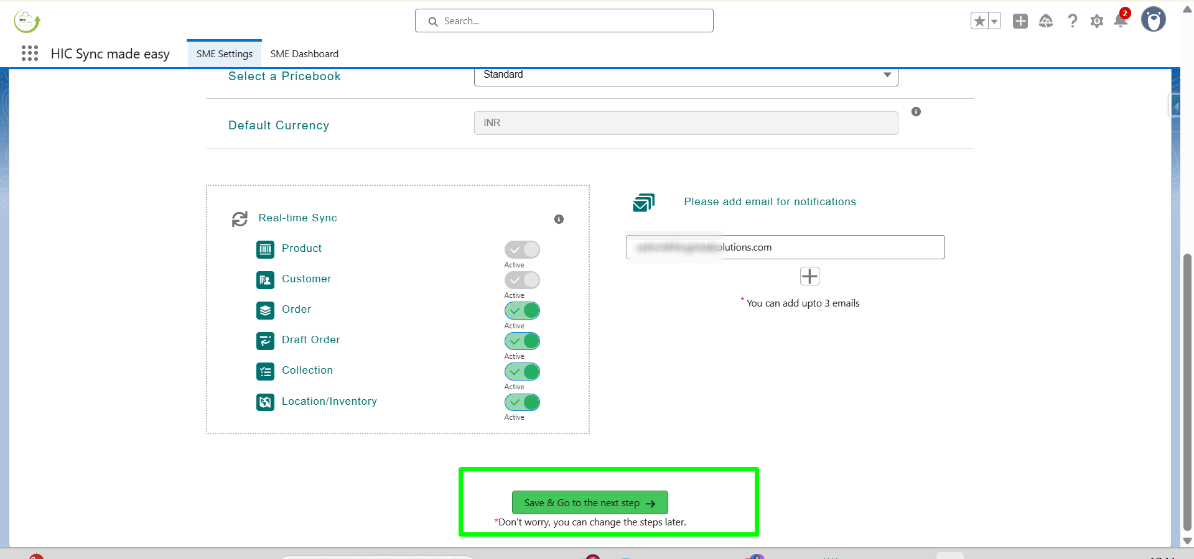
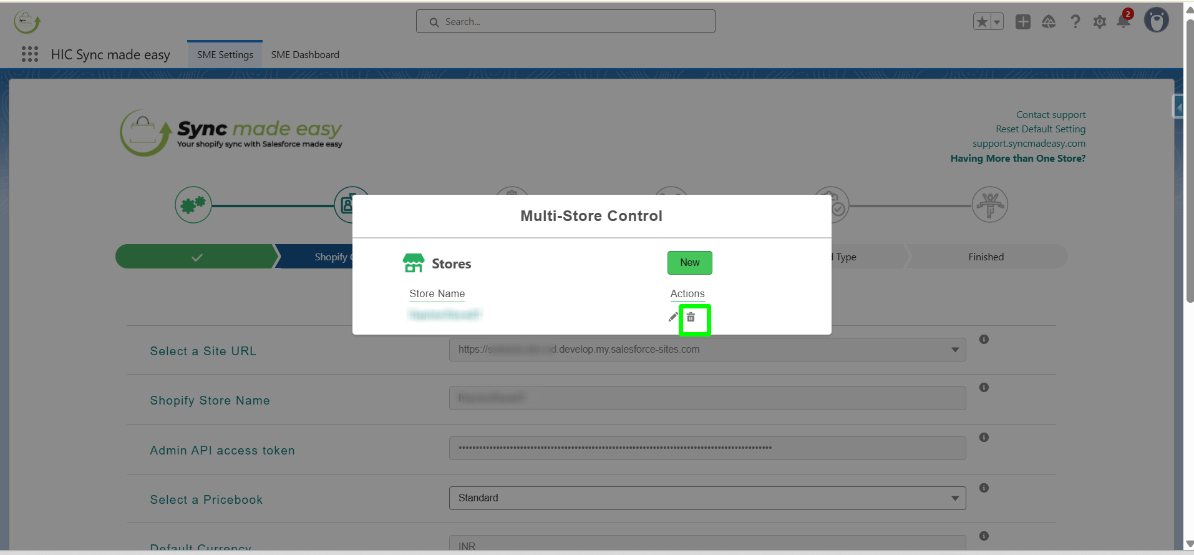
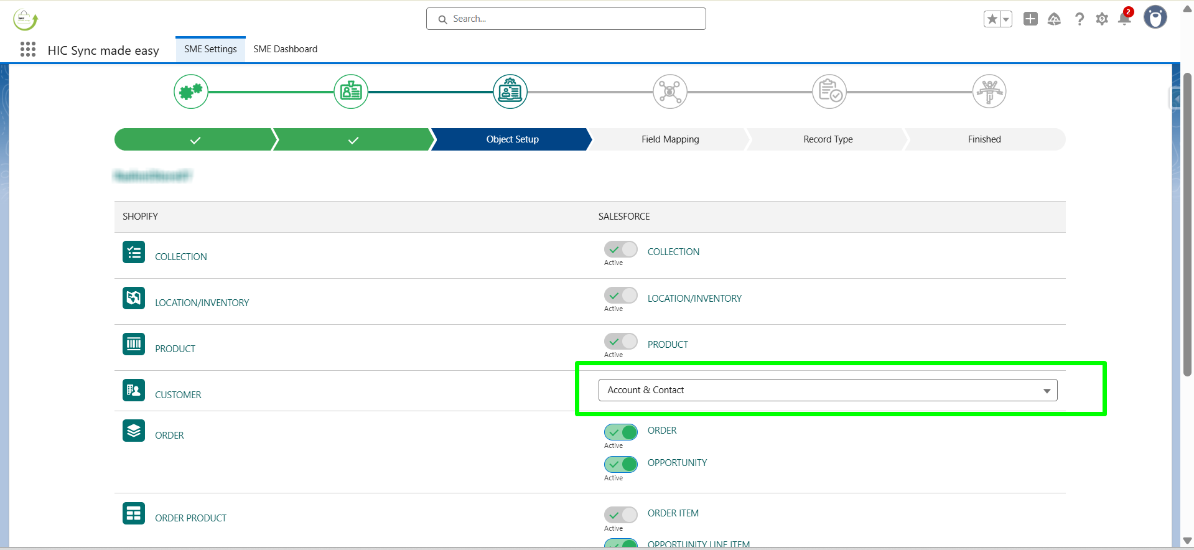
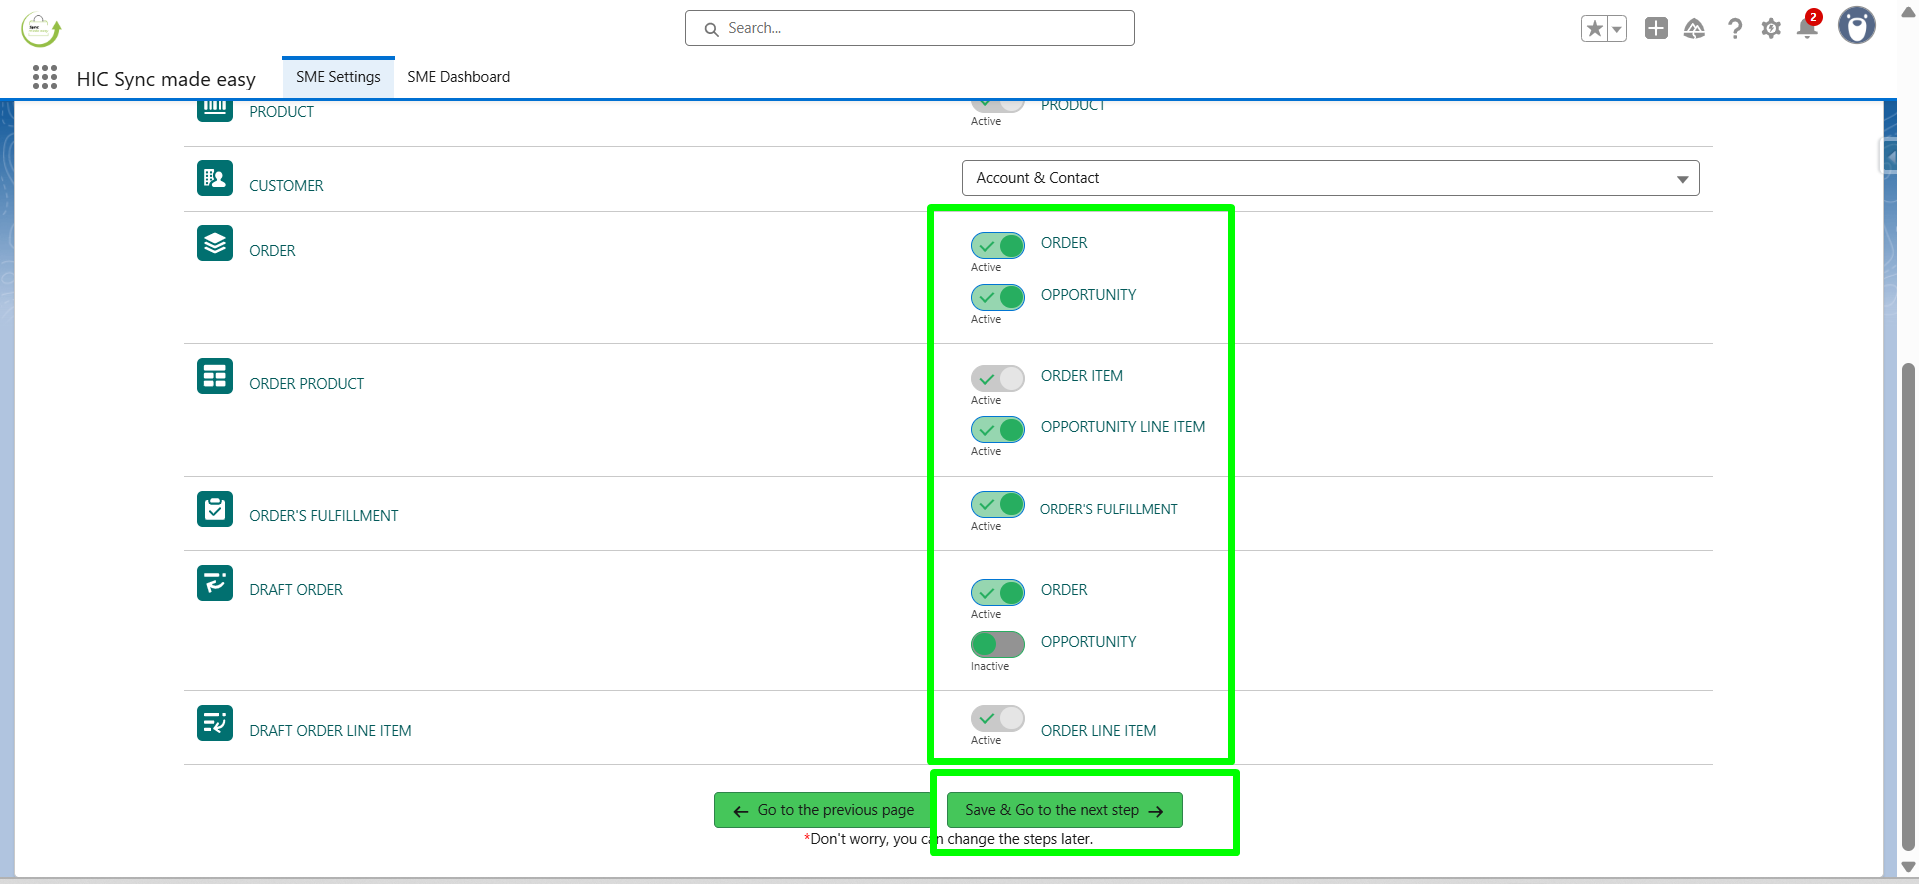
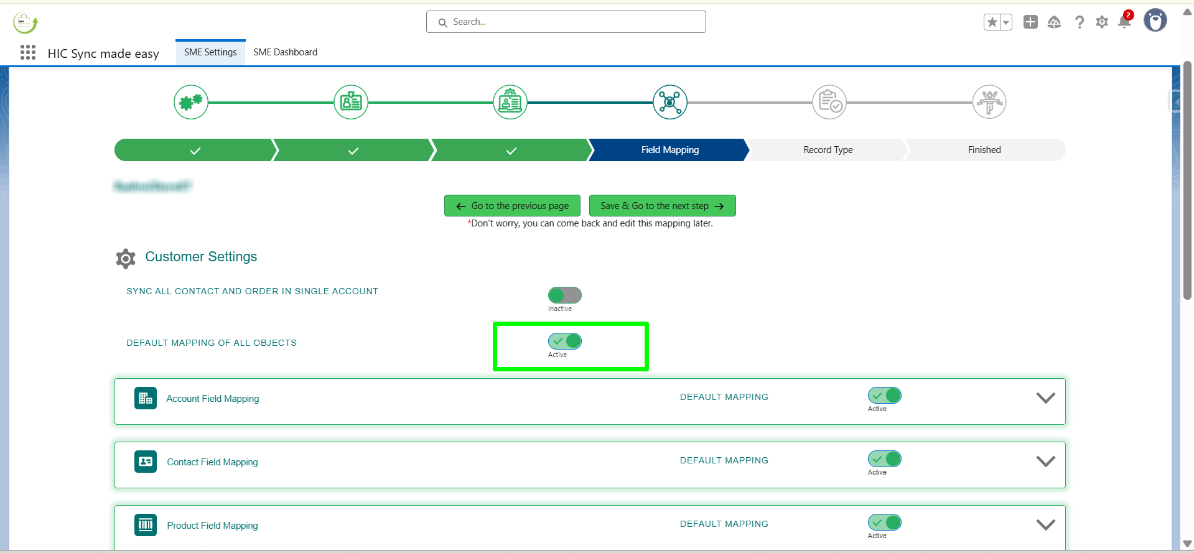
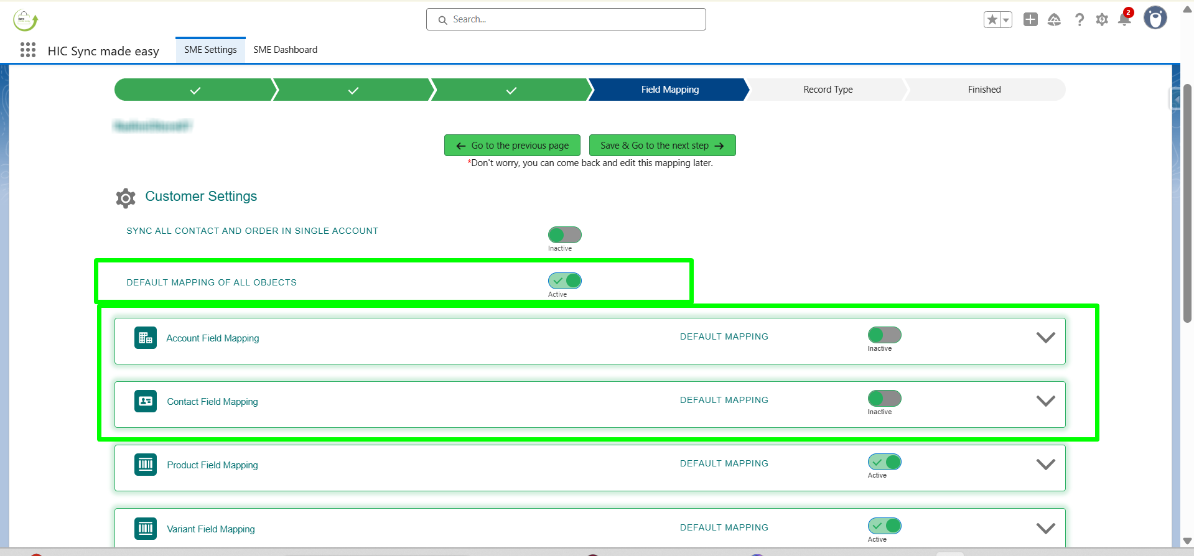
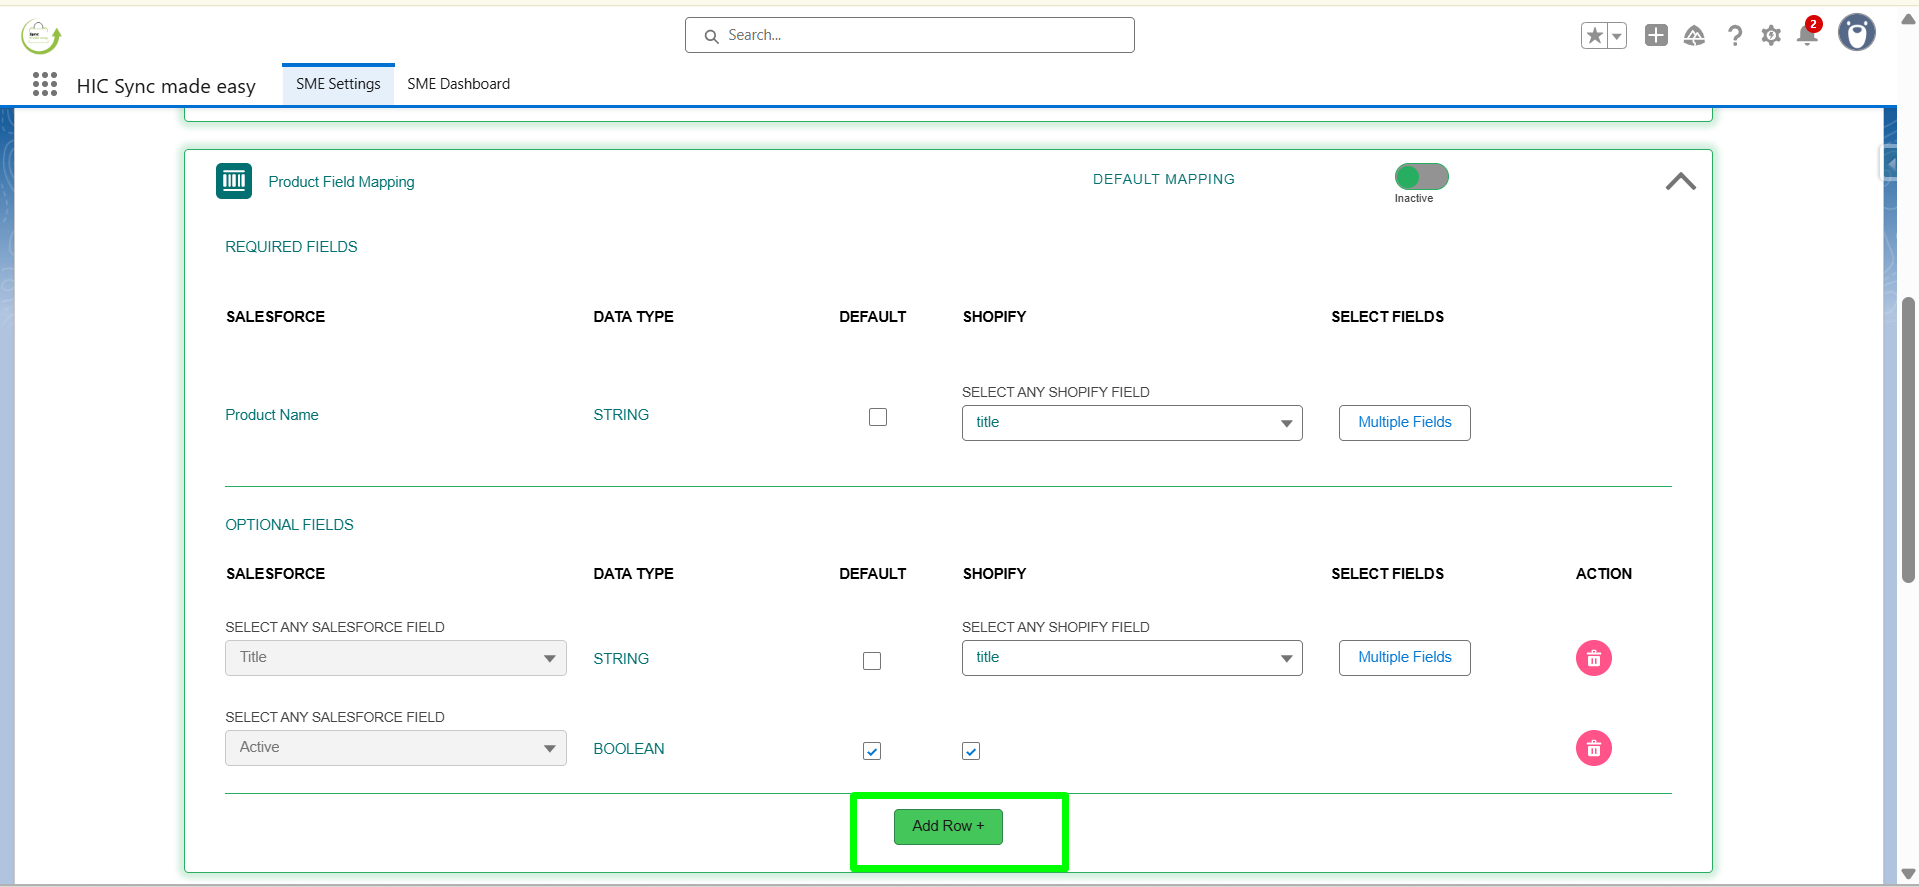
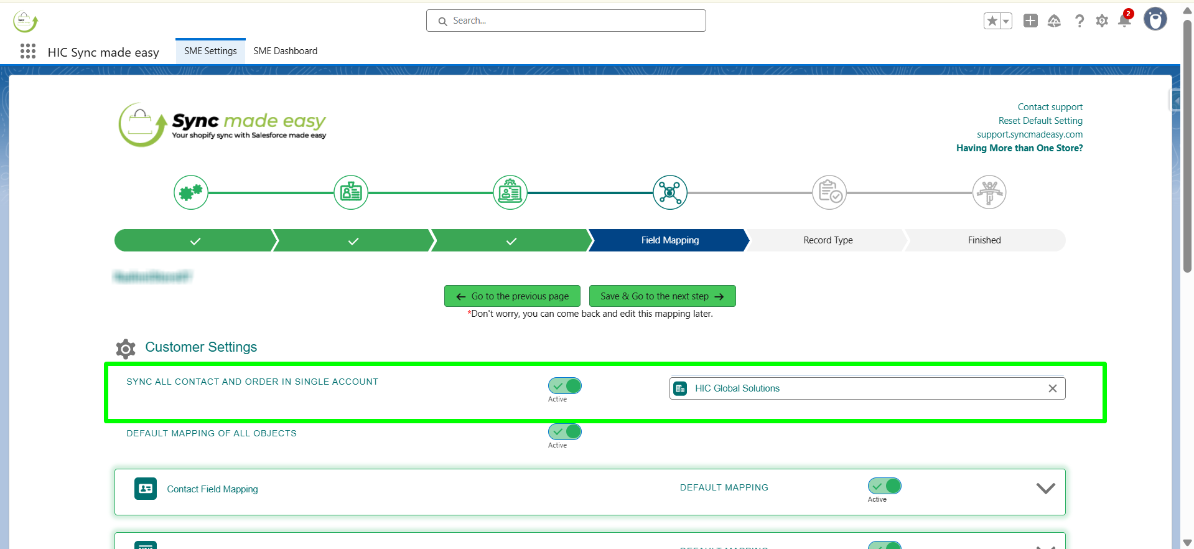
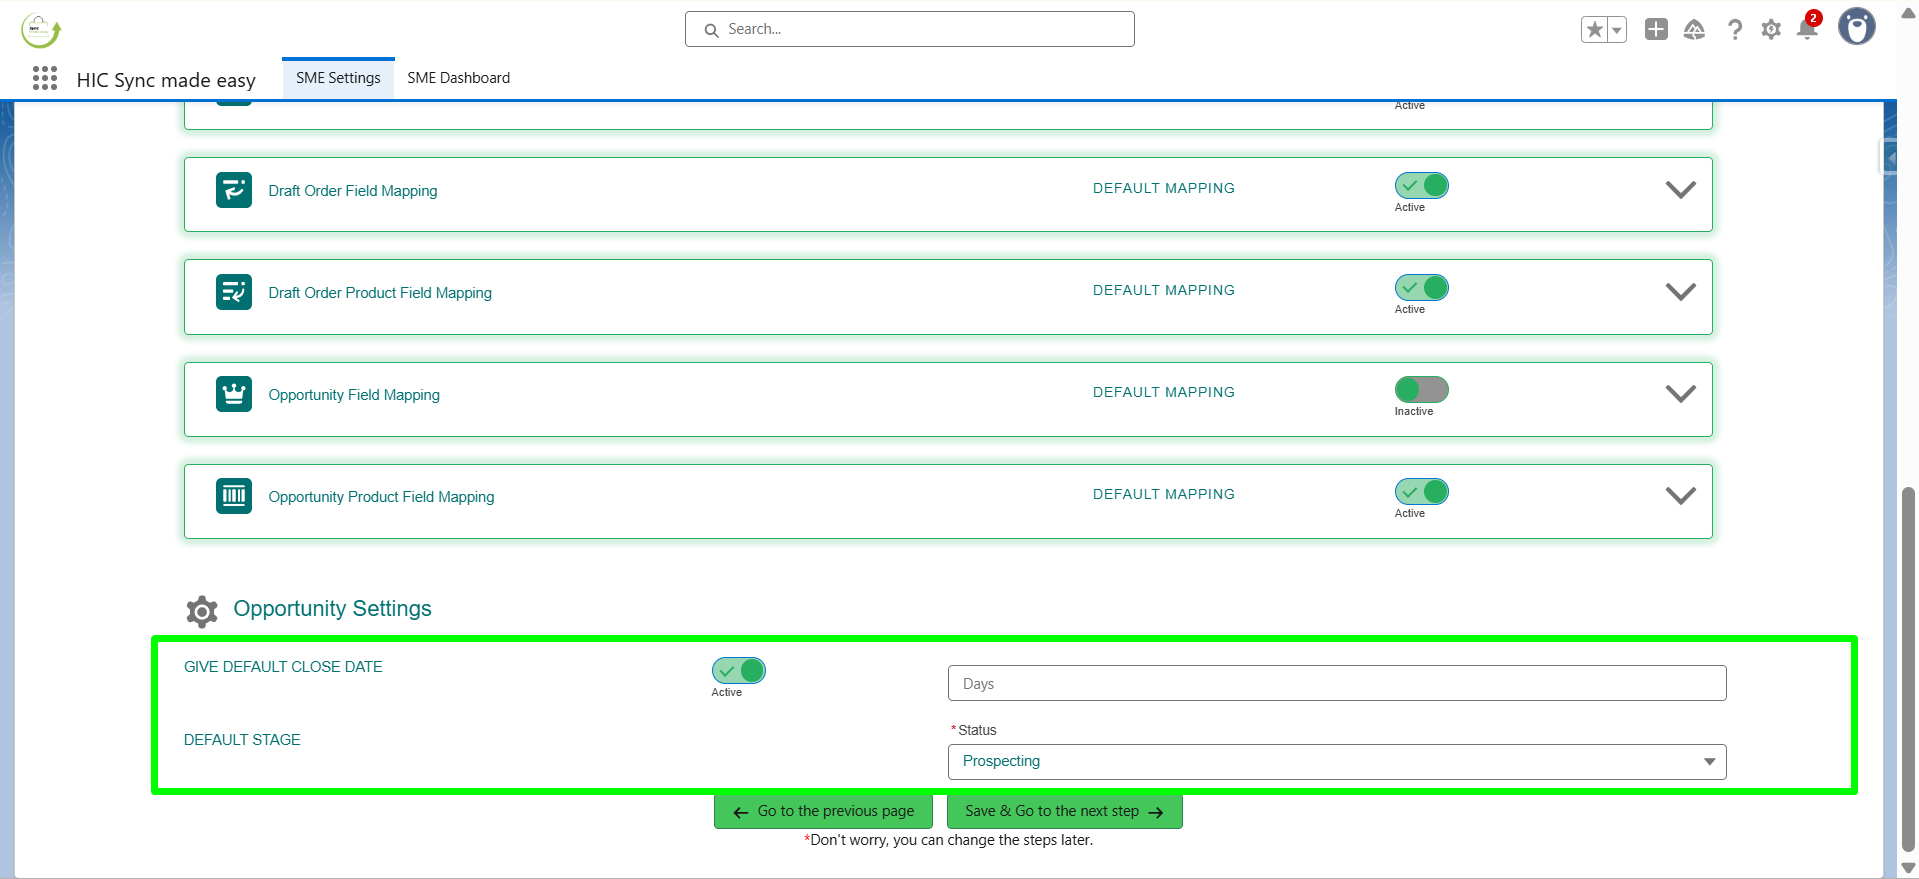
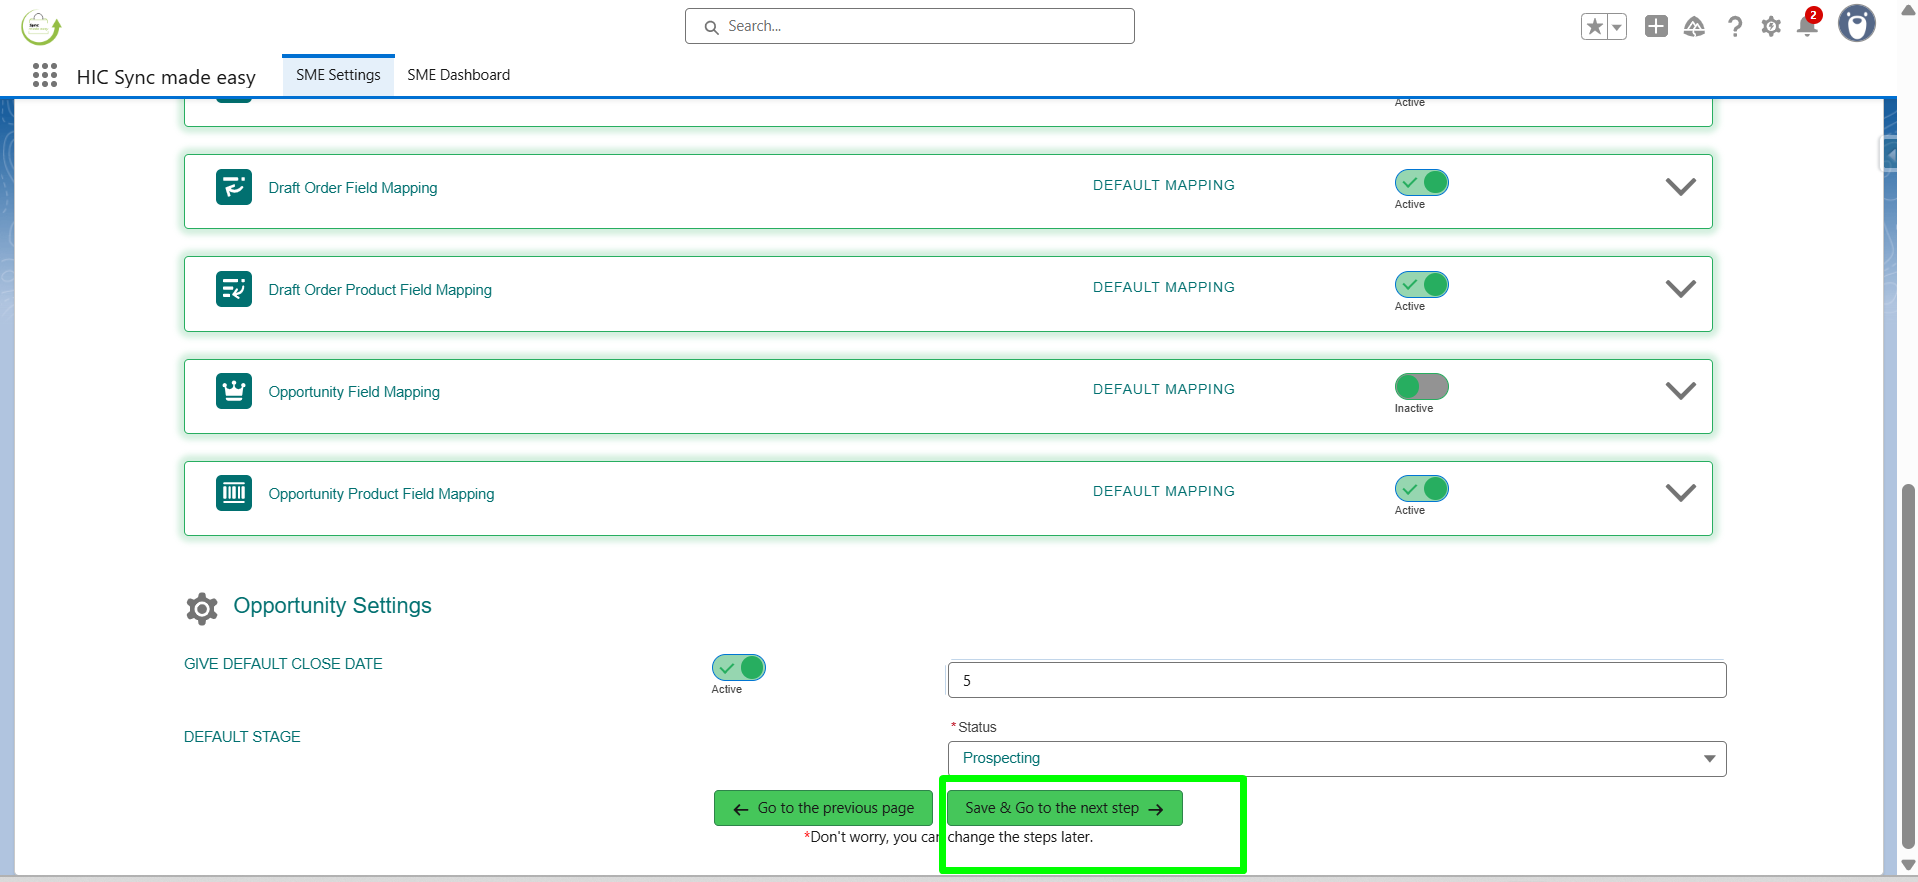
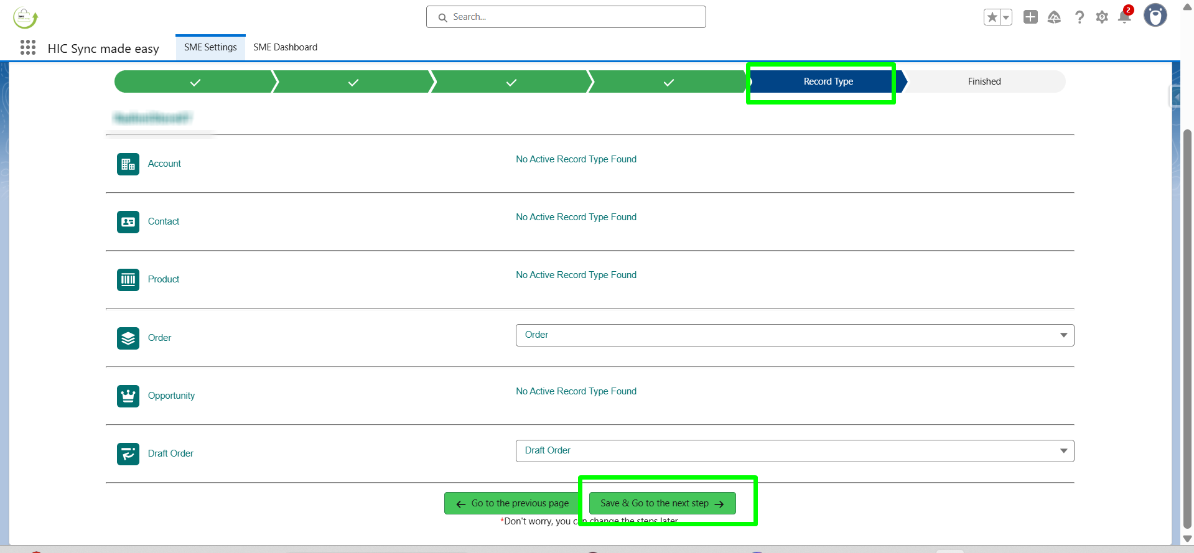
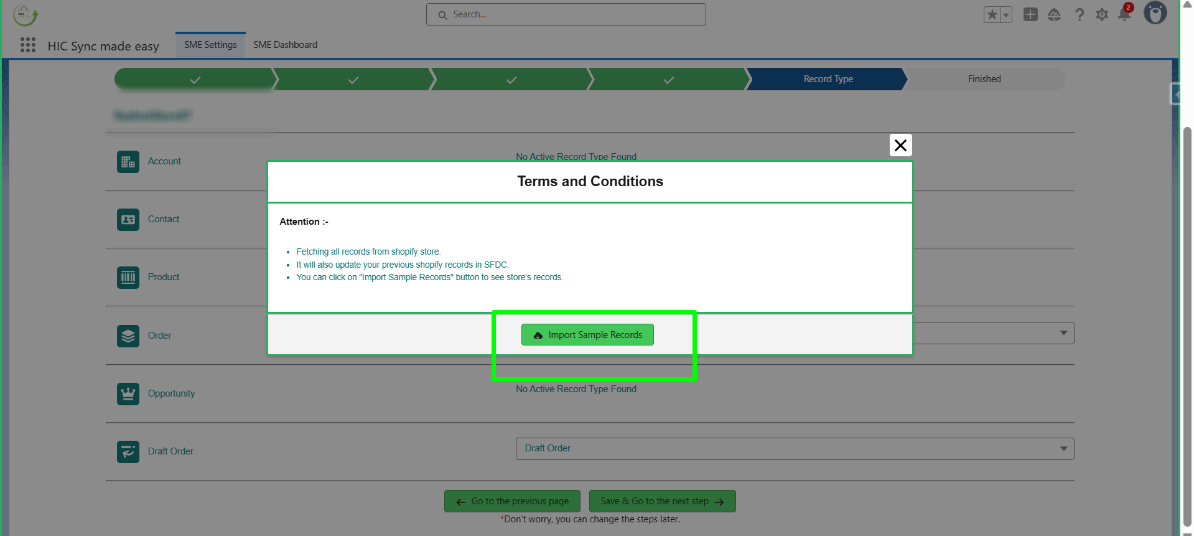
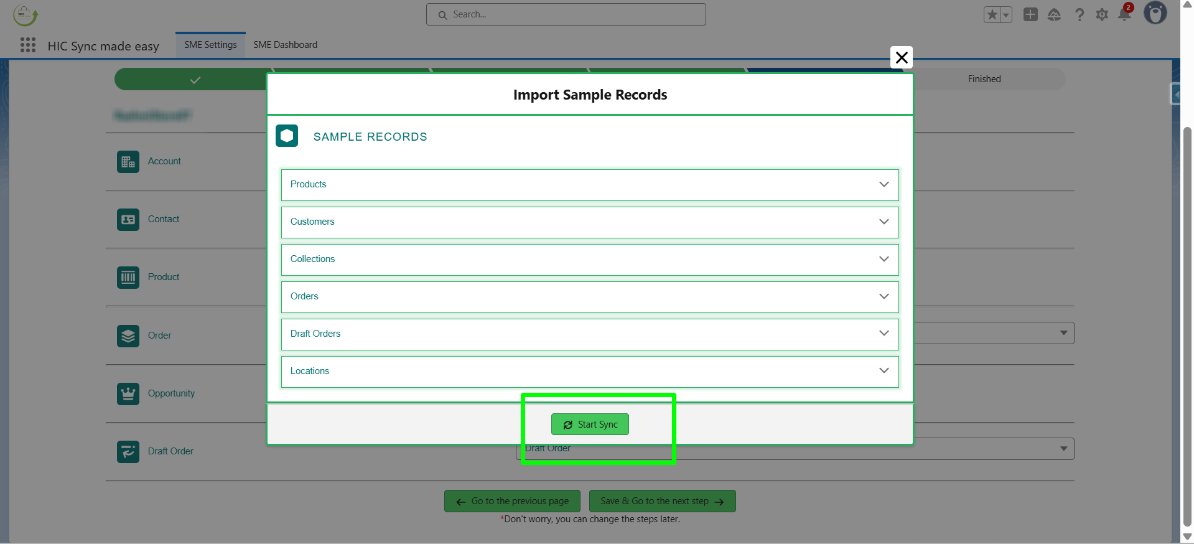
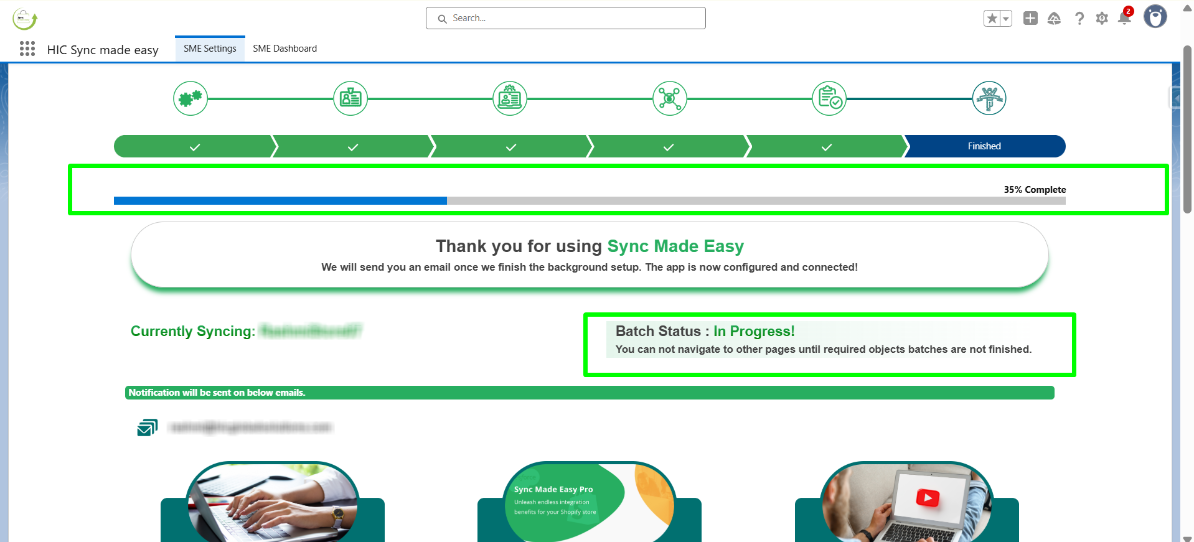
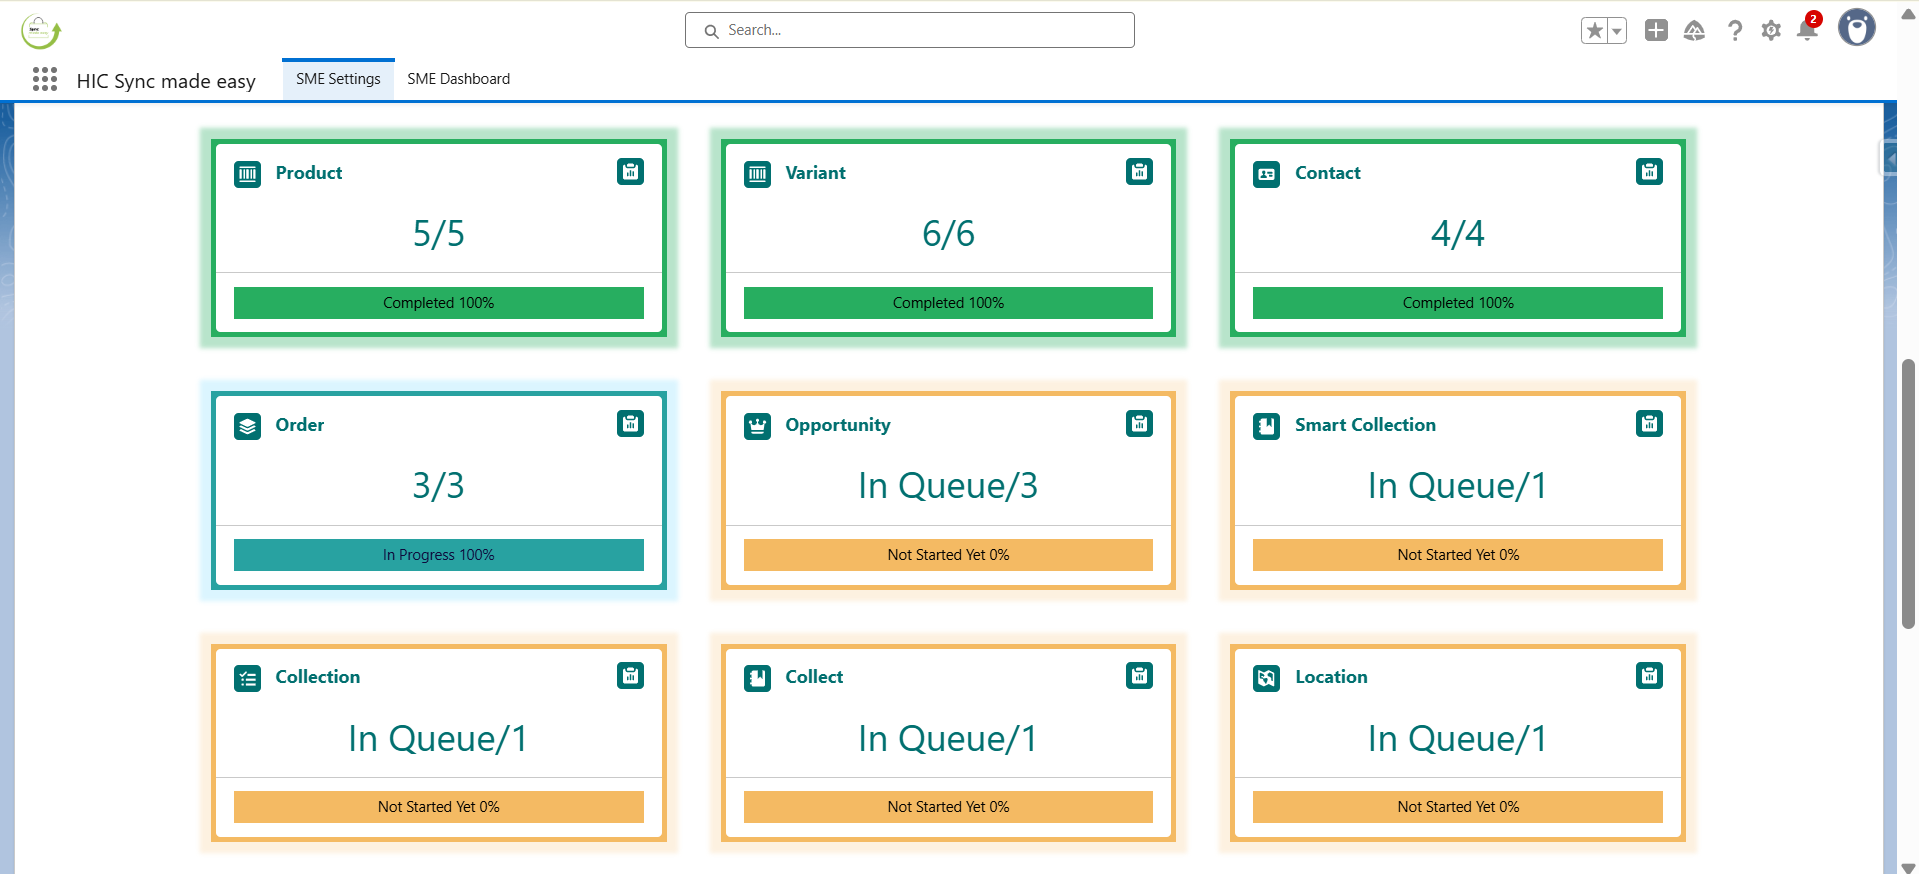
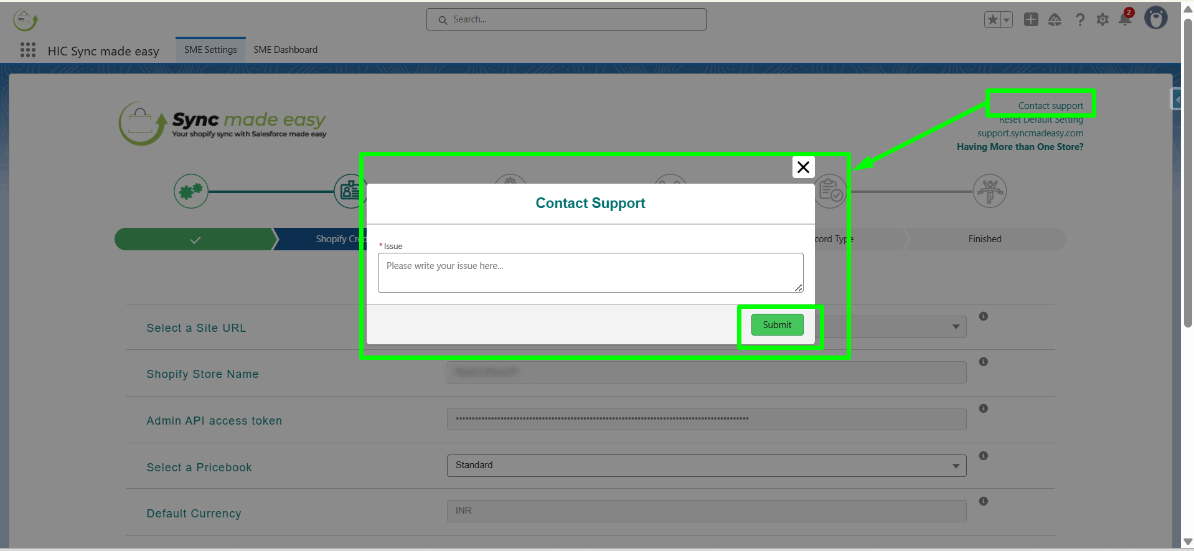
In the next sections of this handbook, we’ll guide you through each important installation step. Please follow them carefully to ensure a smooth and error-free setup.

Installation Setup At the Salesforce Platform

We’ll start the installation by logging into Salesforce.com, where the app has already been downloaded and set up for use.

Search “Sync Made Easy” on AppExchange

  • Visit Salesforce AppExchange and type “Sync Made Easy” in the search bar.
  • Select Sync Made Easy and click on ‘Get It Now’ to install the app.

Note: To install the Sync Made Easy app, you must log in to “Trailblazer.me” using Salesforce account credentials.

  • Alternatively, you can Log into your Salesforce org. > Go to Home as shown in Figure 01.
Figure 01
  • Now, In the Quick Find box, type Installed Packages and then click on it as shown in Figure 02.
Figure 02
  • Visit AppExchange from the slide bar as shown in Figure 03.
Figure 03
  • Now, type Sync Made Easy in the search bar and then click on the “Sync Made Easy” app as shown in Figure 04.
Figure 04
  • Now, click on “Get It Now” as shown in Figure 05.
Figure 05
  • Now, log in to Salesforce AppExchange as shown in Figure 06. 
Figure 06
  • After logging in successfully, you will be prompted to choose where to install the package. We recommend selecting Install in Production as shown in Figure 07. 
Figure 07
  • You will now be redirected to a confirmation web page to confirm installation details. Accept the terms and conditions by checking the box. then Click Confirm and Install to continue as shown in Figure 08. 
Figure 08
  •  Now, You will be redirected to the Salesforce login page. Enter your Salesforce credentials for the org where you want to install the package, and click Login as shown in Figure 09. 
Figure 09
  • Here, “Install for All Users” is chosen by default as we recommend. So, Click on ‘Install’ to complete the installation process as shown in Figure 10.
Figure 10
  • Once the process begins, you will see the message Installing and granting access to all Users… on your screen as shown in Figure 11.
Figure 11
  • The Installation process will take a few minutes. However, You will receive a notification once the installation is over. Then click on Done to finish as shown in Figure 12.

Figure 12
  • After the package is installed, you will be able to view the package at the Installed Packages in Salesforce, where HIC_ShopifySync will be listed as shown in Figure 13.
Figure 13

Prerequisite Salesforce Configurations

  • Now, you’ll need to connect the store and configure the mappings as per your business needs.
  • We will configure the installations in 6 steps. you need to follow them one by one as shown below.
  • From the same page, open the App Launcher, search for HIC Sync Made Easy in the search bar, and click on it as Shown in Figure 14.
Figure 14
  • Next, Go to SME Settings.
  • This brings you to Step 1 of the configuration process.
  • In Step 1, we will 
    • Register your site.
    • Create a Domain URL Remote setting.
    • Create a remote setting.
    • Generate a self-signed certificate.

Step 1: Setup

Creating A Site URL for your Org

  • Once you open the app you will be on the Setup page as shown in Figure 15.
Figure 15
  • We will begin by creating a new site.
  • You may check the status of your site by clicking the Check Status button, as shown in Figure 16.
  • We recommend checking the status after completing every step on the page.
Figure 16
  • Here on this webpage, there are four mandatory tasks to carry out. So, the first one is to create a new active site.      
  • Now, Tap on  “Click here” as shown in Figure 17.
Figure 17
  • This will take you to a webpage as shown in Figure 18. 
  • Here, enter a unique Domain Name for your Salesforce Site.

WARNING: Once you register your Salesforce domain name, it cannot be changed. So, please choose it carefully before moving forward.

  • Check the Checkbox next to I have read and accepted the Salesforce Site’s Terms and Conditions.
  • Then, click Register My Salesforce Site Domain to finish registration.
Figure 18
  • After a while, refreshing the page should display your Salesforce Site Domain Name as shown in Figure 19. Click on “New” to create a new site.
Figure 19
  • From here, you will be taken to The Site Edit Page, where you will need to create Your Site Label and Site Name.
  • Now, on the Site Edit Page, fill in mandatory fields marked in red and tick the checkbox next to ‘Active’ to activate the site as shown in Figure 20.
  • You only need to enter the Site Label and Site Name and do not forget to put a tick on the Active Site Checkbox.
Figure 20
  • Fill in the Active Site Home Page field by opening the lookup next to it, and pick one of the values in the list of Recently Viewed Visual force pages as shown in Figure 21.
  • This populates the rest of the mandatory fields with appropriate values.
Figure 21
  • Now, click Save and finish creating the site.
  • On the following page, you should be able to see the site detail. Click on Public Access Settings as shown in Figure 22.
Figure 22
  • This will bring you to the Profile page.
  • Here, click on “Enabled Apex Class Access” as shown in Figure 23, then click on ‘Edit’.
Figure 23
  • Now, you will be landed on to Enable Apex Class access page.
  • Here, select “HIC_ShopifySync.AuthenticateAllApexClass” then click on ADD as shown in Figure 24.
Figure 24
  • Now, Click on “Save” as shown in Figure 25.
Figure 25

Activate the site created

  • Go to the Setup page of the Salesforce sync Settings page, then click on Check Status as shown in Figure 26.
Figure 26
  • After the site is activated, it’s time to configure your site.

Configure the Site

  
  • From the Setup of the SME settings page, configure your site.
  • You can click on Check Status after completing the authentication required.
  • Now, tap on ‘Click here’ to configure the site as shown in Figure 27.
Figure 27
  • This will take you to the webpage to enter your site as shown in Figure 28.
  • Select your site URL from the dropdown and click on “Success”.
Figure 28
  • After clicking the Success button, you’ll be directed to the Initialize page. Clicking it will automatically create your ‘Authenticate’ and ‘Domain’ URL remote site settings.
  • Click on the initialize button as shown in Figure 29.
 
Figure 29

Warning:- If you have already installed Sync Made Easy, you need to open it and edit the remote site settings so it should not be the same or you need to delete the previous remote site settings.

  • Now the Salesforce Authenticate page is open, scroll down and click on ‘Allow’ as shown in Figure 30.
Figure 30
  • Now you see the initialization page. Once the initialization process is completed, click on the ‘Go to the next steps’ button as shown in Figure 31.
Figure 31

Generate Self-Signed Certificate

  • In this step, we will generate a self-signed certificate with the name “Shopify”.
  • Right from the Create Certificate popup window page, click on the ‘Create Certificate’ button as shown in Figure 32.
Figure 32
  • On the Certificate page click on “Save” as shown in Figure 33.
Figure 33
  • The next page will display the Certificate details as shown in Figure 34.
Figure 34
  • Again, Go back to the sync settings page and click on “Close”, as shown in Figure 35.
Figure 35
  • On the setup page, click on the ‘Check status’ as shown in Figure 36. Once you click on the check status it will take you to the next page and you have completed your setup.
Figure 36

Step 2: Shopify Credentials Retrieving Shopify Access Token

  • Here onwards, Step 2 begins, which is the Shopify Credentials page.
  • In Step 2, you will need the Shopify Store Name and API Access token, as shown in Figure 37.
Figure 37

Shopify Store Name and Shopify Access Token

  • To retrieve the Shopify Store Name and Access Token:
  • Open another tab, go to https://www.shopify.com/, and log in using your store credentials.
  • After logging in, you will be on the homepage of your store. From the same page, go toApps” as shown in Figure 38. 
Figure 38
  • You should be now on the Apps page. Search for “Apps and sales channel settings” in the search bar & click on it, as shown in Figure 39.
Figure 39
  • Once you are on this page, click on Develop apps as shown in Figure 40.
Figure 40
  • You should be now on the App Development page. Now click on “Allow Custom app development” as shown in Figure 41.
Figure 41
  • On the next page, again click on ‘Allow Custom App Development’ as shown in Figure 42.
Figure 42
  • Once on the App Development page, click on “Create an App” as shown in Figure 43.
Figure 43
  • On the next page, you will need to name the app. The app developer’s email address is populated by default. Fill in the app’s name and click on “Create App” as shown in Figure 44 for reference.
Figure 44
  • Your app will be created successfully, now you have to give access to what your app can access from your store. Go to “Configuration”. as shown in Figure 45.
Figure 45
  • Then, click “Configure” as shown in Figure 46.
Figure 46
  • Now, on the Configuration page, you need to permit the below objects and then click on Save as shown in Figure 47.
  • Product
  • Draft Order
  • Customer
  • Location
  • Order
  • Inventory
Figure 47
  • After you have saved your app configuration, scroll up and Go to API Credentials. To access your API access token, you will need to install the app. Click on “Install app” as shown in Figure 48. 
Figure 48
  • Once the confirmation window appears, click on “Install” to complete the app installation as shown in Figure 49.
Figure 49
  • After the app is installed, you can view your Admin Shopify Access Token.

Note: Shopify access Token key can be viewed only once after revealing the token. Ensure to copy the Token key and save it in a secure place for later use.

  • To retrieve the Shopify Admin API and Access Token, click on ‘Reveal Token Once’ as shown in Figure 50.
Figure 50
  • To get the Name of your Store, from the homepage Copy the Store name from the URL as shown in Figure 51.
Figure 51
  • Now, back to the Shopify Credentials page(step 2), and enter your Shopify Store Name.  
  • Insert the Shopify Access Token in the next field & Click on “Check Credential” as shown below in Figure 52.
Figure 52
  • Next, Select the Price book. If you have created any custom price book in your org then it will show here, Otherwise select “Standard” as shown below in Figure 53.
Figure 53
  • For Multicurrency, you can choose any currency you want. If you have enabled the multicurrency in your org, then it will show all the currency you have created here. However, if you haven’t enabled it then it will show you the currency of your ORG (location) as Default Currency as shown in Figure 54.
Figure 54
  • Now, scrolling down on the same page, the real-time sync section is displayed.   
  • In this step, “Product” and “Customer” are default on as its required for sync process, but if you want to adjust the sync of other objects you can do that by turning On/Off the toggle button anytime you want. as shown below in Figure 55.
Figure 55
  • Select Email ID. You can provide more than one email ID by clicking the “+” button or you can remove the added Email Id by Clicking on Trash button and clicking Save and Go to Next Step as shown in Figure 56. This completes step 2, and you should be now on step 3.
Figure 56

Multi-store sync functionality

  • For syncing more than one Shopify store from this interface, click on “Having more than one store” in the right corner of the webpage.
  • Choose your desired store from the Multi-Control store panel to start mapping as shown in Figures 57, and 58 for multiple store synchronization.
Figure 57
Figure 58

Adding, Editing, and Deleting multiple stores

  • To add a new store to your Salesforce org, Click on Having More than one store. Now, from the multi-store control panel, click on “New” as shown in Figure 59.
Figure 59
  • You will be redirected to the Shopify credentials page where you have to insert the new Store name and Shopify access token and click on ‘Check credential’ as shown in Figure 60.
Figure 60
  • Go back to www.Shopify.com and log in using your store credentials. Now, follow the same process as mentioned in section 5.1 and retrieve your Shopify access token. As mentioned above, the access token once revealed can’t be accessed again. So, make sure to copy the token and keep it securely for later use.
  • Now back on the credentials page, insert the new store Name and access token in their respective fields. Scroll down and click on Save & Go to Next Step” as shown in Figure 61 for reference.
Figure 61
  • The new store is now added.

Step 1 - Editing the Store

  • To modify the store, click on ‘Having more than one store’ and then select Ok on the warning dialogue box as shown in Figure 62.
Figure 62
  • Now, on the multi-store control panel, select the store you want to edit and click on the edit button. See Figure 63.
Figure 63
  • You will be redirected to the Shopify credentials page, and you can modify fields as you want and then click on Save & go to Next Page to save your changes as shown in Figure 64.
Figure 64
  • Likewise, to delete a store, simply go to the multi-store control panel, select the store you want to delete, and click on the trash icon next to it as shown in Figure 65.
Figure 65

Step 3 - Object Setup

  • On this page, you can view what Salesforce object is mapped with your Shopify objects.
  • You can also select “Person Account” or “Business Account” as shown in Figure 66.
Figure 66
  • If you don’t want to create an “Opportunity” of orders or “Opportunity Line Item” or “Order Fulfillment”, you can turn off the toggle button of these objects. If you want to use full functionality, you can go with our default settings. Now Click on Save and Go to the Next Step as shown in Figure 67.
Figure 67

Step 4 - Field Mapping

  • On the Field Mapping page, you can choose to use the default Field Mapping. Click on ‘Save and go to Next Step’ as in Figure 68.
  • Sync Made Easy comes with default field mapping that you can always use. 
  • But if you want to customize the mapping, you can also do that by turning off the toggle button.
Figure 68
  • For Custom mapping, you can turn off the toggle button for all the objects or just turn off the toggle button of the object in which you want to add your custom mapping as shown in Figure No. 69.
Figure 69
  • Now, if you want to add a few more fields, you need to open the object scroll down to the Add row option, and click on it. Refer to Figure 70.
Figure 70
  • You can also “SYNC ALL CONTACTS/ORDER IN SINGLE ACCOUNT” by enabling the toggle button of “SYNC ALL CONTACTS AND ORDER IN SINGLE ACCOUNT” and giving the name of the account you want to sync all your contacts/order, as shown in Figure 71.
Figure 71
Field Mapping: Final step of field mapping

You can also give all your opportunities a “Default Date” and “Default Stage” by scrolling down to the bottom of the page to “Opportunity Settings” when you turn off the toggle button of Opportunity Field Mapping. Enable the toggle button and give the number of days you want, and you can also select the stage by clicking on the stage as shown in Figure 72.

Figure 72
  • Click Save and Go to the Next Step, as in Figure 73.
Figure 73

Step 5 - Record Type

Here, whatever record type you select, the Record will be created by the respective record type only as shown in Figure 74.

Figure 74

After completing all the configuration steps, when you click on the “Save & Go to Next Page” you will reach the final step of the setup.

Here, you will have the option to sync your legacy records in Salesforce. After completing this, you will see the “Terms & Conditions” popup window from where you can click on the “Import Sample Records” button as shown in Figure 75.


Note: You can sync legacy records and proceed with the process, or else, you can simply start using the app with the real-time syncing feature.

Figure 75

Now the Import Sample Records popup window is opened, click on “Start Sync” as shown in Figure 76.

Figure 76

Step 6 - Finished

After you click on “Start Sync” the legacy data sync will get started, and you can see the progress of your sync in Figure 77 and 78.

Figure 77
Figure 78

Support

For further assistance or installation-related queries, click on Contact Support at the top right of each page to submit an issue as shown in Figure 79, Or reach out to us at support@syncmadeasy.com.

Figure 79

Learn More : How to install and setup the Pro

Click Here

Need Help with Sync Made Easy
Implementation ?

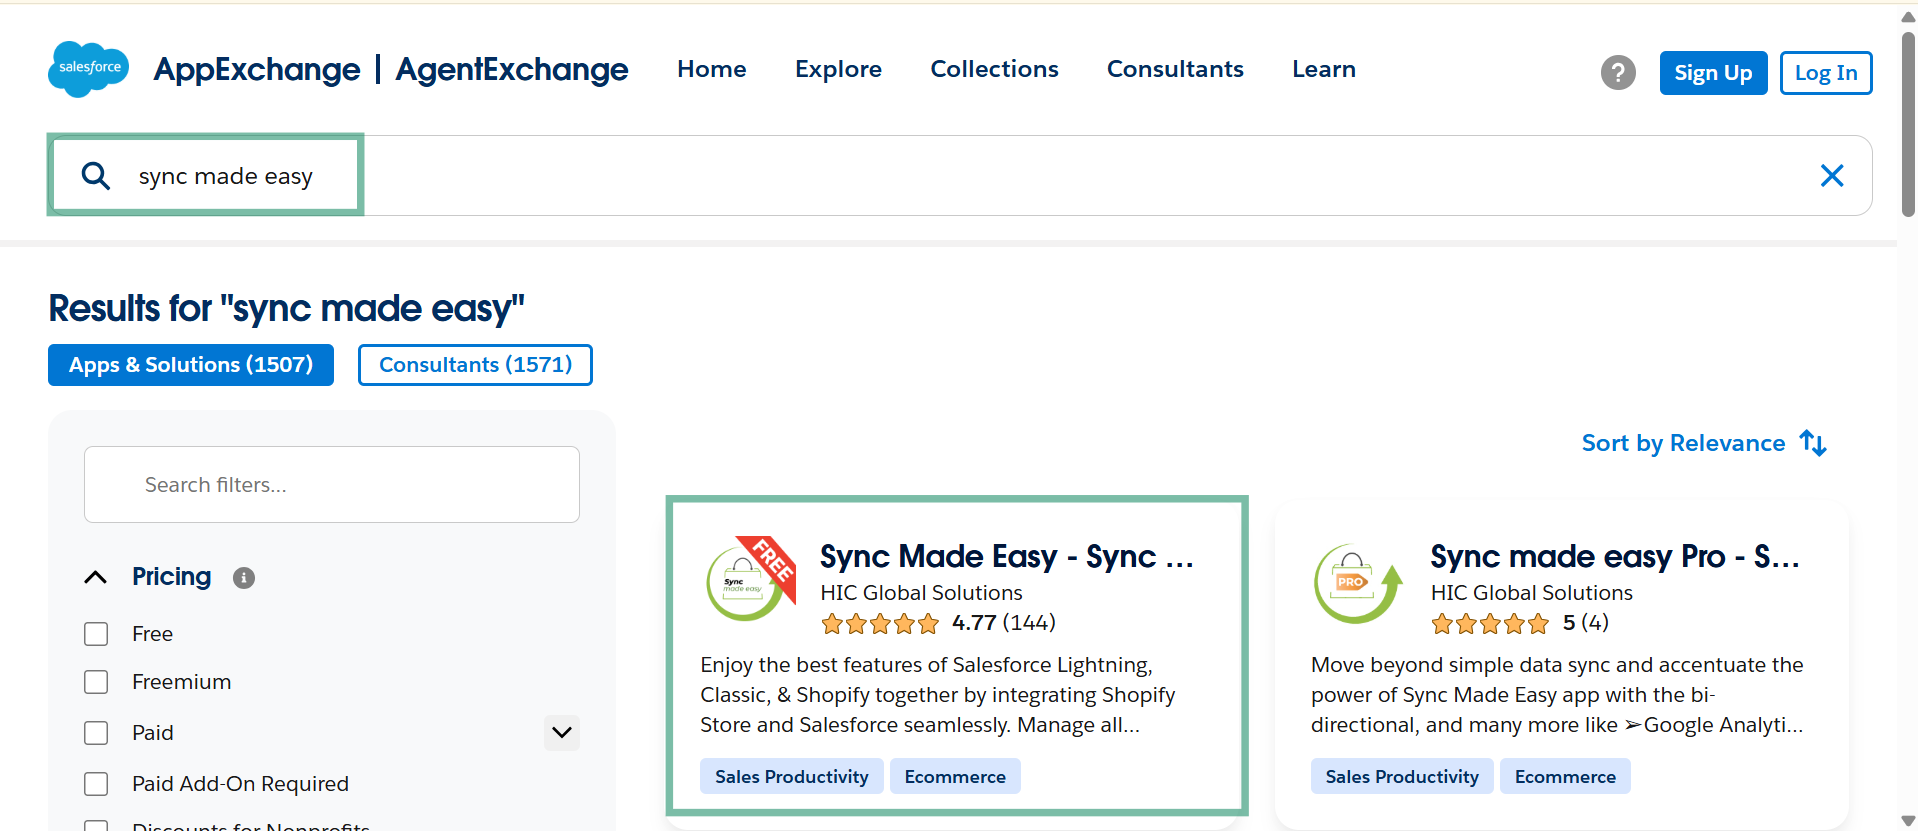
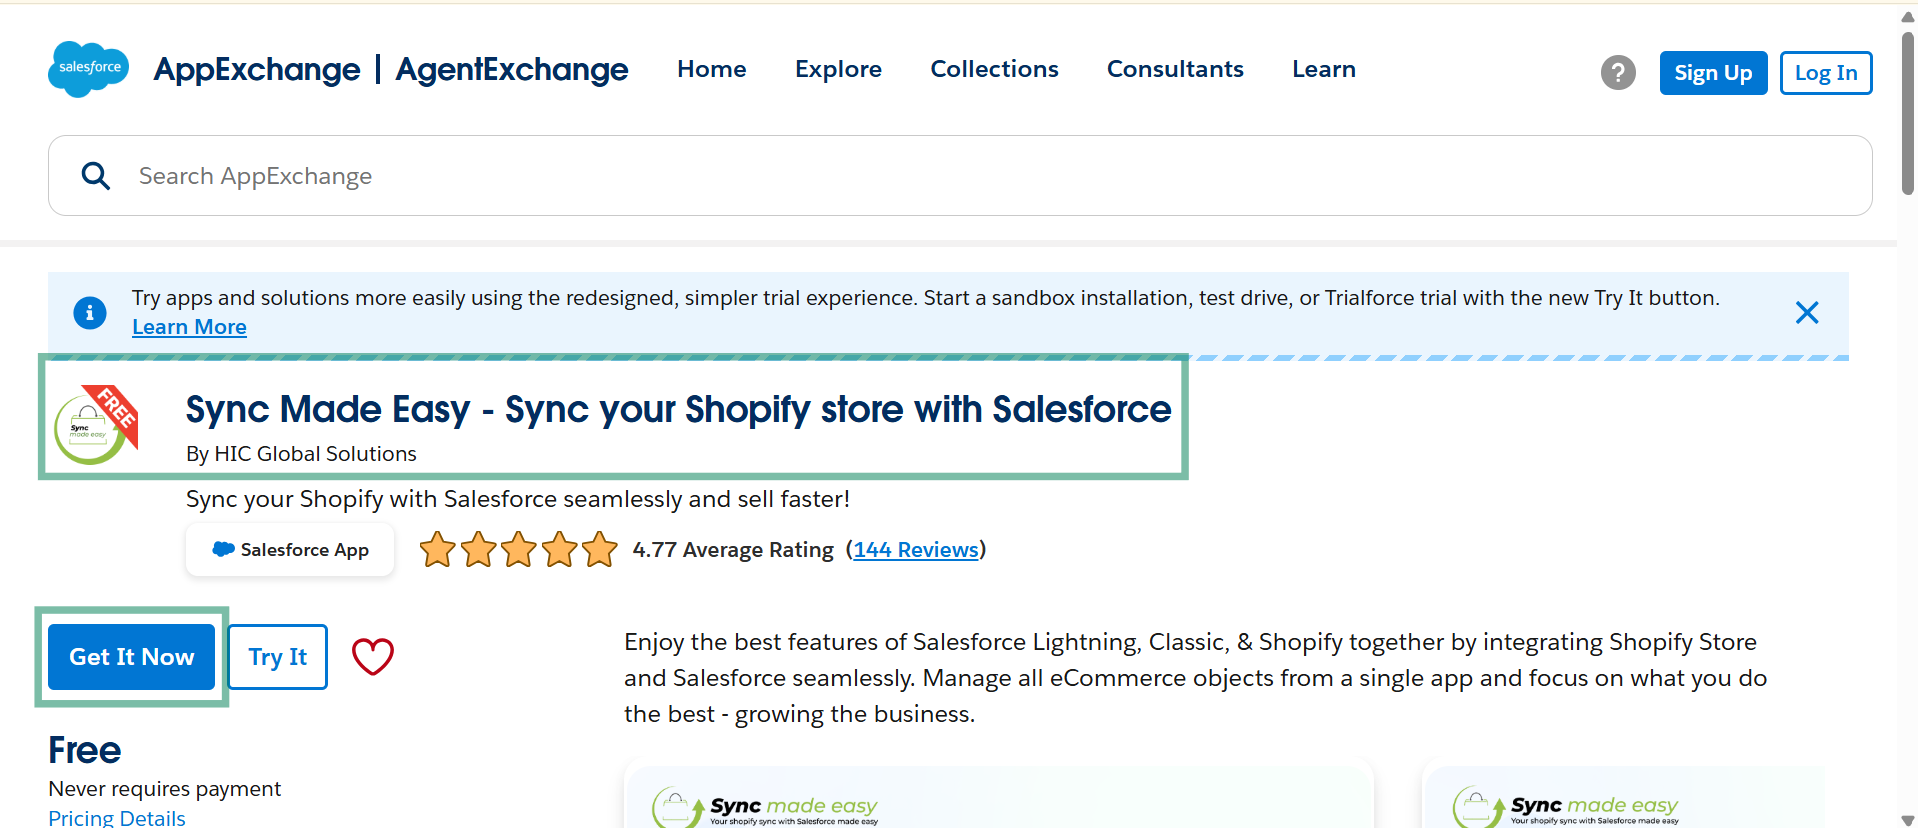
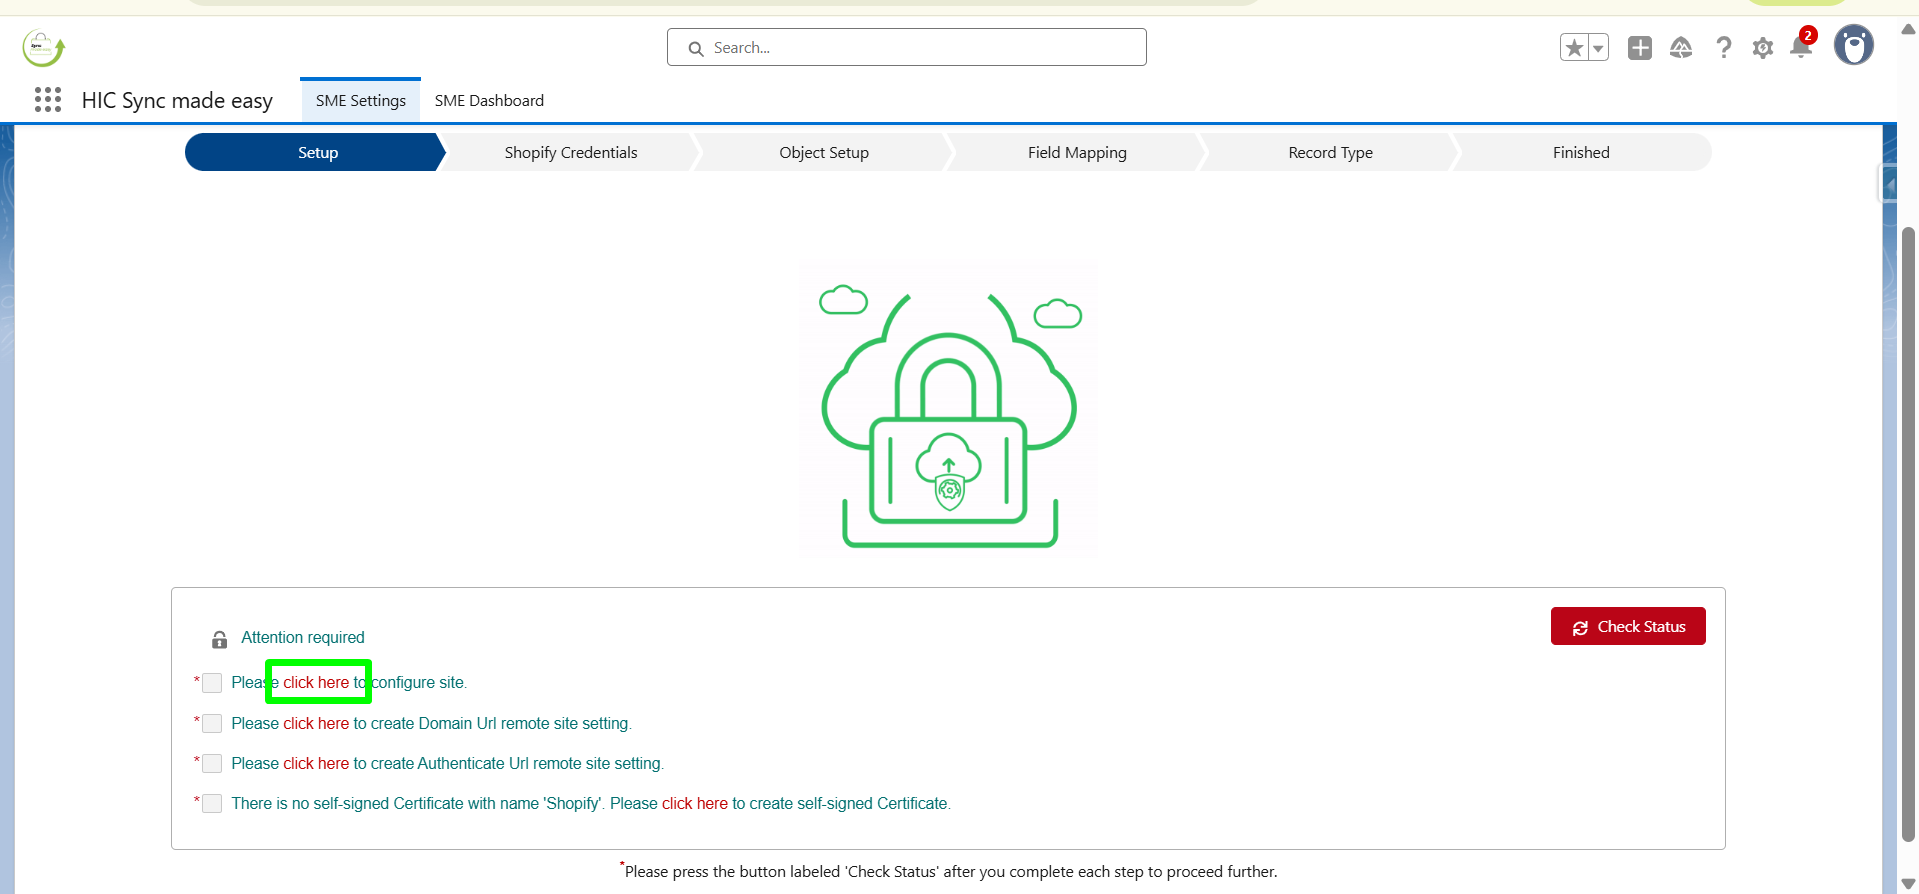
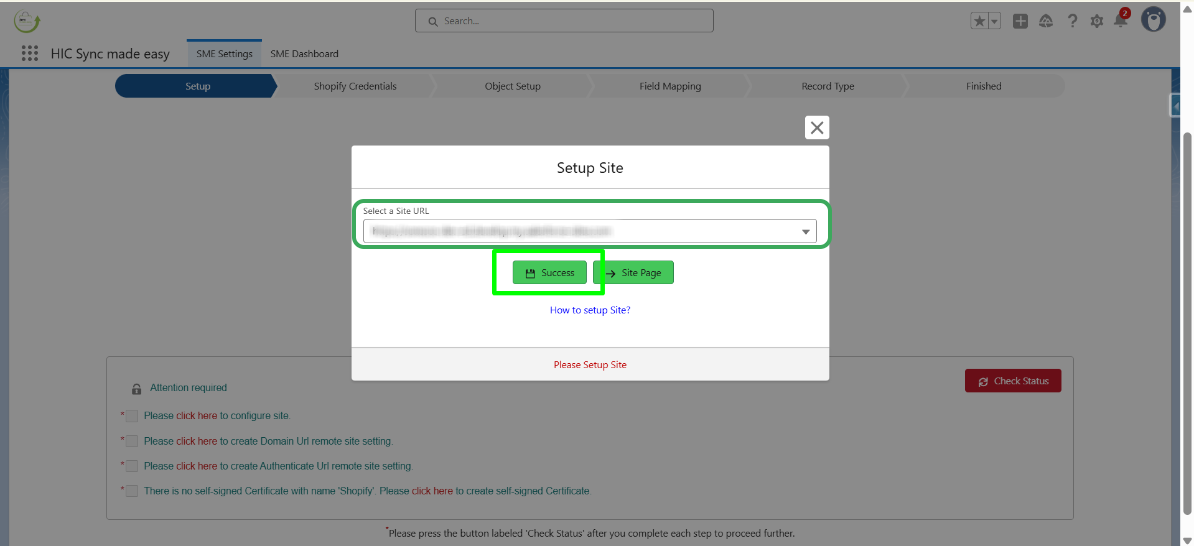
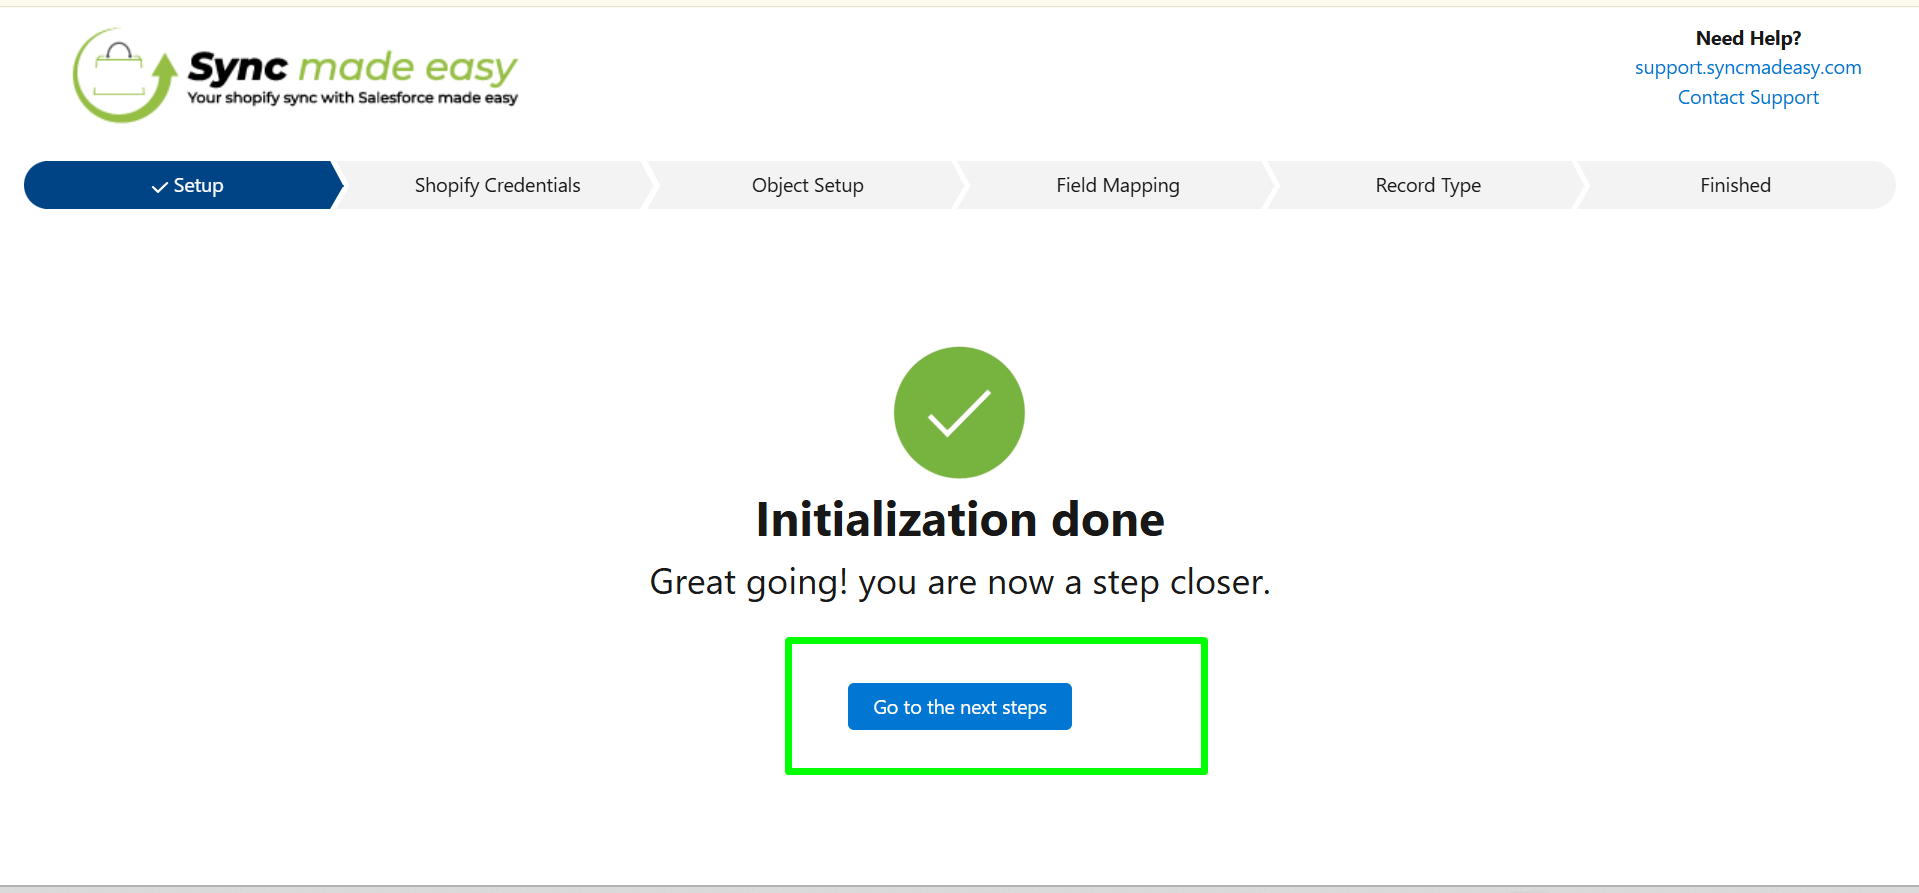
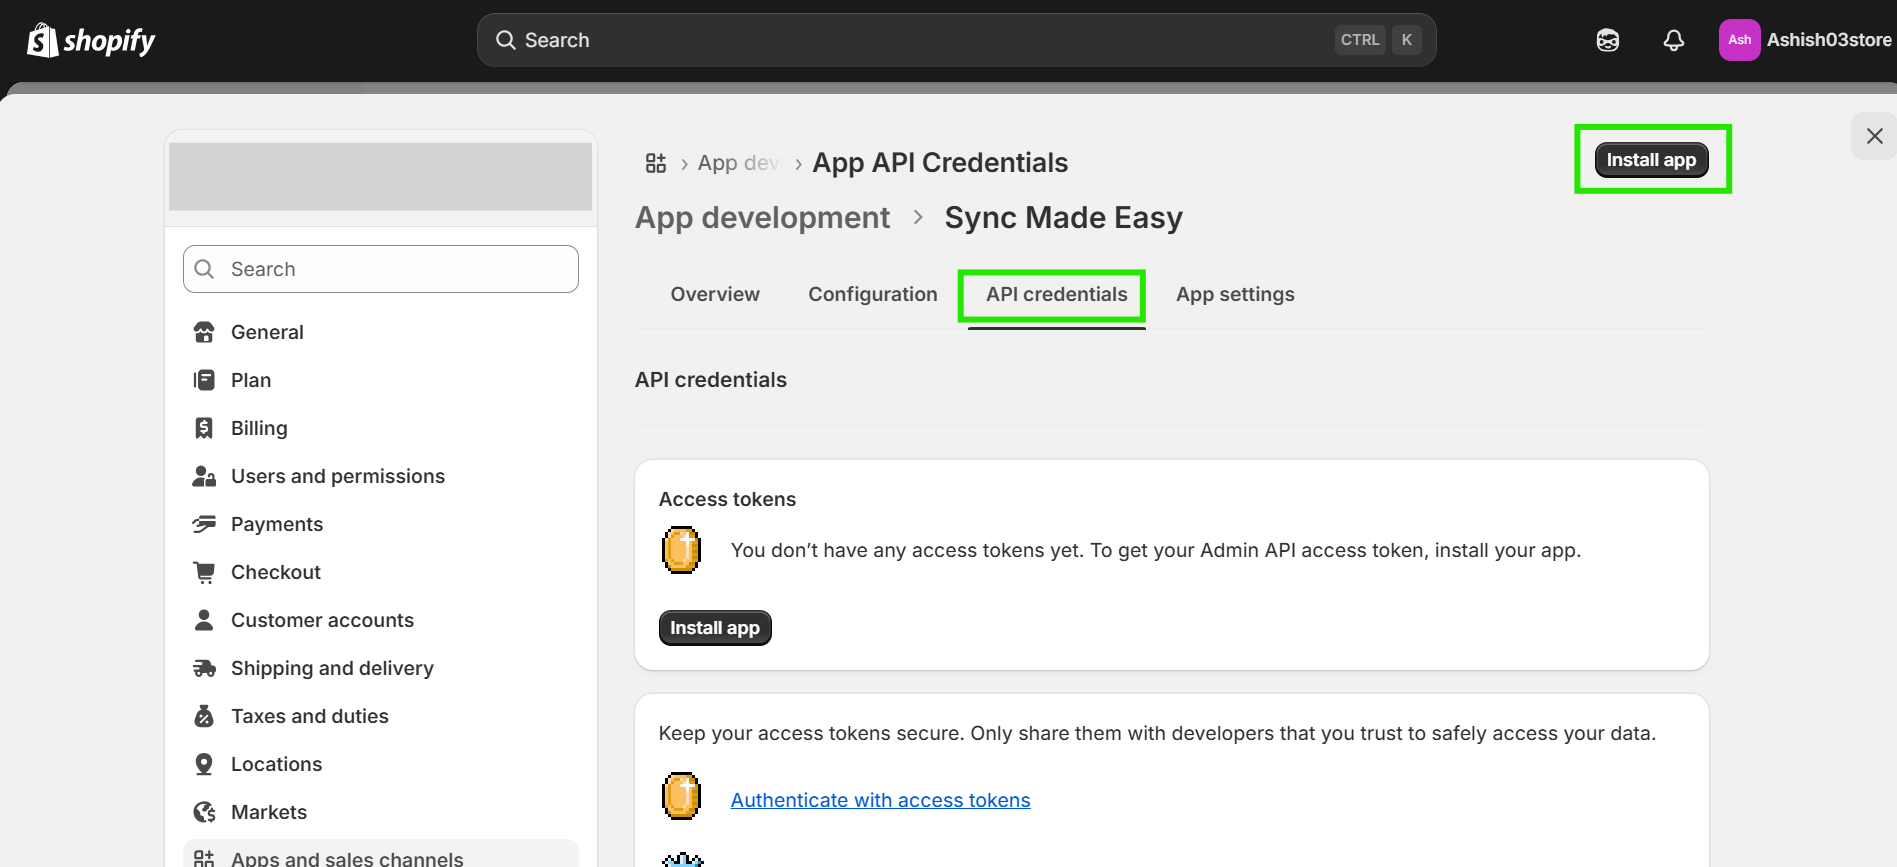
Start your shopify integration journey today.